10 Ways in Launching File Explorer on Windows 10’s Final Build
Almost all of us have surely been able to use some previous Windows operating system editions before finally settling for Windows 10. The FREE Windows 10 Upgrade phenomenon has really been effective in encouraging everyone to finally move to this latest Windows operating system edition but aside from that, others had heavier reasons for moving to Windows 10 and one of them is the return of the Start Menu after it was taken away from both Windows 8 and Windows 8.1.
If you came from these Windows OS editions then you should be able to remember how hard it was to access File Explorer in them which led some to switch back to Windows 7 even it it meant facing the end of mainstream support for the OS version. The anticipated return of the Start Menu in Windows 8.1 has also turned out be a hoax and the operating system was still confusing which led Microsoft with no choice but to abandon both the Windows 8 and Windows 8.1 editions and develop a new Windows OS version.
Of course, the offer would not be an effective bait to the millions of users who decided to return to Windows 7 if it would be for sale so the software giant decided to offer Windows 10 FREE for a year after its initial release. In this tutorial, we will be showing you how Microsoft has addressed the problem of the File Explorer being hard to access in Windows 8 and Windows 8.1 so be sure to get your Windows 10 machine ready and follow each of the steps that we will be demonstrating below.
The Old Way In Accessing File Explorer
Launching File Explorer back in Windows 8 and Windows 8.1 was a big challenge especially if you were a fresh user coming from previous Windows editions such as Vista or Windows 7. For instance, because of the absence of the Start Menu, the only way for you to launch File Explorer is by clicking on its icon that is pinned on the Taskbar but the problem is when this Taskbar icon gets unpinned. Well, the usual way for average users was to open the Start Screen, click on the “All apps” button and on the All apps screen, browse towards the right in order to find the “File Explorer” shortcut right under the “Windows System” category.
While there are other advanced methods in accessing File Explorer in these operating system editions, these are the least that ordinary users actually know about and use more often but now that we have Windows 10, let’s see what Microsoft did in terms of providing access to the operating system’s file management tool which is still known as “File Explorer”.
1. Launching File Explorer the Normal Way in Windows 10
So let’s go to the very first method that you can use in launching File Explorer and let’s assume that you have just opened your newly upgraded Windows 10 machine for the first time. Just like all of the other Windows editions that were released in the past which provides a quick launch icon for Windows/File Explorer already pinned on the Taskbar, Windows 10 also does follow this tradition and so you should be able to see File Explorer as one of the pinned items on the Taskbar together with some other newly introduced features such as the “Search box” and the “Task View” icons as shown on the screenshot below.

2. Launch File Explorer from the New and Improved Start Menu!
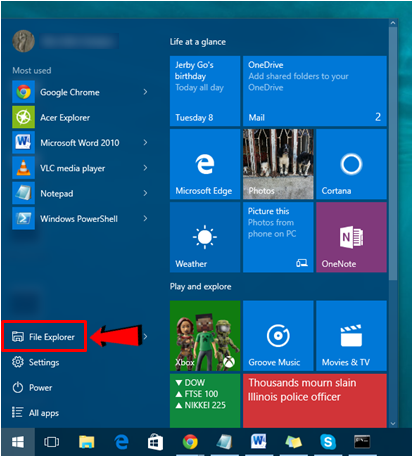
Now, in case the File Explorer icon is already unpinned from the Taskbar, you don’t need to be doing things the hard way as was the case in Windows 8 and Windows 8.1 because the Start Menu is finally back in this latest operating system edition from Microsoft. To summon the Start Menu, just do the usual click on the Start Button or press the Windows key on your computer’s keyboard and the Start Menu should open instantly. From here, you just need to look for the “File Explorer” link that is located on its bottom-left portion as highlighted on the screenshot below then click on it and the File Explorer Window should open in an instant!
3. Open File Explorer from the All Apps List
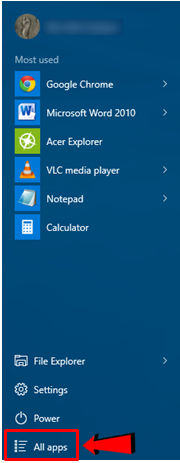
Another way in launching File Explorer in Windows 10 which is not found in Windows 8 and Windows 8.1 is by clicking on its shortcut from the new “All apps” list that is found in the Start Menu. To access this list, you will simply need to open the Start Menu first by clicking on the Start Button or pressing the Windows key and once it opens, you will need to click on the “All apps” link that is found on its bottom-left portion as shown on the screenshot below.
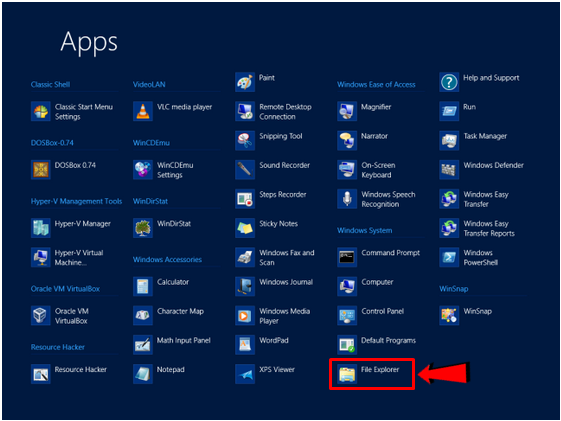
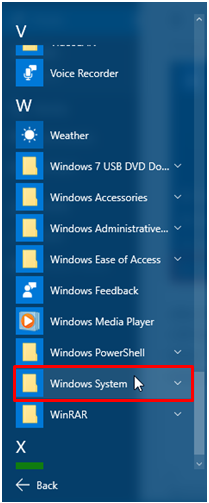
After the link is clicked, the list that shows all the apps and Desktop programs that are installed in your computer will then be displayed and are arranged in alphabetical order. On this list, just scroll down toward the items in the letter “W” and once you them, just look for the folder that is labeled “Windows System” as highlighted on the screenshot below.
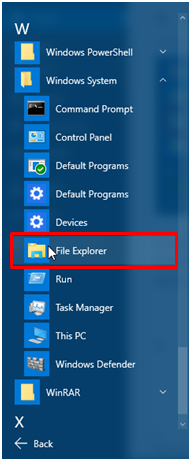
Once you find this folder, you will need to expand it simply by clicking on the folder itself and all of its contents will then be displayed below it. From here, just look for the item that us labeled “File Explorer” which you will need to click in order to launch the File Explorer tool in your Windows 10 machine!
4. Launch File Explorer Using Windows PowerShell
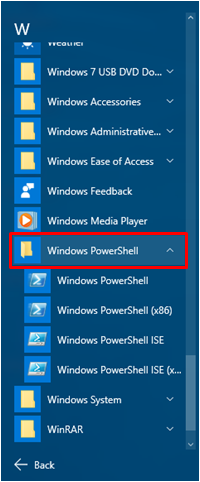
One of the most recent rumors circulating about the latest Windows editions including Windows 8, Windows 8.1 and Windows 10 is the near phasing out of the “Command Prompt” tool in order to be replaced by “PowerShell”. However, if you are using Windows 10 now, you should still be able to access Command Prompt which proves that it was really just a false rumor. Both the Command Prompt and the PowerShell can be used to launch the File Explorer tool but let us first use PowerShell. To open this built-in application in your Windows 10 computer, you will simply need to click on the “All apps” link in the Start Menu. Once the list of all you installed apps and Desktop programs displays, just scroll down towards the items that start with “W” and once you find it, simply click on the folder that us labeled “Windows PowerShell” as shown below.
After, clicking on the folder, its contents will then be displayed just below it. From these contents, just click on the first one which is labeled “Windows PowerShell” and after you do so, the PowerShell Window will automatically launch. The Window looks similar to Command Prompt but the difference is its background is blue as you can see on the screenshot below.
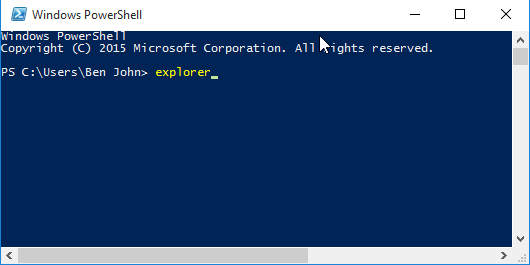
On this Window, you will simply need to type in “explorer” then press the “Enter” key on your computer’s keyboard and the File Explorer Window should be launched right away.
5. Open File Explorer Using Command Prompt
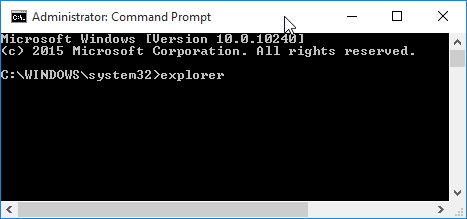
As we have mentioned in the previous method, Command Prompt can also be used to launch the File Explorer tool and what’s really nice about it is that it also uses the same command in order to launch the tool. To start, you will first need to open Command Prompt on your Windows 10 computer and you can quickly do so by first pressing the Windows + X keys in order to launch the WinX menu which is also known as the “Admin menu”. This menu will pop-out of the bottom-left portion of the screen after you press the “Windows + X” keyboard shortcut combination as you can see on the screenshot below.

On this WinX menu, you can click on either the “Command Prompt” or the “Command Prompt (Admin)” links and once the Command Prompt application Window opens, all you need to do is type-in “explorer” to it as you did earlier in PowerShell and then press “Enter” on your computer’s keyboard. After doing so, the File Explorer Window should launch right away.
6. Use the Run Tool
Windows has loads of built-in tools that are very useful to everyone provided they know how it works. For instance, there’s a small application called the “Run” box which can be a handy tool for launching almost anything in your Windows 10 computer and it has been built within Windows in as early as Windows XP. The Run box can be used to launch Device Manager, Task Manager, Command Prompt, PowerShell and yes! You guessed it right! It can also be used to launch File Explorer and many other system tools and locations in your computer. To open the Run box, you will simply need to press on the “Windows + R” keyboard shortcut combination and after doing so, the small Run box tool will pop-out of the bottom-left portion of the screen.
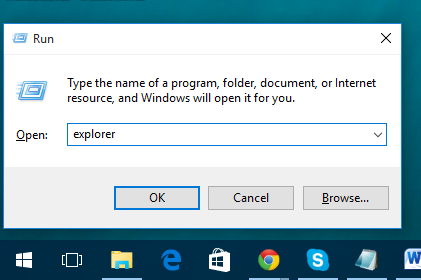
Now, in this small Run box Window, you will simply need to type-in “explorer” into the input box that is provided then hit the “OK” button and after doing so, the File Explorer Window should launch on your computer screen.
7. Use Task Manager
Another method that is also quite an easy one is done by using the “Task Manager” tool. To open Task Manager in your Windows 10 machine, you will again need to click on the “All apps” link that is found on the bottom-left portion of the Start Menu and once the list of all programs and apps that are installed on your computer opens, just scroll again towards the “W” apps group and from here, simply click on the folder that is labeled “Windows System” so you can view its contents that will expand just below it as you can see on the screenshot below.
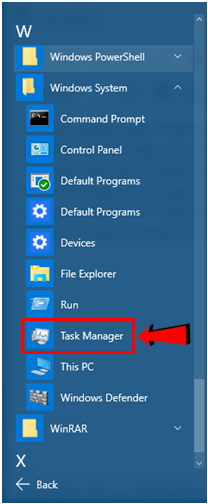
From the contents of the “Windows System” folder that expanded below it, just look for the item that is labeled “Task Manager” then click on it and the Task Manager Window should instantly open.
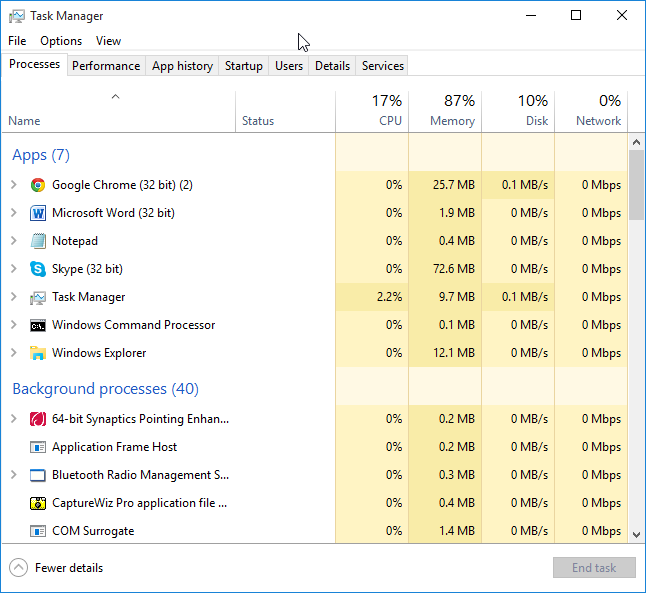
Another way in launching the Task Manager tool in your Windows 10 computer is by using a keyboard shortcut combination. To do this, just press the “CRTL + Shift + Esc” buttons simultaneously and the Task Manager Window should open on your screen right away. Now, on the Task Manager tool, you will need to click on the “File” tab that is located on its top-left portion the from the options that would appear, just click on the one that says “Run new task” as shown below.
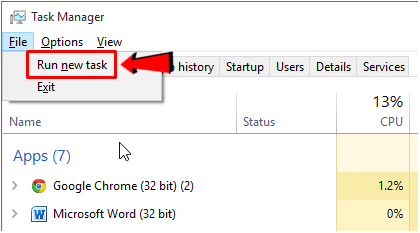
After clicking on the “Run new task” option, a small Window which resembles the Run box will now appear but it is labeled as “Create new task” and the same as the Run box, it also has an input box where you will need to type-in “explorer” and after doing so, you will need to hit the “OK” button on its bottom portion in order to finally launch the File Explorer tool.

8. Use Cortana
One of the brand new features in Windows 10 is its built-in virtual assistant which is called Cortana. This tool literally speaks to you and gives some suggestions about many things if you configure it to do so and it can even remember the things that you often do with your computer but one of the simplest task that it is capable of accomplishing is looking for items in your computer. To use Cortana in launching File Explorer, all you need to do is type in “file explorer” into the Search box that is found at the bottom-left portion of your computer screen just beside the Start Button then simply wait for the search results to be displayed as you can see below.
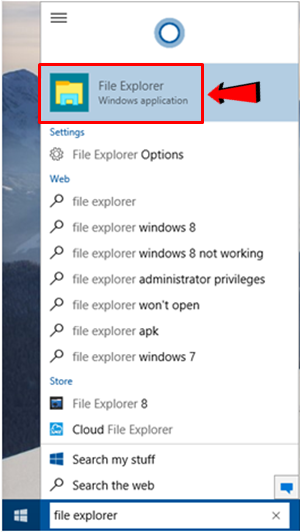
From the Search results that would appear, just look for the File Explorer shortcut which should be on top of the list as highlighted on the screenshot above and after doing so, the File Explorer Window should be launched instantly!
9. Pin File Explorer Back to the Taskbar
File Explorer has a shortcut icon pinned on the Taskbar by default but if this gets removed, you can just quickly pin it back to the same location so you can have a single-click access to it whenever its needed. To put a File Explorer icon back to the Taskbar portion of your Windows 10 machine, all you need to do is open the Start Menu and once you’re on it, just right-click on the “File Explorer” link that is found on its bottom-left portion.
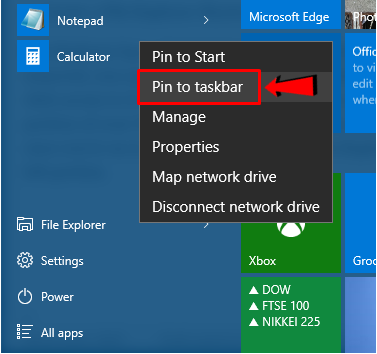
After right-clicking on the link, you will then see a menu that contains options available for the File Explorer link. From this menu, simply click on the one that says “Pin to taskbar” as highlighted on the screenshot above and after doing so, the File Explorer shortcut icon should now be pinned back to the Taskbar of your Windows 10 computer.

10. Create a File Explorer Shortcut
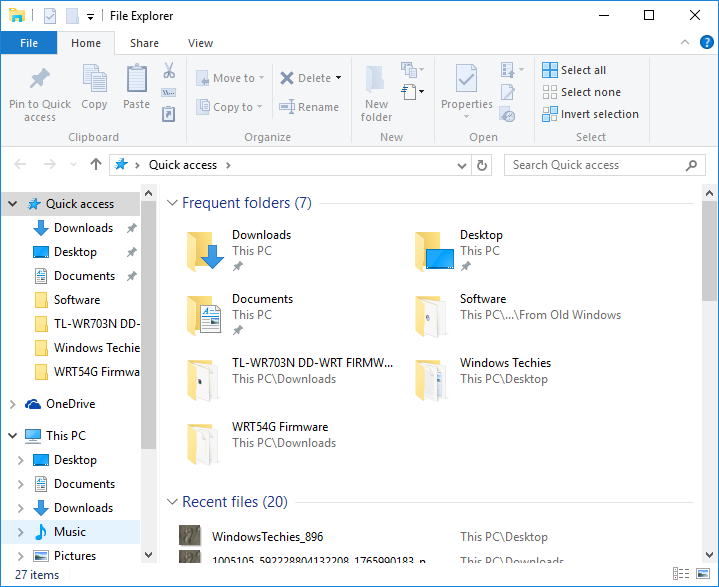
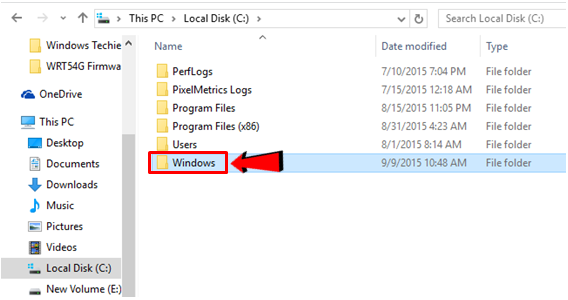
Lastly, another available way in accessing File Explorer in an easier manner is done by first creating a shortcut of it on the Desktop screen. To do this, you will first need to launch File Explorer from the Start Menu then once it opens, simply click on the “Local Disk (C:)” link that is located on the navigation pane at the left.
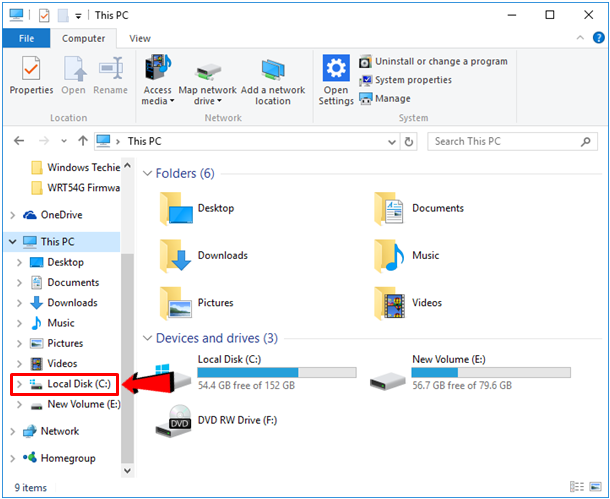
After clicking on the link, its contents will then be displayed on the main screen of the File Explorer Window. From here, you will need to click on the folder that is labeled “Windows” as highlighted on the screenshot below.
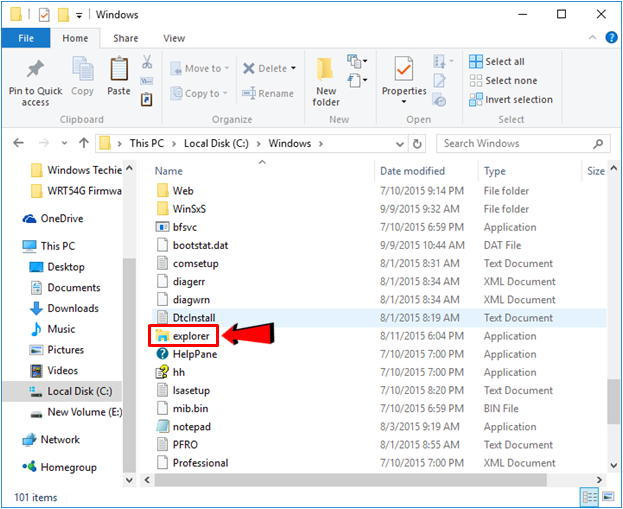
Again, after the folder is clicked, its contents will then be displayed on the main screen of the File Explorer Window and from here, all you need to do is scroll towards the bottom until you find an item that is labeled “explorer” with a small icon that resembles that of the File Explorer tool as shown below.
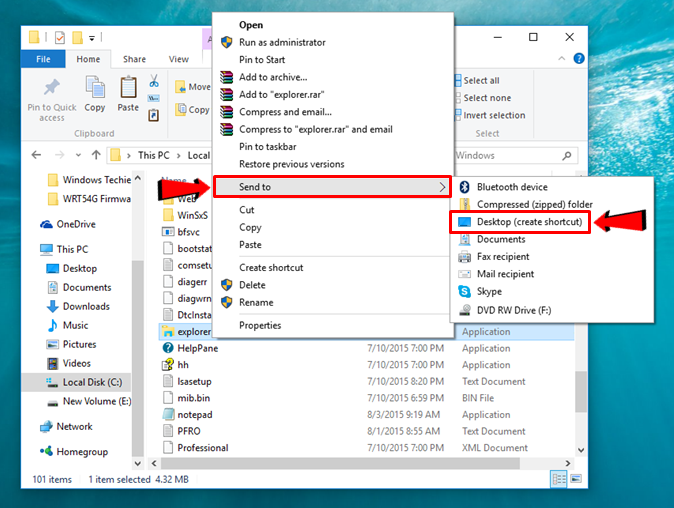
Once you find the item that is labeled “explorer”, all you need to do is right-click on it then on the right-click menu that would appear, just click on the option that says “Send to” and another set of options will appear in a separate box where you will need to click on the item that says “Desktop (create shortcut)” in order to finally create a shortcut for the File Explorer tool in your computer’s Desktop screen.
Windows 10: The Best Windows Yet!
As you can see, the File Explorer tool in Windows 10 now has some very easy to access links all around the operating system and if you prefer to use some advanced methods in launching it, you can freely do so by following the steps that we have shown above. This most recent innovation in Windows 10 is only one of the improvements that makes it the best Windows edition yet and in our next tutorials, we will be exploring more about this latest Windows OS so be sure to stay tuned-in with us here on WindowsTechies.com to find out more!