6 Tips for Working with the Lock Screen
After turning on a Windows 8.1 machine, the very first thing that you will meet is the Lock Screen. This is the default setting that every brand new Windows 8.1 machine has to follow after the boot up process. The Lock Screen serves as the very first obstacle that any unauthorized user needs to get through. It is one of the security features added in the new Windows 8.1 system to make it even stronger and a lot better compared to its predecessors.
1. Getting Through the Lock Screen
Whether you are using a tablet or a laptop computer that runs in Windows 8.1, there’s always a way that you can use in order to get through the Lock Screen so you can finally access the log on screen which will ask you to enter your account password if in case you assigned one for your account on the device. Back in the days of some previous Windows versions, you can only see the “Log on” screen after your computer boots up or whenever you lock it but in the new Windows 8.1 system, the Lock Screen displays right away making the screen look more attractive.

There are many ways in getting through the Lock Screen and all of them are easily done with the use of simple actions and gestures using the mouse or your finger, you can even use your computer’s keyboard to get through this beautifully designed screen. To get through the Start Screen using a mouse, all you need to do is do a click on the Lock Screen and it will disappear or swipe upwards to give way for you to access the log on screen. If you are using a touchscreen device, you can simply swipe to the left, right, up or down to get the Lock Screen image get out of your way. If you are using a laptop, you can also press on any key and the Lock Screen will just slide upwards.
2. Changing the Lock Screen Image
There are plenty of Lock Screen designs that are available in the PC settings section of every Windows 8.1 machine. To access these images which you can use as Lock Screen background, all that you need to do is open the Start Screen then hit the Windows + I keys to access the Settings screen. Once it appears, simply click on the “Change PC settings” link at the bottom.

When the PC settings section opens, you will see the Lock screen menu opened and at the right portion of the screen, all available Lock Screen image will be displayed. To change the current image, simply click on the one that you want to use in replacement of the current one and it will automatically be assigned as the Lock Screen image.

3. Using Your Photo as a Lock Screen Image
The available Lock Screen images are not the only ones which you can use. You can also use your personal photos and images that you own as a lock screen image. To do this, all you need to do is access the Lock screen menu of the PC settings section as you did above and instead of clicking on any of the available images, you will need to click on the “Browse” button at the bottom of the built in lock screen images then navigate to the location of the photo/s that you want to use as lock screen background.

4. Play a Slide Show as Lock Screen Image
If you feel bored of using only one Lock Screen image all the time then you can choose to use multiple images on it and display them one after another in a slide show. To do this, simply click or tap on the switch that is under the “Play a slide show on the lock screen” option and after you do so, you’ll see some available locations and folders under it where you can get the pictures from. If you saved the photos that you want to use in a different location or folder, all that you need to do is click on the “Add a folder” option.
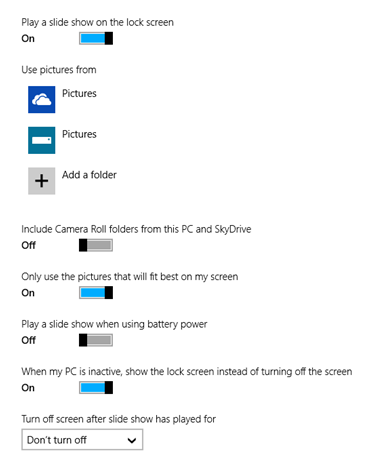
More options are available below the locations and folders under the “Use pictures from” section. These options can either be turned on or off depending on your choice. Windows 8.1 turns on the “Only use the pictures that will fit best on my screen” and “When my PC is inactive, show the lock screen instead of turning off the screen” options by default while the remaining two options are turned off as you can see on the screenshot below. You will also find a drop-down options menu at the bottom which is labeled “Turn off screen after slide show has played for”. If you click on it, the following options will open on a small screen.

5. Choose which Apps Display Information on the Lock Screen
The next options that are available on this settings screen will help you decide and assign which apps display information on the Lock Screen. There are two groups here, first are the apps that show quick status and the second which you can only assign one in it is the app that will show a detailed information on the Lock screen. To add an app that will show quick status and information, simply click or tap on the box that has a “+” icon inside. There are up to 7 apps which you can add to show quick status on the Lock Screen. To replace one that is already existing, simply click on the box where the app that you want to replace is located and select a new one from the available apps that appears on a small screen.

There is also another section that will allow you to assign an app that will show alarms on the Lock Screen. To replace the existing one, simply click on the box then choose an app that will replace it from the screen that appears. If there are no other apps that are installed on your computer which can show alarm then there will be no other options on the small screen aside from the “Alarms” app that is already assigned by default.
6. Open the Camera When You Swipe Down
The last option available under the Lock Screen menu is a switch that will turn on the feature which allows the “Camera” app to open when you swipe the Lock Screen down. Simply click or tap on the switch to turn it on or off.

That’s all there is to it. Now that you know some Lock Screen secrets, you can start doing some tweaks on it from your Windows 8.1 machine and make it work that way you want it to. Do you love reading our tutorials? You can get the latest ones straight to your inbox by joining our email list. We at WindowsTechies are dedicated to make Windows become easier to all types of users. Stay tuned with us and learn even more tips and tricks tackling almost about anything regarding the Windows operating system.