7 Tips for Customizing the Desktop
Most of the tasks that we do on our Windows computer happens on the desktop screen. It serves as a place where desktop programs paste their shortcuts and you can also place some of your files on it for easier and faster access.
The Desktop screen has been present ever since Windows came into existence and now in Windows 8.1, it has become a lot easier to tweak and change and the right-click menu is now filled with more options to make you become more productive in your day to day tasks. The default desktop background image after you install Windows 8.1 on your computer changes after a certain period of time and all the other default settings may already do well but there would surely come a time when you already want to make tweaks with it to change the look and feel of your Windows machine. If you want to learn more of these then you need to learn some tips by reading this tutorial towards the end.
1. Tweaking the Desktop Background
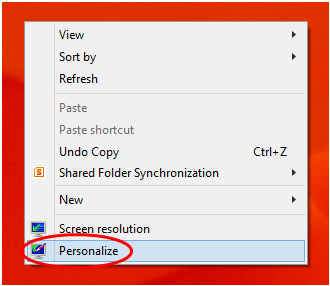
As I have mentioned earlier, the default desktop background in Windows 8.1 (if you only installed it on an old computer which matches the system requirement) is the one included on the “Lines and Color” theme. This desktop background changes on a fixed interval of time. A changing desktop background also takes some memory juice and may cause the overall system to slow down. To set a fixed desktop background on your Windows 8.1 computer, all you need to do is right-click any empty space on the desktop screen then on the right-click menu that appears, click on the options that says “Personalize”.
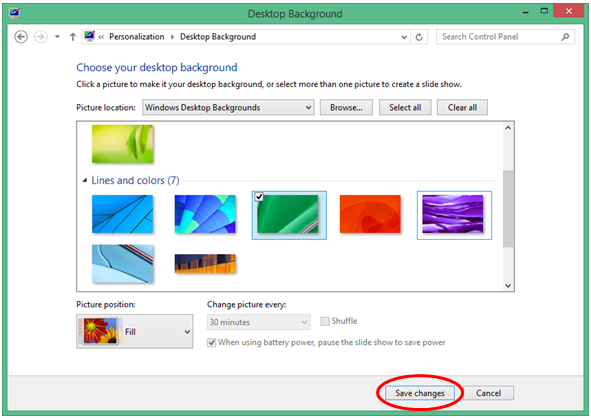
After clicking on it, a Window will open which is labeled “Personalization”. This is where most tweaks to your desktop screen is done. Once this Window opens, you will need to click on the link that says “Desktop Background” which is found on the bottom-right portion of the screen.

On the Window that follows, you can now select only one image to set as your desktop background. just remove the check marks on the other images that you don’t want to use as desktop background and retain only the check mark on the one that you want to use. After doing this, simply click on the “Save changes” button found at the bottom.
You can also set your own picture as the desktop background. Simply save the picture to your computer and browse to its location. Once you find it, just right-click on it and hit the “Set as desktop background” option from the right-click menu.

2. Setting a Slideshow of Pictures as Desktop Background
You might have a collection of pictures you took yourself during your travels which you’d like to set as desktop background to make your machine look more personalized. If you want to do this, you’ll first need to put the pictures into one folder and save it in a location which you can easily find. Once your pictures are saved altogether, you’ll need to access the “Personalization” Window again and click on the “Desktop Background” link like you did earlier. Once you’re on the “Desktop Background” Window, you’ll need to click on the “Browse…” button.

After doing so, a small Window will appear labeled “Browse for Folder”. From here, all you need to do is locate the file then select it and hit the “OK” button. The photos that are saved in the folder you’ve selected will then appear inside the desktop background box and all of them bear a check mark which means they are selected and will play as a slideshow desktop background. To make the changes final, simply click the “Save changes” button at the bottom of the “Desktop Background” Window.

3. Tweaking the Slideshow Image Change Time Interval
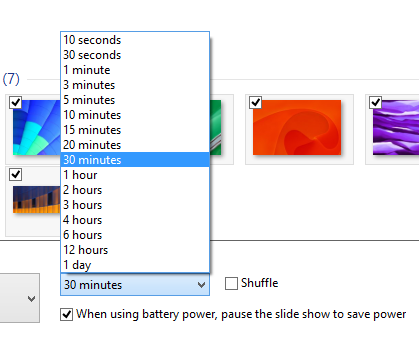
The image that are set to play on a slideshow changes every 30 minutes by default but you can change it to as long as 1 day or as short as 10 seconds. To make tweaks on it, simply access the “Desktop Background” Window as you did in the two previous steps and click on the box below the label that says “Change picture every” found at the bottom.

After doing so, a drop-down list of time interval options will appear and you can simply click on the one that you want to set for the desktop background images that you have selected.
You can also download a new theme from the Microsoft website or other third party sources.
4. Tweaking the Color and Appearance
The color and appearance of the Window borders on your Windows 8.1 machine can also be tweaked according to your preference. To do this, simply access the “Personalization” Window and click on the “Color” link located at the right of the “Desktop Background” link which we worked on earlier.

The default “Color and Appearance” for Windows 8.1 is set to “Automatic” but you can choose a specific color by clicking your choice then hit the “Save changes” button at the bottom to save all the changes you’ve done.
5. Setting a Desktop Screensaver
Located at the right-most portion of the “Personalization” Window in line with the “Desktop Background” and the “Color” links is another option labeled “Screensaver”. Clicking on it will open a Window that shows all available screensaver that are built-in with the Windows 8.1 operating system. These screensavers are listed on a drop-down menu and all you need to do is select the one that you want to set, check it out on the preview section and if it fits your taste, simply click on the “Apply” and “OK” buttons to save all changes.
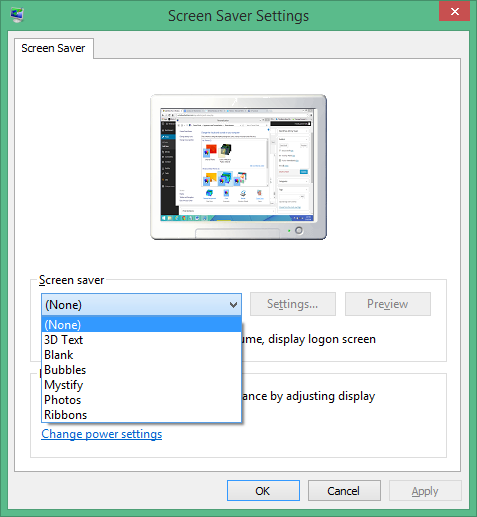
From this Window, you can also tweak the time it would take for your computer to stay idle before the screensaver appears and there is also a link that will lead you to the “Power settings” section. For other screensavers like the “Bubble” option. You can click on the “Settings” button and set the number of bubbles that appears on the screen.
6. Hide the Taskbar from Your Desktop Screen
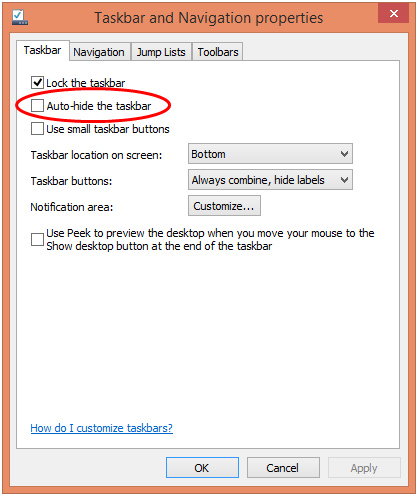
Do you feel disappointed with your computer’s small screen? If you are working on a small laptop, there would be times that some of the images which you are viewing doesn’t fit on the screen and you’ll still need to scroll to the left or right and up or down to view other parts of an image. If this is the case then you can set the taskbar to auto-hide itself on your computer screen to free some space of the screen. To do this, simply right-click a vacant space on the taskbar and in the right-click menu that appears, simply hit the option that says “Properties”. After doing so, the “Taskbar and Navigation properties” Window will appear and under the “Taskbar” tab, you should be able to see a check box that says “Auto-hide the taskbar”. Just put a check mark on this tiny box and hit the “Apply” then “OK” buttons at the bottom of the screen to save the changes.
7. Move the Taskbar to the Different Edges of the Desktop Screen
Aside from setting the taskbar to auto-hide mode, you can also move it to the other edges (top, right or left) of the screen. To do this, simply right-click a vacant space of the taskbar as you did in the previous tip and uncheck the “Lock the taskbar”. After doing so, you can now point the mouse on the taskbar, click and hold it and drag it to the edge where you want to put it. Once you’re done moving the taskbar, simply right-click on it again then put a check mark on the “Lock the taskbar” option so that the taskbar will permanently be locked on the edge where you now placed it. On the screenshot below, you can now notice that the taskbar is already on top of the Desktop screen.
