A Detailed Guide for Using the Home Tab in the New File Explorer Window (Part 1)
The release of Windows 8 and its supposed improved version called Windows 8.1 has really been anticipated by millions of loyal users from around the world but many have expressed disappointment after noticing some changes in it that were not that favorable especially to those who have already been used to the older Windows editions.
However, looking deeper into these Windows versions would actually reveal the opposite and that’s what we are going to focus on in the tutorials that we’re going to publish in the next few days and in this one, we’ll go into the first tab that is found on the ribbon-based options in the new and improved as well as renamed “File Explorer” (previously called Windows Explorer) file management tool that is included in both Windows 8 and Windows 8.1.
What exactly is under the Home tab of the new File Explorer tool and how can you maximize its use to improve your productivity in varied ways especially when you’re working with the files and folders that are stored in your Windows machine. In this tutorial, we will be learning more about the Home tab and see all of the features that are available in it so you can start making sense out of this less noticed feature in both Windows 8 and Windows 8.1.
Accessing the Home Tab in the New File Explorer Window
Getting to the Home tab is quite simple because it readily appears on the top-left portion of the File Explorer Window but in case the File Explorer quick launch icon has already been removed from the Taskbar, accessing it would be a bit of a challenge especially if you are using these Windows versions for the first time.
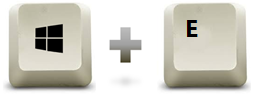
Thankfully, Microsoft has provided quick ways in launching the File Explorer Window so let’s first learn how it is done. The first method is the simplest one and you can do it using the keyboard shortcut “Windows + E”. Try pressing these keys simultaneously on your keyboard and you’ll see that the File Explorer Window will launch right away.
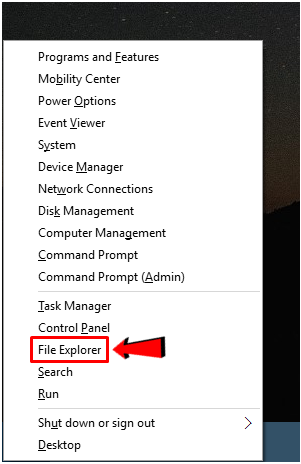
The other method is also an easy one and it’s done by first pressing on the “Windows + X” keys in order to open the “WinX menu” or the “Admin menu” as what it is commonly called.

After pressing on this keyboard shortcut, the WinX menu will pop-out of the bottom-left portion of the screen and from the links that are found in it, simply look for the one that says “File Explorer” and once you find it, you will need to click on it in order to launch the File Explorer Window.
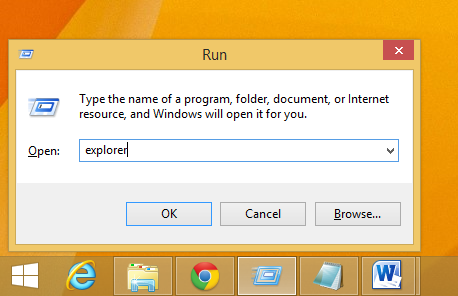
You can also use a third method which involves pressing the “Windows + R” keys and once the “Run” tool pops out, simply enter the word “explorer” into the box that is in it then click on the “OK” button in order to launch the File Explorer Window.
The Home Tab
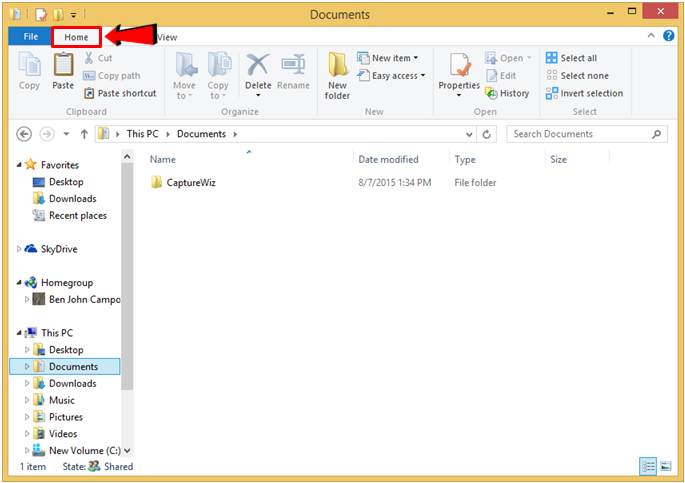
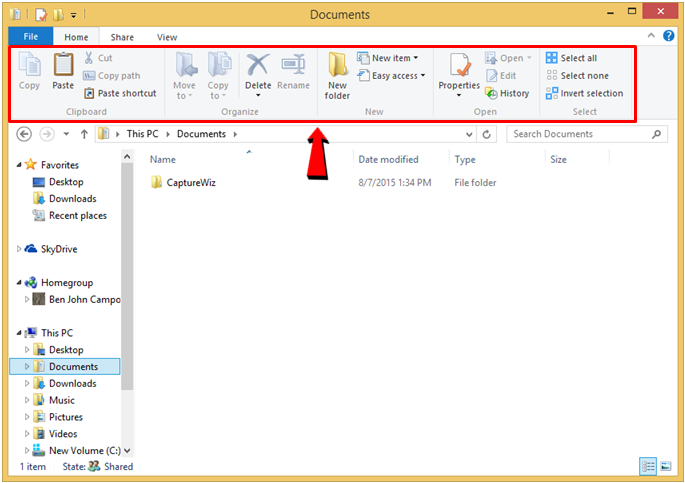
Now that you already know how to open the File Explorer Window, you should now be able to see the “Home” tab that is located on its top-left portion but the options that are under it are hidden by default. The screenshot below highlights the “Home” tab’s location on top of the File Explorer Window.
In order to view all of the options that are available under the “Home” tab of the File Explorer Window, you will simply need to click on it and you’ll find 5 groups of options under it which are labeled “Clipboard”, “Organize”, “New”, “Open” and “Select” as shown below and we will take you through each of these option groups as we move along in this tutorial.
NOTE:
Since the ribbon-based options in File Explorer is highly contextual, the “Home” tab may not always appear on the top left portion of the Window. For instance, if you are on the “This PC” location on File Explorer, the Home tab will not appear on the tabs at the top but if you open any library such as “Documents”, “Downloads”, “Pictures” and others, the “Home” tab should be seen appearing on top.
How to Use the Options Under the Clipboard Section
Now, let’s go to the very first set of options under the “Home” tab which is labeled “Clipboard” and see what each of the options under it is really used for. The “Clipboard” section basically takes care of the addition and removal of information in your machine’s clipboard, the section where all the stuff that were copied and cut are stored. There are five options under the “Clipboard” section and their uses are described below:
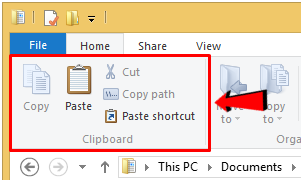
- Copy- Functions by adding a copy of any selected file or folder into your computer’s clipboard for later pasting.
- Paste- Takes the file or any other information that has been copied into the clipboard and saves or pastes it to the location that is currently selected in File Explorer.
- Cut- Removes a selected file/information from its current location in the File Explorer Window and places the file/information into the clipboard for later pasting/moving.
- Copy path- When giving directions about the location of a file or folder in your Windows machine, it would be more effective if you give the file path and the “Copy path” option under the “Clipboard” section does this copying all in a single click!
- Paste shortcut- Files, folders and any other stuff in your computer can easily be accessed using shortcuts so if you want to create a shortcut quickly while on the File Explorer Window then clicking on the “Paste shortcut” option under the “Clipboard” options section should do the magic!
Keyboard Shortcuts for the Clipboard Options
Most of the options that are located under the “Clipboard” section of the “Home” tab actually has a keyboard shortcut for executing them so you won’t need to be clicking different options every time you want to do certain tasks such as Copy or Paste.
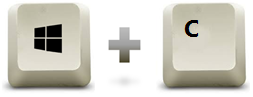
Keyboard Shortcut for the Copy Option
After describing what the “Copy” option does, it is time to learn what keyboard shortcut combination you can use to do the same action without the need of clicking on anything. To “Copy” a file, folder or any other data on the File Explorer Window using a keyboard shortcut combination, all you need to do is select the file or folder that you want to copy then simply press the “CTRL + C” and it will automatically be copied to the clipboard.
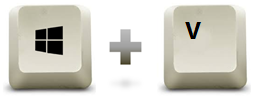
Keyboard Shortcut for the Paste Option
Next, let’s learn the keyboard shortcut for the “Paste” option. After copying a file, folder or any other data from the File Explorer Window, you will simply need to browse towards the location where you want to place it and after doing so, simply press the “CTRL + V” keys to paste the copied item into your selected location.
Lastly, there’s still one other option under the “Clipboard” section of the “Home” tab that has a keyboard shortcut equivalent. It is the “Cut” option and in order to use it, simply select the file, folder or any other data that you want to cut and after doing so, simply press the “CTRL + X” keys to cut it from its original location then browse towards the new location that you want to move it into and once you’re in it, just press “CTRL + V” to “Paste” it to the new location.
More Home Tab Options in our Next Tutorial
As you can see, just the “Clipboard” section of the “Home” tab alone has a lot of options under it and since we’re running out of space for this tutorial, we’ll continue on with the rest of options under the “Home” tab in Part 2 of this tutorial.