How to Access and Work with the AutoPlay Options in Windows 10
One of the oldest features that you would find in the Windows operating system is called AutoPlay. It has been in existence starting in Windows 98, Windows XP then down to Vista, Windows 7 and was carried over to Windows 8, Windows 8.1 and now in Windows 10!
However, only a small fraction of Windows users pay attention to this important feature that can even save a single Windows machine from being infected by viruses that come from portable storage devices such as USB flashdrives and external hard drives.
Yes! turning the AutoPlay feature on or off would make a big difference in terms of protecting your computer from certain forms of viruses and malware that an spread fast and corrupt your files that are stored in an external storage device. In order to know what the AutoPlay feature is all about, we are going to cover the steps in how it can be accessed and what sort of tweaks you can do with it in your Windows 10 machine.
If you’re curious about this feature then we encourage you to join us as we explore the different ways in launching it as well as discover the different uses and tweaks that you can do so be sure to get your Windows machine started up and follow the steps as we show them below.
What Exactly is AutoPlay?
Before getting into the different methods in launching the AutoPlay feature on your Windows 10 computer, it is important that we first know what the feature does and learn how you can benefit if you turn it on or off. From it’s name alone, you can already have an idea on what it is for and what it does but we’ll explain things clearly for you here.
AutoPlay is a feature that detects and examines removable storage media and devices such as USB flashdrives, external hard drives, CD/DVD and many others and according to the contents like music, video, photos, documents found in any of these devices, AutoPlay shows some appropriate applications/software for playing, displaying or launching the content/s. It is different from the AutoRun operating system feature but it is very closely related to it.
AutoPlay was created in order to facilitate the use of external peripheral devices such as memory cards, MP3 players and storage devices no matter what type it is. The good thing about AutoPlay is that it can be configured by users so it would associate certain AutoPlay events and actions to favorite applications.
These uses as explained above already looks exciting but as you will see later on, there are even more options, events and actions that are made very specific by the AutoPlay feature so just keep reading towards the end of this tutorial.
How to Access AutoPlay in Windows 10
Now, we will come to the most exciting part of this tutorial which will show the different methods that are available in launching the AutoPlay feature in your Windows 10 machine. There are varied ways in accessing certain features and tools in Windows 10 and this same fact applies to the AutoPlay feature. In order to get into this awesome tool, you can choose from the following methods that are demonstrated below:
Accessing AutoPlay Using Search
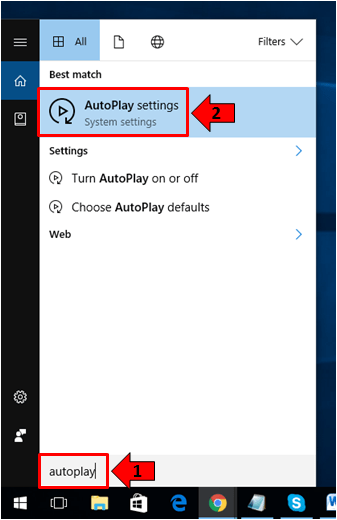
One of the easiest methods in launching the AutoPlay tool is done using the Search feature. Search has been around for probably as long as the Windows operating system’s existence but it has not been made better or maybe best until Windows 10! In order to launch the Search feature in your computer, all you need to do is press on the Windows + S keys.

After pressing on these keys, the Search feature should slide-up from the bottom-left portion of your computer screen and from here, all you need to do is type-in the word “autoplay” (excluding the quotations marks) into the search input box that is found at the bottom as shown on the screenshot below.
In Windows 10, you need to be aware of the existence of two environments. One is the Desktop environment which is the usual Windows interface that we’ve all been working on since Windows XP and a new environment which is called the Metro. If you access AutoPlay using the method shown above, you will be able to access a limited set of options for it and it will open from the universal Settings app.
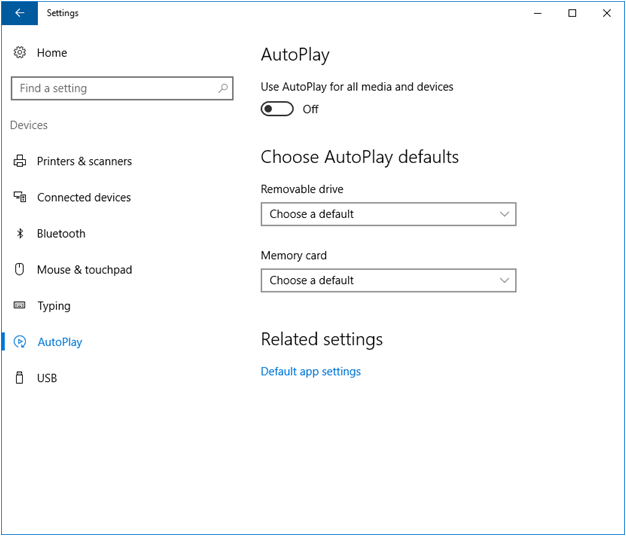
Most of the options that you will find in the AutoPlay section found in the universal Settings app are intended for users who own a touch-enabled Windows device. Since these devices don’t have CD or DVD drives, you will not find AutoPlay options from these kind of devices but instead, you will only see options for “Removable drive” and “Memory card” as shown below.
Now, if you want to see the complete list of AutoPlay options so you can tweak and customize the programs and apps that do certain events and actions for the contents that are stored in the storage devices that you connect to your Windows 10 machine, all you need to do is follow the second method that we’re going to show next!
Accessing AutoPlay from the Control Panel Window
As we have said earlier, there are two coexisting environments or interfaces in Windows 10. You might have been able to notice this back in Windows 8 but everything has been improved in Windows 10. The universal Settings app that we’ve shown in the previous step is the equivalent of the Control Panel feature in touch-enabled devices such as tablets and smartphones that run the Windows mobile OS.
If you want to stick with the traditional stuff and access the AutoPlay options from the Control Panel, you can do so by first going through a challenge which is launching the Control Panel Window itself. Unlike the older Windows operating systems, launching Control Panel in Windows 10 is not possible from the Start Menu simply because there is no shortcut for it which you would normally see in Windows XP, Vista and Windows 7.

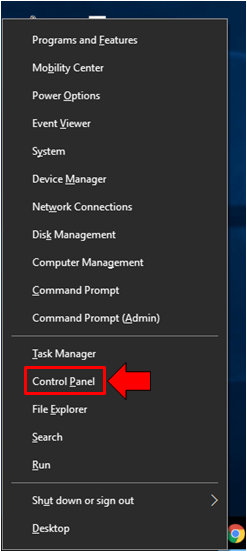
In order to open Control Panel in your computer, you will first need to launch a feature called the WinX menu which is done by pressing the Windows + X keyboard shortcut combination as shown above.
The menu will then appear at the bottom-left portion of your computer screen right after you press the keys and from here, just look for the shortcut link which says “Control Panel” as you can see being highlighted on the screenshot below.
The Control Panel Window will then launch the at the top-right portion of it, you should be able to see a search input box. In here, you will need to type the word “autoplay” (excluding the quotation marks) then wait for the search results to appear on the main contents pane as shown below. The results should show instantaneously while you are typing “autoplay” into the search input box and once you are done typing, simply click on the only item that will appear on the search result which is labeled “AutoPlay” as you can see below.
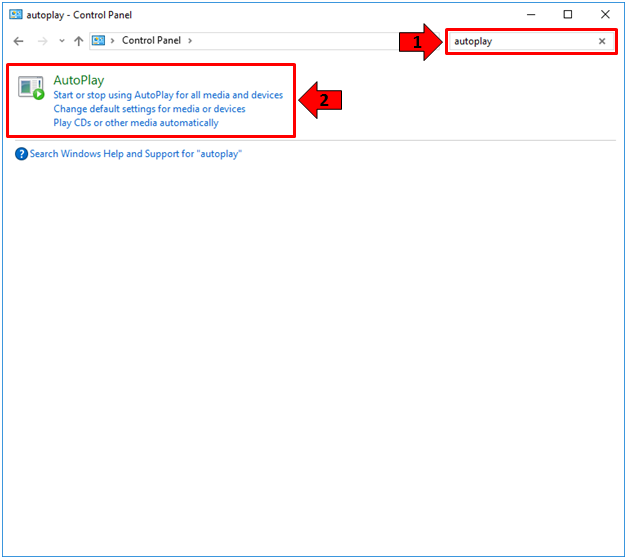
After the clicking on the “AutoPlay” shortcut link which is found on the search results as you have seen above, the AutoPlay section should then open and since we’re on it now, it is time to get to the next stage which is knowing what options and tweaks are available in it. We will be starting with the AutoPlay section that is found in the universal Settings app as we’ve shown earlier.
Working With the AutoPlay Section in the Universal Settings App
Since there are two places where the options for AutoPlay are found in your Windows 10 machine, it is important that you know which of these two offers more tweaking options and what each one of them contains. Again, the AutoPlay section that is found in the universal Settings app has been mostly intended for mobile Windows operating system users but it can also be accessed from your Windows 10 desktop or laptop as we have shown earlier.
Now, let’s take the time to launch it so we can see what options and tweaks are found under the this section. The Window that you should be able to access looks exactly like the one that is shown on the screenshot below.
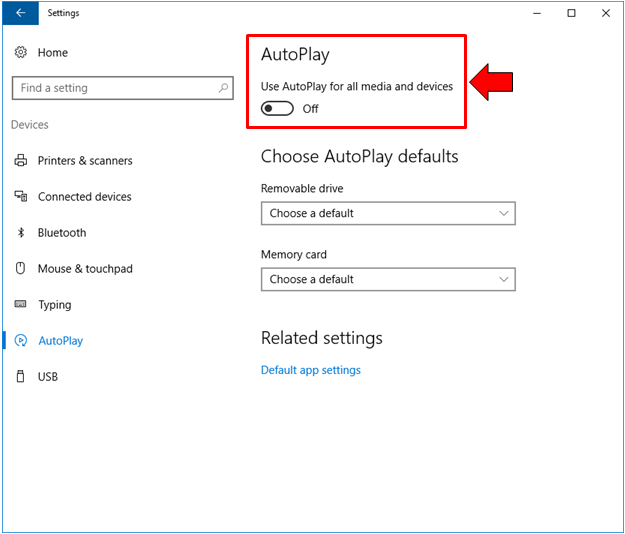
The very first option that you will find in the AutoPlay section found in the universal Settings app is a switch for turning the feature on or off as you can see being highlighted on the screenshot below. Just click on the switch that is found below the AutoPlay option in order to flip it to the On or Off position.
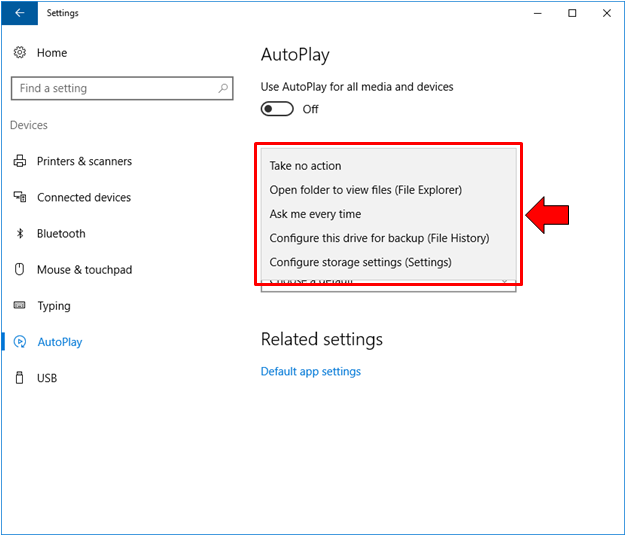
Next to this is the “Choose AutoPlay defaults” section which has two items under it which are “Removable drive” and “Memory card”. From here, all you need to do is click on drop-down box that is found under the item that you want to tweak defaults for in order to see the available options for it. On the screenshot below, you will see the different options that you can choose for “Removable drive”.
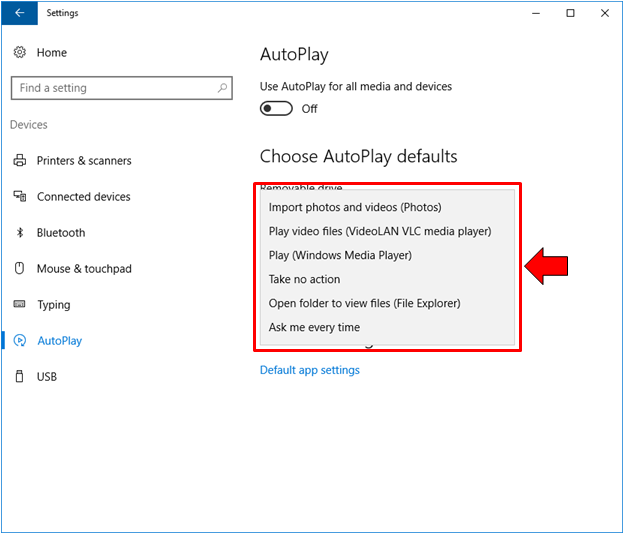
If you want to change the AutoPlay default for “Memory card”, just click on the drop-down box that is found under the “Memory card” item which is the last option under the AutoPlay section of the universal Settings app as you can see below.
Lastly, you will also find another item at the bottom-most portion which is labeled “Related settings” and it only has a link which says “Default app settings”. Clicking on this link will take you to the Default Apps section where you can make changes on the default programs and apps that your computer is using for different events such as opening a document, playing audio and video, browsing and many others.
Working With the AutoPlay Section in the Control Panel Feature
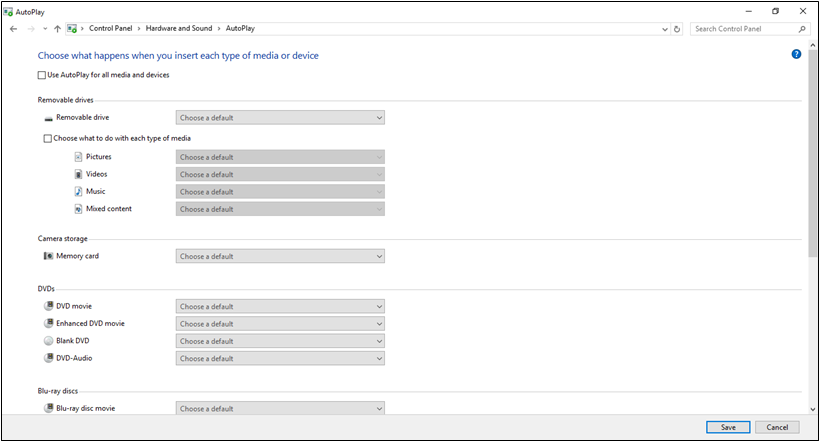
If you wish to see a comprehensive list of AutoPlay options that will be applicable to different types of storage devices then you will need to access it from the Control Panel feature in your Windows 10 machine. As you can see on the screenshot below, there are drop-down options box under each type of device that can be attached or inserted into your computer and under each of these device types, you will find the different media that they might contain.
But first of all, you will need to make sure that the AutoPlay feature is enabled in order to make each of the drop-down options box clickable. You can do this easily by clicking inside the tickbox that is found at the left of the “Use AutoPlay for all media and devices” option located at the top of the Window.
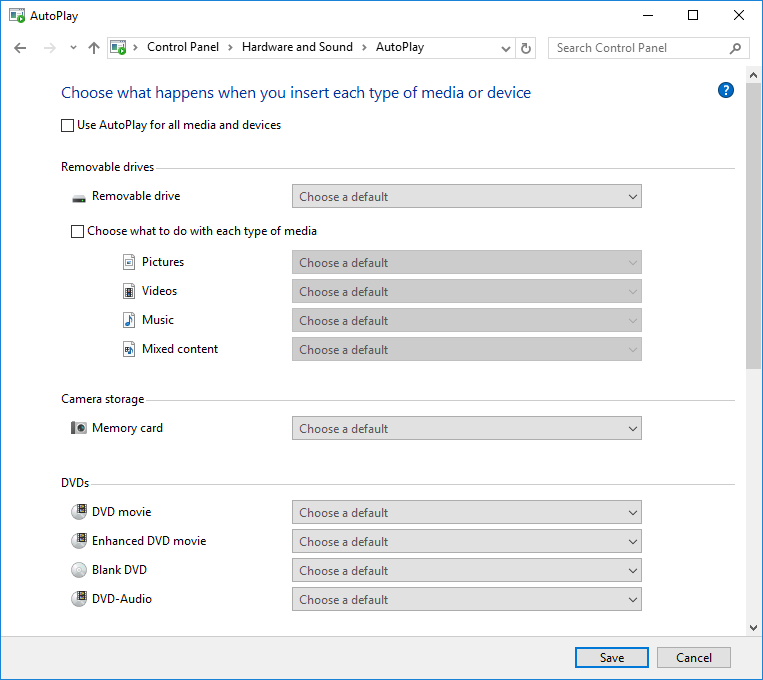
Once you are done doing tweaks with the defaults for each media type under a specific storage or peripheral device, all you need to do is click on the “Save” button that is located at the bottom-right portion of the Window in order to apply all of the changes that has been made. It’s as simple as that and the advantage of accessing AutoPlay from this section is that you get to really work with specific types of content and set the default action for each one instead of setting it as a general action that would apply to a single device as was the case in the AutoPlay section found within the universal Settings app as we’ve talked about earlier.
An Important Reminding for Your Device’s Safety
As we have mentioned earlier, the AutoPlay is closely related to the AutoRun feature of the Windows operating system and this feature is often exploited by a form of malware that spreads through removable storage devices such as USB flashdrives and even external hard drives.
In order to get rid of these potential threats that can affect and infect all the stuff that are stored in your computer and as well as those that are stored in other storage devices that aren’t infected yet, we recommend that you install antivirus software for removable devices or best is just to disable AutoPlay especially if your computer is used by different people who attach different storage devices to it.
Have you been infected by this type of virus before? How were you able to fix it without doing a device reset or clean install? Your experiences can be of help to others, if you have some then please feel free to post them on the comments section below.