How to Clean Install Windows 10 From a USB Flash Drive
When the worst happens on our Windows 10 laptops or PCs, the last resort that is available is a reformat process. Doing this is easy if you’re one of those few power users or geeky earthlings who knows the way to almost anything PC related.
But what if you’re part of the large number of average users out there? What will you do to fix your machine by yourself? That’s exactly what we’re going to find out here but before anything else, be sure to create a bootable Windows 10 USB installation media.
You’ll need a USB flash drive with at least 3GB of memory for this and once you secure one, just follow the steps that we’ve shown in this previous tutorial. Once you have the installation media ready, just follow the steps below to do a clean install of Windows 10 on your selected device.
Save Backups First
The process of doing a reformat or clean install on a troublesome computer is pretty straightforward. It doesn’t need an expert to be able to do it but before starting, be sure to save all important stuff into a separate computer as a backup.
A reformat process will delete everything that is stored in your computer’s hard drive so saving a backup of all your precious stuff is important. You can do easy backups to devices such as:
- A USB flash drive that has a large storage capacity
- An external hard drive
- Another PC using a file sharing app like Connect2
- A mobile device that has enough space in its memory card to store your backup files
Other backup options which can provide gigabytes of space are cloud services like Google Drive, OneDrive, Dropbox and others. These cloud storage services allows you to store your files online so they can be accessed anytime from any device as long as you are connected to the Internet. Once backups are saved, you can proceed to the next step which is the reformat process.
How to Clean Install Windows 10
Once you have the USB installation media ready and your backups saved, it is time to get the process started. First of all, you will need to turn off your PC or laptop. Turn off means “Shutdown” then power it up and follow the steps below.
1. Change the Boot Device
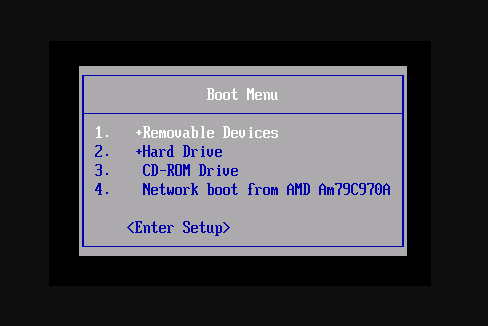
The very first thing that you need to do is to change the boot device and make sure that the USB installation media is connected to your computer before you do so. You can do this by entering the boot device menu in your computer’s BIOS setup. Just press F12, F9, F2 or any required function key to be pressed when your computer starts up.
If you don’t know which key to press, be sure to Google the brand and the key to be pressed to enter boot options menu. Once you are able to enter the Boot Options Menu, simply select “Removable media” and put it as the first item so that you computer would boot from it.
2. Follow the Process Shown by the Windows Install Wizard
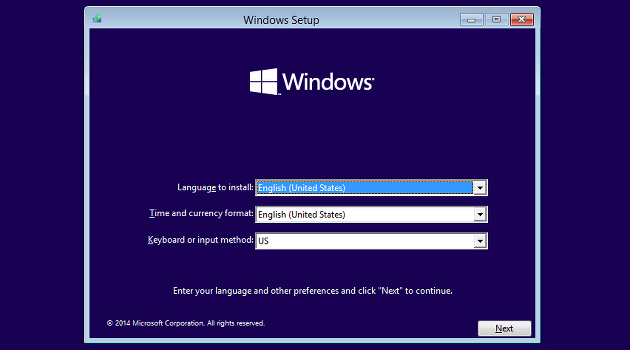
Once your computer boots from the USB installation media, the Windows Install Wizard should then initiate. From here, you will simply need to follow the steps because it is there to guide you. You will need to prepare your product key at this stage but if you don’t have it yet, you can input it later on and just skip the step that asks for it.
It should be pretty straightforward if you follow what the wizard says but if you are a novice user, you can follow the step-by-step process shown in the video below.
As you can see, it doesn’t need an expert to actually do a reformat or clean install process because you yourself can actually do it! Once Windows 10 gets installed, you will need to install all the programs that your machine had before you did the clean install. Remember, Google is there to help so just type in the name of the program that you need to install, hit “Search”, open the download page and download the program installer.
Installing them is also easy because each program has a wizard that will guide you through the steps. Just be sure to download the version of the program that works with your Windows 10 system architecture (32-bit or 64-bit) but most installers at present provide a universal installer so you don’t have to worry about this.
What About Drivers?
In some instances especially if you wiped out everything from your machine’s hard drive during the clean install, you will be needing to install hardware drivers. In this case, you can simply use a built-in Windows utility called “Device Manager” and if you need help in how to use it, be sure to watch out for our next tutorial which will demonstrate the process of automatically finding drivers for your newly reformatted Windows 10 machine.
Have you experienced any problem while following the steps shown in the video we shared above? Let us know in the comments section below and we’ll do our best to help! If you love our content, you can get more of it if you subscribe to our email newsletter. Feel free to do so by inputting your email address into the box found at the bottom.