Creating and Deleting Partitions with Windows Disk Management
Most users are not aware that their computer is actually capable of handling two operating systems at a time like Windows 7 and Windows 8 for instance. This is simply done by creating two partitions where you can install each one of them. Having more than one partition also is a good way of creating a safer place to store backup files in or sharing other important stuff with other users on a network. Thankfully, Windows provides a very easy to use utility that guides you through the creation of disk partitions. With this tool, you won’t be needing any third party software or boot into a special utility just to create the partition that you want. The feature that we are referring to is the Windows Disk Management Utility which is available on Windows Vista, Windows 7 and Windows 8.
This tutorial will teach you how to access the Disk Management tool and create as well as delete partitions with it. Don’t worry, the process is very simple and it doesn’t take an expert to do it. All you need to do is follow all the steps which I will show below. The screenshots provided on this tutorial is taken from a Windows 7 computer.
How to Access the Windows Disk Management Tool
There are several ways that you can use in accessing the Disk Management utility on Windows 7 and Windows 8 but we will be teaching you three simple methods of opening it on Windows 7.
1. Use the Start Menu Search Feature
The first method is by searching for it using the search box found on your computer’s Start Menu, to do this, just follow the steps below:
- Click on the “Start” button located at the bottom left corner of your computer screen then type “disk management” inside the search box and wait until some search results appear.
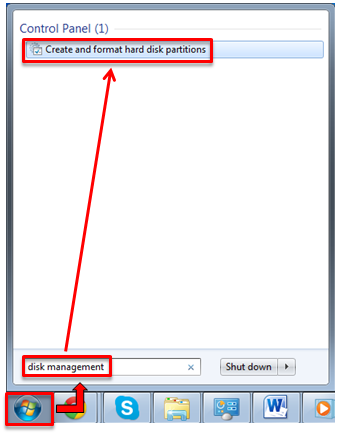
- Once the search results appear, just click on the “Create and format hard disks partitions” item located under the “Control Panel” search results category as shown above and after doing so, the Disk Management Window should appear which looks exactly like the screenshot below.
2. Clicking on Manage from the Right-Click Menu
Another easy method is by simply right-clicking on the “Computer” item from the start menu then clicking on the “Manage” option. Here’s how:
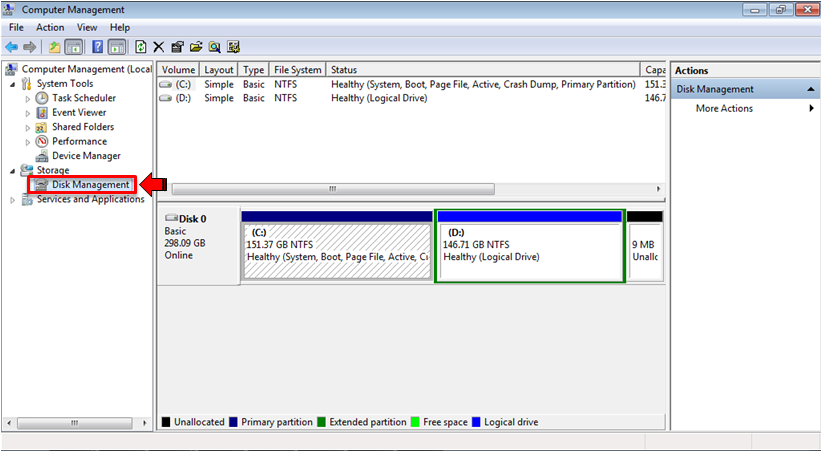
- First, click on the “Start” button then look for the “Computer” item and when you find it, just right-click on it. After doing so, you will find see a right-click menu containing some options in it. Just look for the “Manage” option and click on it as shown below.

- After clicking on “Manage”, the “Computer Management” Window should appear. Just look for “Disk Management” from the navigation panel located at the left then click on it to open Disk Management.
3. Accessing it from the Control Panel
The traditional way of accessing it is through the “Control Panel”. To learn how this is done, just follow the below steps:
- Open the Start Menu by clicking on the “Start” button then look for “Control Panel” and click on it. Once the main Control Panel Window appears, click on “System and Security” and on the Window that follows, just click on “Administrative Tools”.
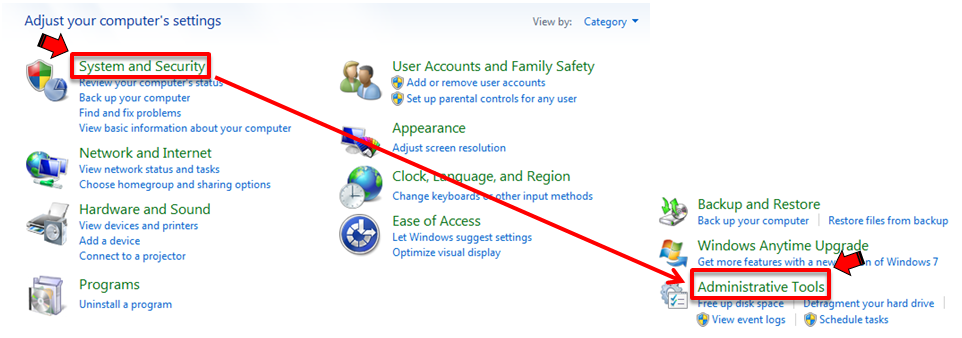
- The Administrative Tools Window will then open where you can find the “Computer Management” shortcut. Just click on it to open the Computer Management Window where you can find a “Disk Management” link which you can click on.

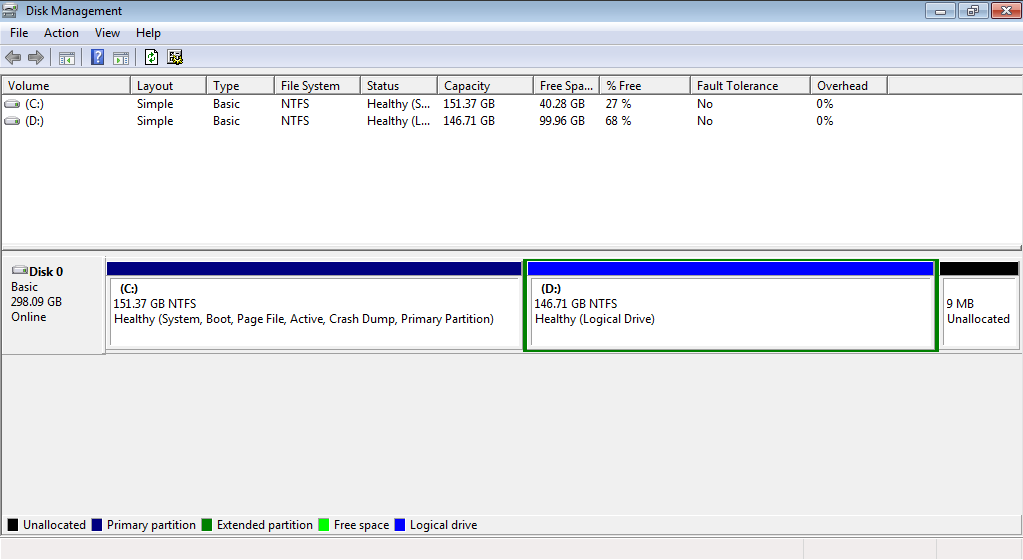
- After clicking on the “Disk Management” link, a list of all the existing drives and partitions on your computer will appear with other details like Volume, Layout, Type, File System and Status of each.

Creating a New Partition
Now that you already learned how to open Disk Management on your Windows 7 computer, it’s now time to learn how to create a new partition which you can use for a lot of purpose like storing backup files, installing a trial version operating system or putting files in it which you want to enable or sharing with other users joined to your HomeGroup Network.
But before doing so, you need to see if your disk still has enough space to accommodate the use that you would like for the new partition. You can create partitions for different uses (Primary, Extended, Logical) but on this tutorial, we will just be focusing on creating a new Primary partition and just leave discussing the other types on a future tutorial.
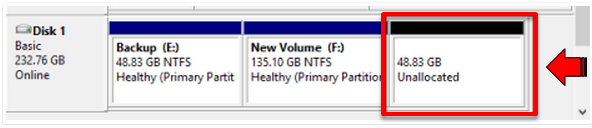
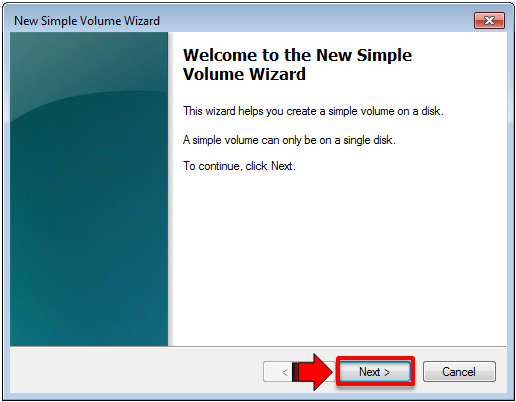
On the screenshot above, the free space is labeled “Unallocated” and is colored black. The size of the available space is also shown on it. To create a new partition using the available space, just right-click on the “Unallocated” space and click on the option that says “New Simple Volume…” from the right-click menu that appears.

After clicking on it, a new Window will appear labeled “New Simple Volume Wizard”. Once you see it, you should click on the “Next>” button at the bottom.
The Window that follows will tell you to choose the space that you want for the new partition. At this stage, you have the option to either create a new partition out of the whole available space or just a part of it.

After setting the partition to your desired space, just click on the “Next>” button located at the bottom. The Window that follows will ask you to assign a drive letter, choose whether to mount it in an NTFS folder or just leave it blank and not assign a drive letter for it. Once you are done choosing all the settings that you like., just click the “Next>” button located at the bottom of the Window.

The Wizard will then ask you to choose the file system format for the partition that you want to create. If the partition would be used for backup or storing files that you want to share on a network, you should choose NTFS. This format should also be selected if you are planning to do a trial OS installation. The NTFS format is more preferred because its more secure and tolerant to errors and it performs better than FAT16 or FAT32 system file formats. The “Allocation unit size” on the other hand needs to be at Default which has the value of 4KB. Next to this is the “Volume label” which you will specify according to your liking. After choosing your desired values, just click on the “Next” button again.

All details and settings that you have done for the partition will then be displayed on the Window that would follow. To complete the process, you need to click on the “Finish” button at the bottom. The newly created partition should then appear on the Disk Management Window together with the other existing partitions.

The new partition should now appear on the list of all partitions and drives available on your machine.

How to Delete a Partition
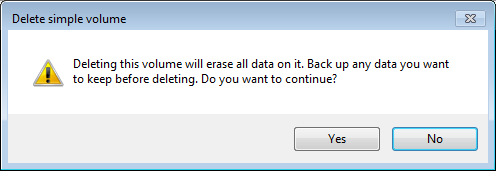
Deleting a partition would at times be needed especially if you want to add space to an existing one or create the partition again with different settings and file system format. To do this, you simply need to right click on the partition which you wish to delete then select the “Delete Volume…” option from the right click menu that would appear as shown on the screenshot below.

After doing so, you should see a prompt asking you to confirm the action. Take note that all of the files and other stuff you stored in the partition will also be deleted during this process so it is recommended that you make a backup of it first before continuing.
As you can see, creating a partition on your Windows 7 machine and as well as deleting one is very easy. Other tasks that you can do with the Disk Management tool will be discussed in a future tutorial. For now, if you encountered any problem in any of the steps I described above or you have any other tips regarding the Disk Management Tool please feel free to post them as comments for this tutorial.