Creating a New User Account (Windows 8)
On the very first time of using a Windows computer or after the operating system is re-installed, it requires a user account to be setup so we can have access to the different features that it offers. This has been the case since Windows XP and even the later versions and it still applies on Microsoft’s latest one called Windows 8. A user account helps the computer owner have control over important files and protect everything stored in his/her account as a whole. Windows XP, Vista and Windows 7 all allow the creation of local user accounts but as you’ll see later, some things have changed on Windows 8.
The account that is set up after using a Windows computer for the first time or after an operating system re-installation process becomes the default one that is used whenever your computer is turned on however, leaving it this way may expose your private files and other important stuff to other users who are not supposed to access such things. This is the reason why you need to create separate user accounts on your machine which can be used by other people but since Windows 8 is a new one and setting up or creating a new user account in it is a bit different than its predecessors, you need something to guide you through the steps and that’s what I’ll be showing on this tutorial. Windows 8 allows you to create a Local account or a Microsoft account. Just read through to learn how this two differs from each other.
Where to Find the User’s Section on Windows 8
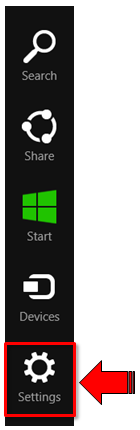
Creating a User Account on Windows 8 would require you to access the “Users” section and an easy way of doing this is through the “Settings” Charm. To access the Charms, simply touch the right edge of the screen (if your device is touch-enabled) then swipe it towards the center and you’ll see a black strip coming out of the edge containing the charms. You can also point the mouse to the upper or lower-right corner of the screen and then move downward if you pointed the top-right corner or upward if you pointed on the bottom-left corner and the black strip containing the charms would then appear. The Charm located at the bottom is the “Settings” Charm. Simply click on it to open the Settings Screen.
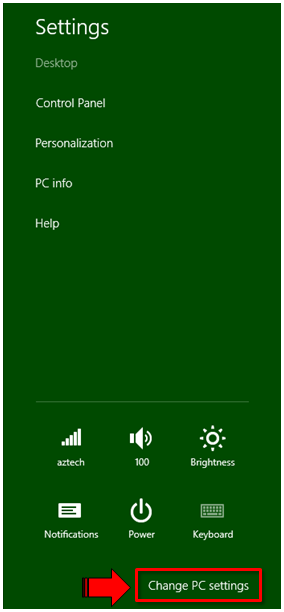
Once the “Settings” screen appears, simply click on the “Change PC settings” tab found at the bottom.
The next screen will show the “PC settings” menu and other options, from here, you need to click on the “Users” menu found at the left portion of the screen.

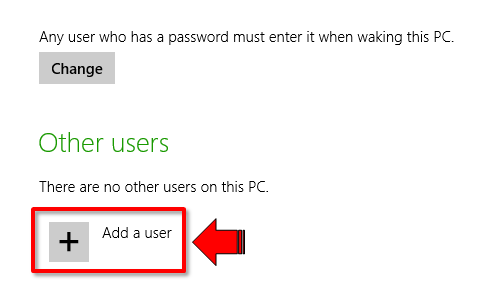
After clicking the “Users” menu, all options and settings under it will then appear at the right portion of the screen. From this list, find the “Add a user” option (found at the bottom) and click on it.
The next screen looks like the screenshot below. Your’s might have a different color but it all depends on the color scheme set active on your computer. This is where creating a new user account will start.

Creating a New User with an Existing Microsoft Account
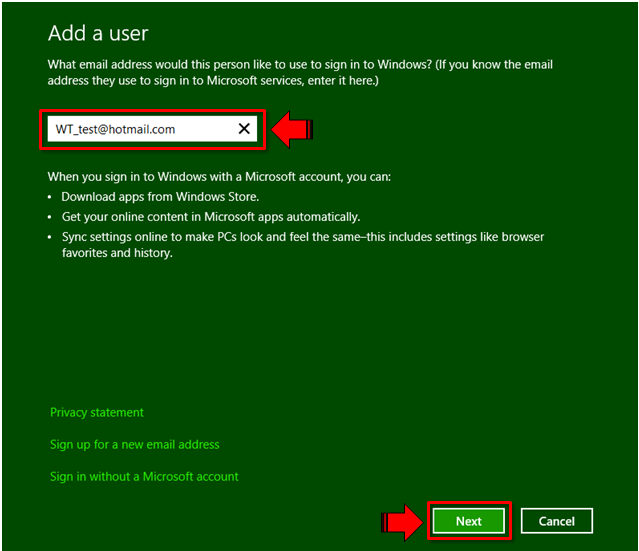
After clicking the “Add a user” option, Windows 8 will automatically take you to the “Add a user” screen which will ask for an email used to sign in to Microsoft services. If you know the email of the person that you wish to set up a user account for, simply enter it on the box.
There will also be some items explaining the advantages of setting up a Microsoft account and using it in creating a user account on Windows 8 and all of these items are found in bullets below the email address input box. After entering the email address, simply click or tap on the “Next” button found at the bottom of the screen then you’ll need to wait until the next page loads.
The screen that follows looks like the screenshot below. From this screen, you have the choice of enabling “Family Safety” feature by checking the “Is this a child’s account? Turn on Family Safety to get reports of their PC use.” option and once everything is set up, simply click the “Finish” button and that’s it! You now have a new user on your machine.
NOTE:
The email address accepted are only the once that are owned by Microsoft like “outlook.com, live.com or hotmail.com“. If you don’t have a Microsoft account yet then you need to create one before creating a user account with it. This will be explained later in this tutorial.
Creating a New User by Signing Up for a Microsoft Account
If the person that wants to have access to your computer wants to also get access to Windows Store and take advantage of the Sync feature but he/she does not have a Microsoft account yet then you need to sign up for a Microsoft account first before creating a user. To do this, simply follow the steps below.
First, you need to access the “Add a user” screen again and once you are on it, click “Sign up for a new email address” found at the bottom.

The next screen will ask for some information regarding the email tat you want to setup and other details about the owner. Simply fill in the required information on all input boxes and once you are done, click on the “Next” button found at the bottom.

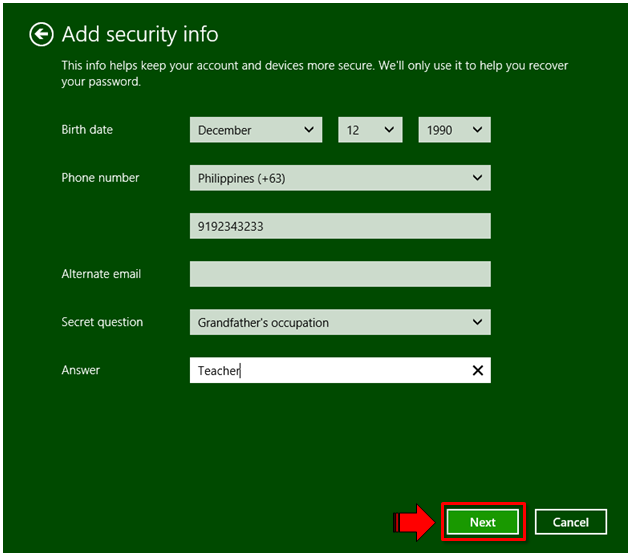
The screen that would follow is labeled “Add security info” which will ask for more details and security questions. You need to fill out at least two security details in this section then click on “Next” at the bottom once you are done entering all the required information.
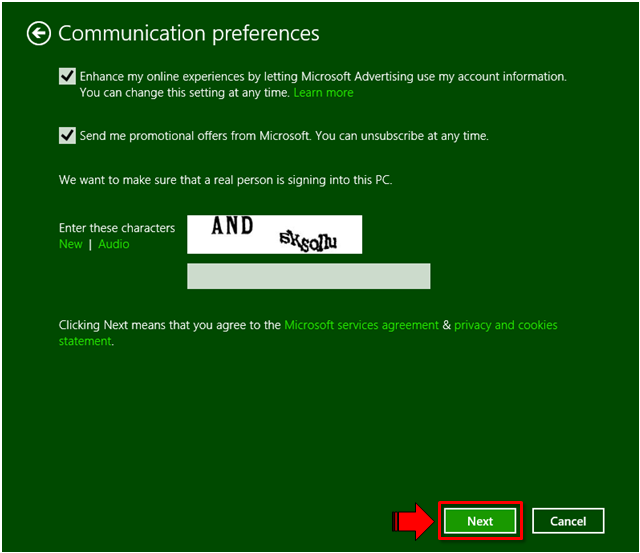
The “Communication preferences” screen will then follow which contains two check boxes for options of how you want Microsoft to communicate with you regarding promotions and updates and how they can use your accounts. Below these checkboxes is a CAPTCHA code which you need to enter on the input box. After checking the options that you want and entering the CAPTCHA code, simply click on the “Next” button found at the bottom of the screen.
The next screen looks like the screenshot below where you can again activate “Family Safety” feature by marking the checkbox. Once you are done setting your preferences on this screen, simply click the “Finish” button at the bottom and you now have a new user account and as well as a Microsoft account set up on your computer.
Setting Up a Local Account
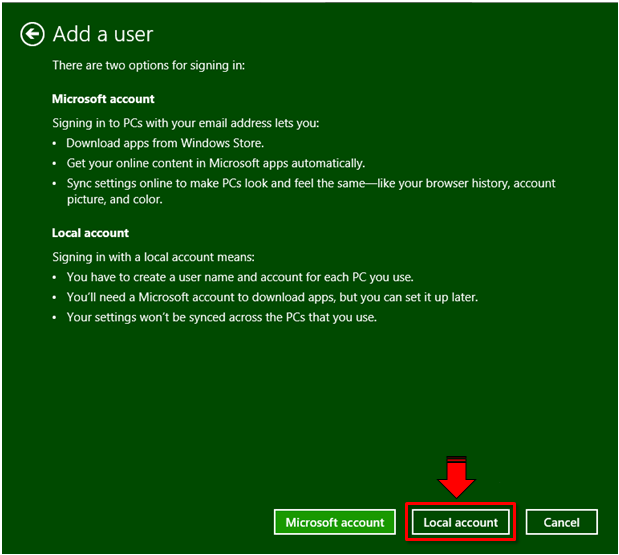
Another type of account that can be created in Windows 8 is a Local account. Local accounts function the same as the traditional user accounts that we all got used to in previous Windows versions and it allows a user to access the system and use different features of it however, unlike a Microsoft account, a local account cannot have access to the Windows Store or use the Sync feature. To create a user account, simply go the the “Add a user” screen again and click or tap on the “Sign in without a Microsoft account” option found at the bottom.

The screen that follows will then enumerate the difference between setting up a Microsoft account and a local account. From this screen, simply click the “Local account” button located at the bottom.
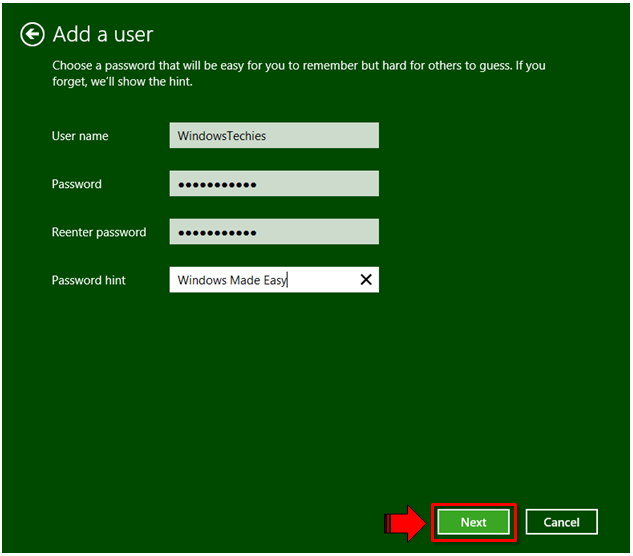
The next screen would then ask for a User name, a Password and as well as a Password hint. Simply fill out these input boxes and click on “Next”.
Next, you will then be brought to a screen which tells you to confirm the action and also contains an option to turn on “Family Safety” for the new user account. If you want to activate the “Family Safety” feature for the account then mark the check box but if not, just leave it blank and click “Finish” at the bottom.

That’s all there is to it. As you can see, setting up a new user account on Windows 8 is a bit different than doing the same process on previous Windows versions but there are more improved features that each account type offers on the Windows 8 platform especially if you choose to set up a Microsoft account. It just takes a bit of exploring and once you get the in’s and out’s, you’ll surely love Windows 8 just as I did!