How to Enable High Contrast
It is always a fact that not all Windows users have clear eyesight. There would be others who have difficulty seeing things clearly because of age or some other reasons and Microsoft has made sure that the Windows operating system also caters to their needs. From making things larger than usual down to speech recognition, narrator and some other stuff, Windows is really an all-in-one operating system which would definitely help people with minor disabilities to still use a PC or laptop without any problem. One of the features that would help you see things clearly is called “High Contrast”. This feature has existed in all the other previous Windows versions and has been improved to make it even better in the new Windows 8.1 operating system. In this tutorial, we will be learning all the steps that are involved in accessing this important feature in your Windows 8.1 machine and as well as discover how you can use it in case someone who has eyesight problems would use your computer so be sure to have your computer ready and follow the directions as you read through.
Getting to the High Contrast Setting in Your Windows 8.1 Computer
The Windows operating system has always been known for providing a number of ways in accessing even just a single feature and this is true even for the “High Contrast” feature that we will be talking about in this tutorial. Before getting into the details, you first need to learn that Windows 8.1 is composed of two environments merged as one so users can have a brand new experience in using a PC or a laptop that runs with the operating system itself. These environments are called “Metro” and “Desktop”. You surely are familiar with the latter which has been the environment that we’ve all got used to back in the days of older Windows editions such as XP, Vista and Windows 7 but the former which is called the “Metro” screen is a brand new one which you need to get familiar with so you can use Windows 8.1 to its fullest.
Accessing features, settings and some other stuff can also be done from any of these environments that composes the Windows 8.1 system and this includes the “High Contrast” settings. First, we will be discussing the steps involved in accessing this section from the Desktop screen and since it is one of the display settings, you will need to access the Control Panel Window first and make use of the search box that is located at its top-right portion. To do this, simply press the Windows + X keys or right-click on the Start Button in order to access a hidden menu which contains some links that will take you to different system locations in your Windows 8.1 machine.
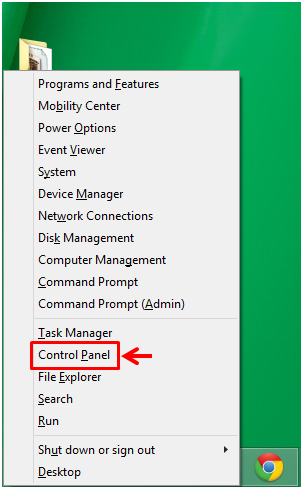
The screenshot above shows the Control Panel link highlighted in the hidden menu that appeared when you pressed the Windows key or right-clicked the Start Button. Once you see this link, simply click or tap on it to open the main Window of the Control Panel.
Now, when the main Control Panel Window opens, just click inside the search input box located at the top-right portion and start typing the words “high contrast”. As soon as you finish typing the words into the box, you should be able to see the search results that will appear on the contents pane as shown below.
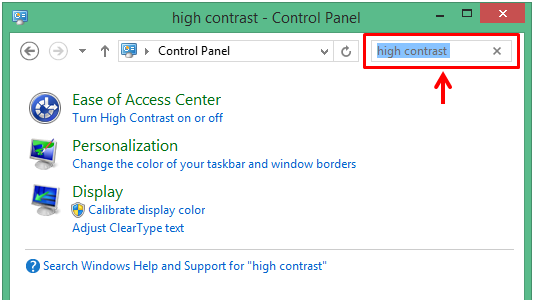
From the search results, just click on the link that says “Turn High Contrast on or off” located under the “Ease of Access Center” category as shown on the screenshot that follows. This will then open the Control Panel section where you can make tweaks with the “High Contrast” feature but before we discuss the details in turning the feature on and changing some settings in it, we will first learn another way in accessing this same section which will now involve the Metro environment.
Accessing High Contrast from the PC Settings Screen
It is important to note that Windows 8.1 also has another way of accessing some important settings. If the Desktop environment has the “Control Panel” Window, the Metro environment features the PC Settings screen which is the modern equivalent of the Control Panel in Windows 8.1’s mobile aspect. To access the “High Contrast” settings section from the PC Settings screen, all you need to do is first open the Start Screen by clicking on the Start Button or pressing the Windows key. Once the screen opens, just press the Windows + S keys to access the Search screen that will appear from the right edge and from here, all you need to do is click inside the search input box and start typing the words “high contrast” in it.
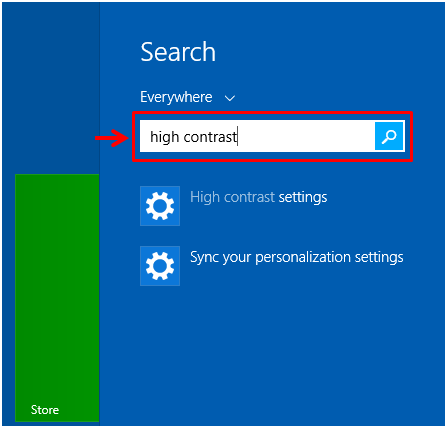
The search results will then appear just below the input box after a few seconds and from here, you will need to click on the link that says “High contrast settings” as highlighted on the screenshot below. Take note that instead of being taken to the Control Panel Window, you will be taken to another metro screen section after you click on this item from the search results so there’s really no need to get confused.

Working with the High Contrast Settings
Now that you learned how to access the “High Contrast” settings section on both the Desktop and the Metro environment, it is time to learn how you can tweak this aspect of the Windows 8.1 operating system from both environments, let us start with the former. After you click on the “Turn High Contrast on or off” link from the Search results that appeared on the Control Panel Window, you will be taken to the Personalization Window where the “High Contrast Themes” are located. From here, you will see options labeled as “High Contrast #1”, “High Contrast #2”, “High Contrast Black” and “High Contrast White” as shown below.
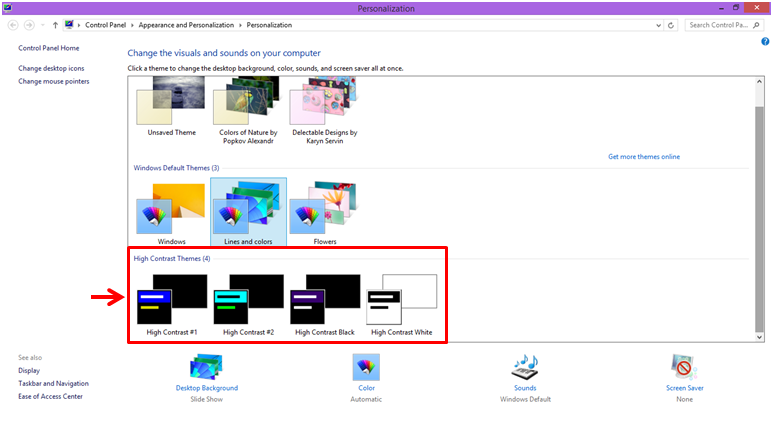
From here, all you need to do is select the “High Contrast Theme” that you want by clicking or tapping on it and after doing so, it should automatically be set as your computer’s theme.
Changing High Contrast from the Metro Screen
Now, another way of switching to a “High Contrast” theme is through the PC settings screen. After you click on the “High Contrast settings” link from the Search results as I have shown earlier, you will be taken to a metro screen that looks like the one shown below and since the High Contrast theme is not yet activated, you will notice that most of the settings are grayed-out and are technically not clickable.

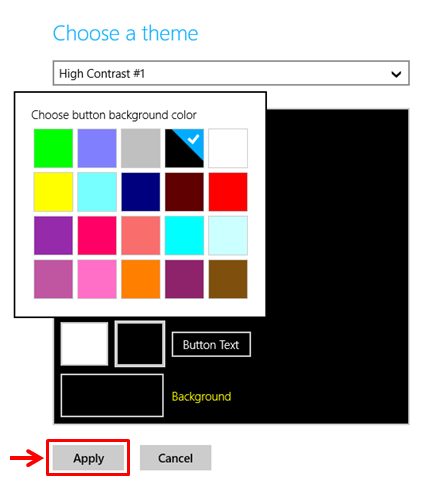
To make these options clickable and changeable, all you need to do is click on the arrow-down icon located on the extreme-right end of the box which is under the “Choose a theme” section. After doing so, the “High Contrast” theme options will appear in a drop-down menu and from here, all you need to do is select the one that you want to set for your computer by clicking or tapping on your theme of choice.

After you click on your theme of choice, you should be able to notice that all the other options will become clickable and can now be changed. Most of the changes that you can do here are related to the background color of the screen when certain tasks are done. Just tweak all the other options that you wish to make changes on and once you’re done, simply click on the “Apply” button to save all the changes made.
That’s all there is to it! You have now learned the steps involved in accessing and enabling the High Contrast feature in your Windows 8.1 machine. Take time to experiment with all the High Contrast themes in your Windows 8.1 machine and see which one fits the taste of the person who needs it while using your computer.