Enjoying Music in Windows 8.1
There are two available options which you can choose from if you want to organize and play your music files in your Windows 8.1 machine and that is if you only have Windows Media Player installed and not any other media player yet. Take time to open and explore the Start Screen and you will see a tile that is labeled “Music”. Windows Media Player and the Music app are among the available options for playing your music contents in your brand new Windows 8.1 machine and since most of us are already familiar with the former, we’ll be looking at the steps in using the latter which is the Music app which is set as the default music player when you first use your brand new computer.
Windows Media Player and the Music App: What’s the Difference?
Both software allows you to browse and play all your music contents and as well as create playlists. If you want to do any of these, you can just choose from the two of them and use the one that you are most comfortable with.

However, beyond the similarities in their uses, these two apps differ greatly especially when it comes to the features and functions that they offer. For instance, if you want to rip music from a CD or any other disk storage device, you will need to use Windows Media Player but if you’d like to purchase music from the Windows Store, you can only use the Music App.
Accessing the Music App
Just like any other built-in app in Windows 8.1, the Music app is accessible from the Start Screen and if you want to open it, you will need to click or tap on the “Music” tile that is pinned to it. The location of the Music tile depends on the size of your computer screen. For smaller screens, the Mail app can be on the lower portion of the screen while for bigger screens like the one I used in taking the screenshot below, the Music tile is located at the upper portion of the Start Screen.

After clicking on the Music tile, the main screen of the Music App will open in full screen. Move your attention to the left hand portion of the screen and you’ll see some of the controls that you can do with app and all the music contents that you open with it.

Accessing the Music on Your Computer
The music app allows you to access music from your computer and as well as uses some free streaming sources to get all the latest songs and music into your playlist. To get access to your music contents that are saved on your machine’s hard drive, simply click on the link that says “Collection” from the navigation pane located at the left of the Music app’s main screen.

After doing so, all of the music that are saved in your computer will appear and occupy the big part of the screen and they will be grouped according to album. From this list, simply click on the one that you want to play and once it opens, click on the “Play album” icon located at the center just below the title and artist’s name.

Adding Music to Different Lists
As you can see, there are four buttons that appear just below the Song/Album name and artist display when you select a certain music from the collection that is saved in your computer. Beside the “Play album” button is another one that says “Add to” and when you click on it, a small Window will appear which will show even more options. The first one says “Cloud collection” and when you click on it, the music you selected will be added to your music cloud (if you signed up to it). Next, if you click on the “Now playing” option, the music which you have selected will be added to the set of music that is currently playing and lastly, the option at the bottom will allow you to create a new playlist and play them anytime you want.

The Explore Artist Option
Next, you will find the Explore Artist option from the buttons located below the Song/Album title and the artist name. When you click on it, you will be able to access some other songs done by the artist including those that the app found from online streaming sources. After doing so, you can simply click on the song of your choice and play it using the app. Just make sure though that you will need an Internet connection so that you can access and some other song suggestions coming from online streaming sources.

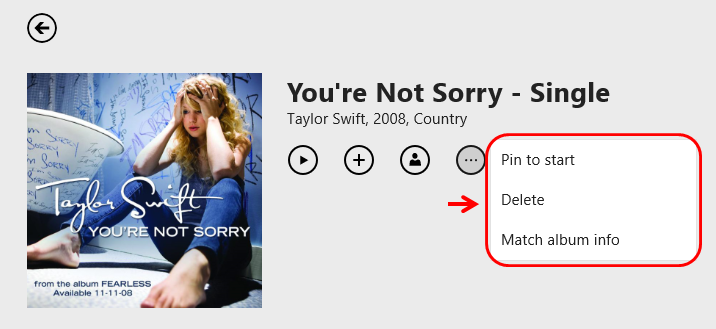
Lastly, you will see a fourth button which has a “…” symbol in it. When you click on it, there will be even more options that will appear on a small screen. These options are “Pin to start”, “Delete” and “Match album info”. The first option will allow you to pin your favorite songs to the Start Screen for a quicker access. Next, if you feel like a song is not worthy to be in the playlist anymore, you can click on the “Delete” option in order to get it out from the list right away and finally, the next option which says “Match album info” will let you search for available songs which belong to the same album of the song that you have selected.
The Radio Section
Still on the navigation pane at the left portion of the screen is a link that says “Radio” and you’ll need to have an Xbox or Microsoft account to get access to it. When you click on it and sign in using your Microsoft account, you will be able to access some music from radio streaming sites and it also allows you to type an artist so it can return you some results which are related to the artists you typed in for a search.

You will also see a “Start a station” link at the center of the screen which you can simply click to access a screen where you can select from artists which are arranged in alphabetical order so you can start to enjoy listening to their music.
The Explore Link
There’s also another link that is located below the “Radio” section which says “Explore” and when you click on it, you will be able to browse through some music which are available on Xbox Music and you can download them to your computer for as long as you have an Xbox Music pass. Downloading the music that you want and saving them into your computer’s hard drive is a good idea if you really want to still listen to them even if you’re offline.

That’s it for the basics of the Music app which is one of the built-in stuff on your Windows 8.1 machine. On our next tutorial, we will dig in deeper with some other options, tweaks, buttons and other stuff that you can do with the music app so you can use it to its fullest but for now, just take time to experiment with the options that I have shown here so you can become familiar with the app and won’t get intimidated when we go to the more advanced tweaks.