Explore and Tweak the Quick Action Buttons in Windows 10’s Action Center
Different people have varied opinions on certain innovations and improvements that were implemented in Windows 10 but everyone for sure will agree that the changes made on the Action Center are awesome ideas! This section which used to just shown you a list of problems and issues needing your attention has now been made more useful by helping you access Settings, connect to your VPN or even create a note for something that you need to be reminded about and all of these are offered as buttons that can easily be clicked or tapped at the bottom of the new Action Center screen as you can see on the screenshot below.
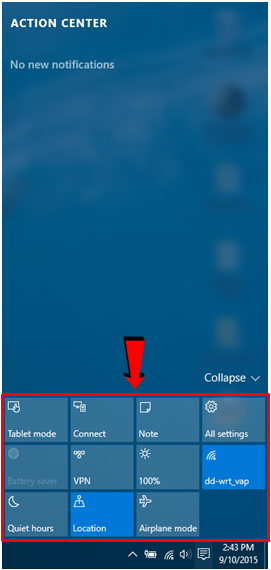
So what has changed in the Action Center? Well, if you have been using some older Windows editions then the screenshot that we have shown above alone will tell you a lot of difference. For instance, the new Action Center now has a more defined section where notifications appear and they are arranged according to the time they actually occurred. The awesome thing about this most recent change is at the bottom of this new Action Center screen, there are buttons that will help you do varied tasks or even access locations in a single click and these buttons are what we’re going to deal with as we move on in this tutorial.
What are the Default Quick Action Buttons in Windows 10’s Action Center
So before making some tweaks with all the buttons that appear at the bottom of the new Action Center screen, let’s first take a look at each one of them and learn what they can be used for. We will start with the button that is found at the top-left portion.
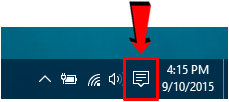
Tablet mode- In the advent of hybrid devices which led Microsoft to develop a hybrid operating system that started with Windows 8, a feature that would make it possible to switch from the Desktop mode to the Tablet mode also had to be developed and this has only been perfected in Windows 10. In your Windows 10 machine, just click on the Notification icon from the system tray as highlighted on the screenshot below in order to launch the Action Center screen.
Once the Action Center screen opens, you should be able to see the “Tablet mode” button at the top-left portion of the Quick Action buttons group as you can see on the screenshot below.
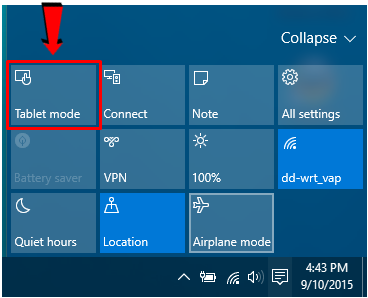
If you are using a computer that has a touch-enabled screen or you own a hybrid device, you can click on this button and the screen will automatically transform into the mobile Windows 10 platform. It’s really a very comfortable way in switching between the Desktop and Mobile platforms which is the main concept that is applied in Windows 10.
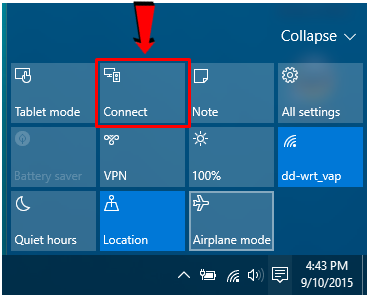
Connect- Next to the “Tablet mode” button is another one that is labeled as “Connect” and if you click on it, you will be able to open the “Connect” screen which will scan for devices that you can connect to wirelessly. These device include audio and video devices that are capable of being connected to your Windows 10 computer.
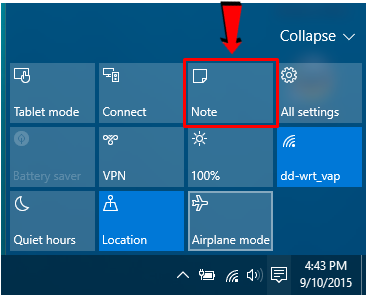
Note- In today’s busy life, it is always possible to forget about something important that we have scheduled for a certain day. To make sure that you’re not missing anything, Microsoft has included the “Note” button in the Quick Actions section of the new Action Center Window. Try clicking on it in your Windows 10 computer and you will be able to open the OneNote app which will then allow you to jot down your schedule so you can keep track of them everyday.
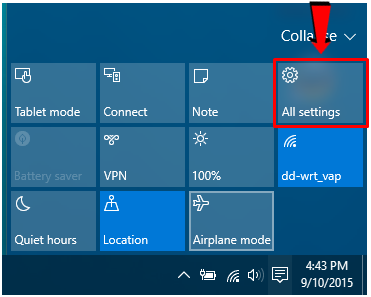
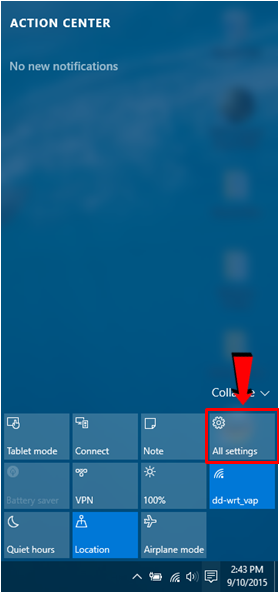
All settings- Moving on, just beside the “Note” button is another very useful one which is labeled “All settings”. As its name itself suggests, it is the button that you would need to click in case you want to make some tweaks with your Windows 10 computer. The “All settings” button will open the modern “Settings” Window in your computer but of course, you won’t really know what we’re talking about if you won’t try clicking on the button so be sure to try clicking on it in your Windows 10 machine.
Battery saver- Most of the devices that we own at present can run using an AC adapter and on batteries. This is true even to the devices that run on Windows. We have laptops, tablets and even phones right now that have built-in batteries so you can use them on-the-go. In case you want to conserve battery power while you are travelling, you can simply click on the “Battery saver” button and Windows will automatically cut-down on different aspects of your device to help extend battery life.

NOTE: If your device is plugged-in, the “Battery saver” button is going to be grayed-out which means that you can’t click on it to switch to the battery saver mode. You are plugged-in anyway so there’s no reason for you to save on batteries.
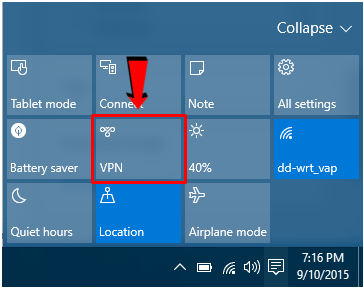
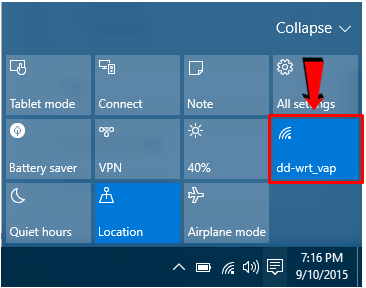
VPN- Want to secure your network? You can switch to the VPN option. VPN or Virtual Private Network is a way of encrypting communication between computers to make it more secure against attacks. This is most commonly done by companies and business who have computers and databases that need to communicate over the Internet but would need extra security. If you want to connect to a VPN in your Windows 10 machine, all you need to do is click on the “VPN” button that is found on the Quick Actions section of the Action Center screen as highlighted on the screenshot below.
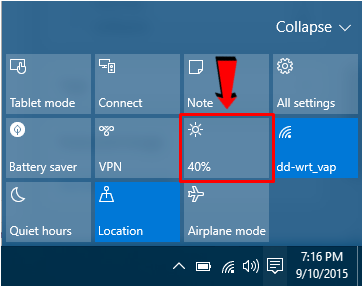
Brightness- Beside the “VPN” button is another one that you will surely love especially if your device mostly runs on batteries. The button doesn’t have any label on it but you will see a small icon like a sun and below it is a percentage. If you click on this button while your device is plugged in, you will notice that you’ll be able to switch it to 25%, 50%, 75% and 100% and along with this percentage change is also the change with the brightness of the screen.
Wi-Fi- Moving to the next button to the right, you will that it has a wireless network icon on its top-left portion and below it is the name of the wireless network that you computer is currently connected to. This is the “Wi-Fi” button and when you click on it, you will notice that you will be disconnected from the network that you’ve been connected to earlier. This button serves as a quick switch for turning the Wi-Fi radio receiver on or off.
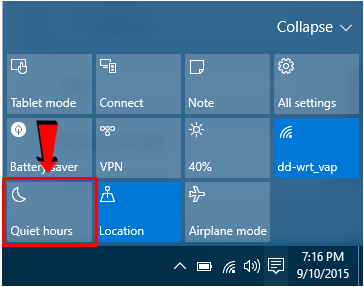
Quiet hours- You surely don’t want to be seeing prompts and messages coming from the “Action Center” all the time even when it’s time for bed. To silence this feature from showing any notification on your computer screen, you can simply click on the “Quiet hours” button and it will automatically be switched to the quiet mode which means that it would stop from showing notifications and playing sounds whenever they appear.
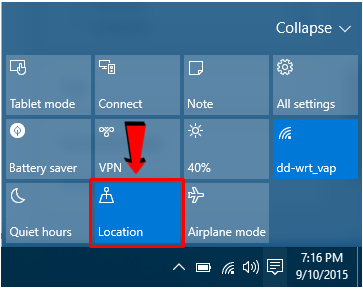
Location- Most of the modern apps that are available from the Windows Store require that you allow you location to be accessed by them. This is true even for the Cortana virtual assistant. The “Location” feature is turned on by default and if you don’t want to experience problems with some modern apps then you would need to leave this feature turned on in your Windows 10 machine.
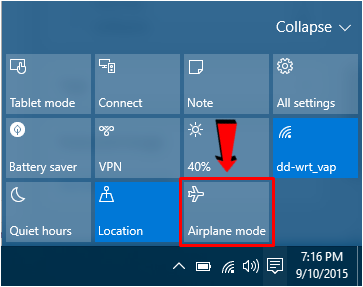
Airplane mode- Lastly, you will find the “Airplane mode” button and you’ve surely met this feature even in your other devices so there’s no need to elaborate its use further. Just remember to turn this feature on whenever you’re travelling on an airplane since it switches off all radio device in your Windows tablet or smartphone.
Accomplish More Things Easily with the Quick Action Buttons
As you have seen have, the 11 Quick Action buttons really provide easy access to some very important functions in Windows 10’s Free Upgrade release. It allows you to jump between the Desktop and Tablet modes, connect to different devices, take note of things that you need to do, access the modern settings Window, switch to Battery saver mode, create a VPN, adjust screen brightness, turn Wi-Fi on and off, switch Quiet hours on or off, turn the location feature on or off and even enable Airplane mode in just a single click.
All of these buttons really prove how Microsoft applied the feedback that they were able to collect from the Windows Insider Program and as the development of the latest Windows edition goes on, we can expect more and more features and innovations to be implemented in this Windows version dubbed as “the best one yet”! So now that we’ve already learned about the uses of each button in the Quick action section of Windows 10’s Action Center, let’s learn how we can tweak the contents of it and change the buttons that appear in this strategic location on your computer.
Tweaking the Buttons That Appear on the Quick Action Section
How many of the 11 buttons appearing in the Quick Action section of the new Action Center screen has practical use to you? Well, if you ask me, I only use the “All settings” button more often and other buttons such as “Location”, “Note” and “Brightness”. The others are seldom used so you might be thinking to put more useful buttons to this section of the Action Center screen. The good news is you actually can and we will show you the steps as we move on to the next part of this tutorial.
1. Open Settings
The very first step is of course to open the modern Settings Window. There are many ways on how you can do this but the easiest one is by clicking on the “All settings” button that already appears on the Quick Actions section of the new Action Center screen as highlighted on the screenshot below.
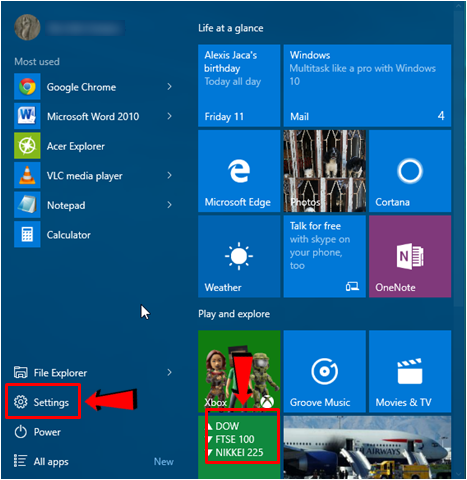
Another method in doing this is by first accessing the Start Menu which you can do by clicking on the Start Button or pressing the Windows key. Once the Start Menu opens, all you need to do is click on the “Settings” link that is located on its bottom-left section as shown below.
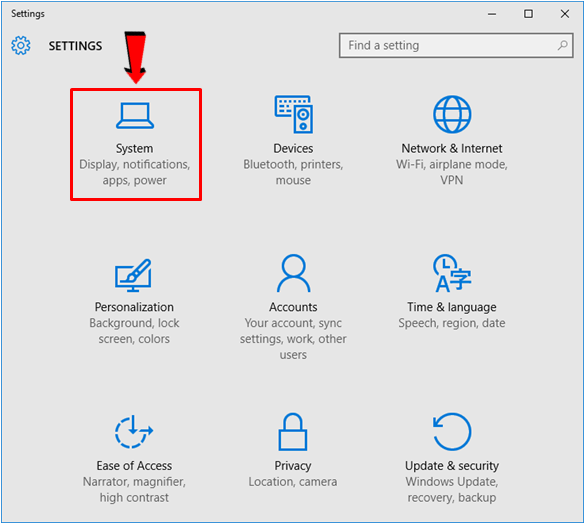
Once the modern Settings Window opens, just look for the category that is labeled “System” and if you are wondering why we’re going to get into this Settings category instead of the “Personalization” section then just hold on and you will see the answer later. The System category of the modern Settings Window is the first item on the list of Setting categories and it is highlighted on the screenshot below.
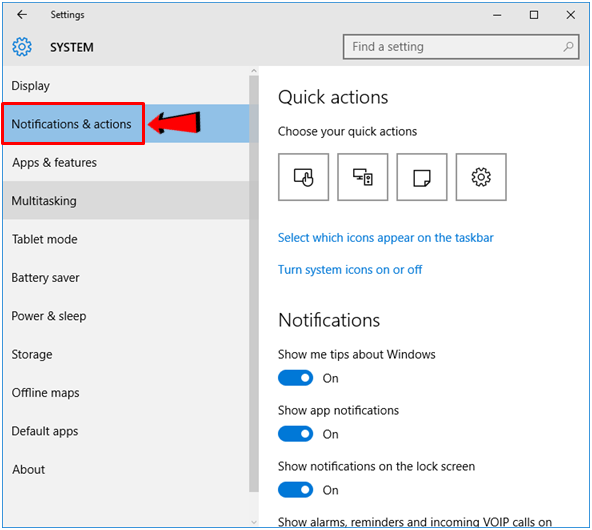
Once the “System” settings category opens, you will now need to put your attention into the items that are found on the navigation pane at the left hand portion and from here, just click on the link that says “Notifications and actions” and this where we are going to make most of the tweaks on so be sure to follow each step closely on your Windows 10 machine.
Once the “Notifications and actions” section opens in your computer, all you need to do is click on one of the items that are displayed under the “choose your quick actions” section that is highlighted on the screenshot below. There are currently four items that are being displayed and they are not labeled with anything but that doesn’t matter because they are just there to serve as a way for you to access the real list of items that can be set to appear in your computer’s Quick Action section on the Action Center screen.
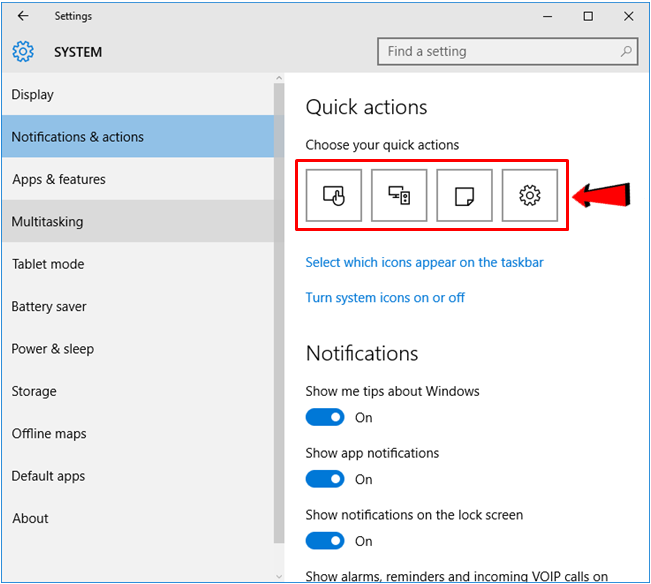
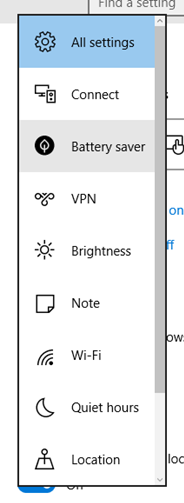
After any of the four items is clicked, you will be able to open a menu which will now show all available buttons that can be allowed to be displayed on the Quick Actions section as shown on the screenshot below. From here, just scroll downwards so you can view all of these items. Again, there are 11 items that are displayed on this section of the Action Center so if you don’t need some of the buttons that are displayed in it, all you need to do is click on the item itself from the drop-down list.
The item that you will click from this drop-down menu will now appear as the first button on the Quick Actions section of the Action Center screen, they are not necessarily removed but if you collapse the buttons, you will see that there will only be four buttons that will be displayed and the first one is the button itself that you have clicked.
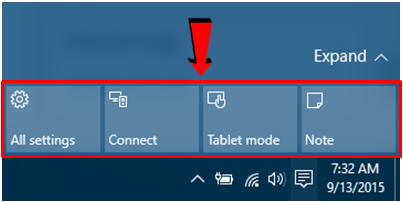
If you click on the “Expand” link that is located at the top-right portion of the Quick Action buttons, you will still be able to view all 11 default buttons but that shouldn’t be an issue at all because you can always hide the other 7 simply by clicking on the “Collapse” link to hide them and display only the ones that you have selected from the drop-down menu that we dealt with in the earlier step.
Other Notification Tweaks
Now, if you scroll down more on the “Notifications and actions” section of the System Setting category, you will be able to see item under “Notifications” and “Show notifications from these apps”. First, under the “Notifications” section, you will see some on/off switches for enabling/disabling notifications from different Windows contents such as programs and apps and as well as allowing or disallowing notifications on parts like the Lock screen.
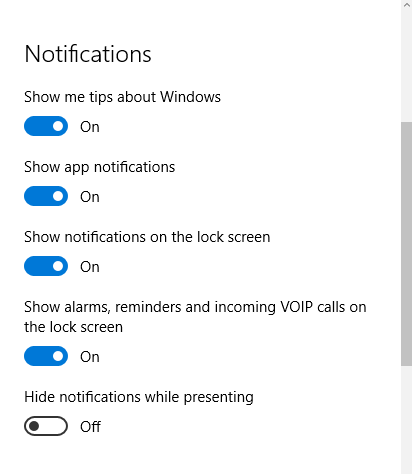
From these switches, all you need to do is turn on the ones that you want to see notifications from and turn off the ones that you want to be disabled.
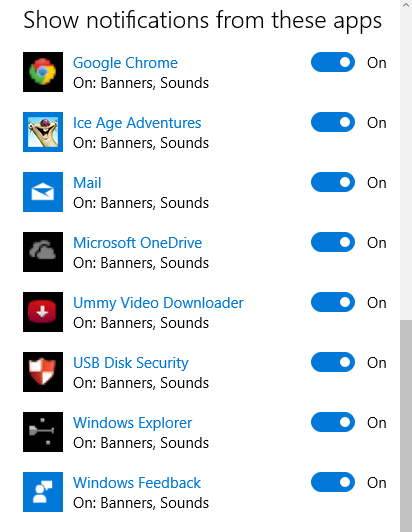
Next, there’s really not much to worry about with the items under the “Show notifications from these apps” section but if you’re getting annoying notifications from a program or app that is not that much useful at all then you can always turn off notifications for it by clicking on the switch in order to flip in from the on to the off position.
As you can see, the new Quick Action buttons that has been incorporated in the new Action Center screen really does some wonders in tweaking your machine’s Notification settings and it also helps you deal more personally with the apps and programs that are installed in your computer. There are still a lot more to discover about Windows 10 and we will be discovering more about this newest Windows OS version as in our next tutorials so be sure to stay tuned-in with us here on WindowsTechies.com to get the latest news, tips and tricks about your favorite Windows operating system!