Exploring Other Options on the OneDrive Website
Microsoft has always made sure that they stayed close on track with all the other competitors and in the case of cloud storage, the company also launched their own brand which used to be called SkyDrive but now, it has taken a new name which is OneDrive. Just like any other cloud service, Microsoft’s OneDrive gives users a free 7GB storage space and even more when they choose to sign-up for a Microsoft account. In this tutorial, we will be exploring deeper into the features and tools that can be found in the OneDrive website so be sure to sign up and get your OneDrive account ready and follow all the steps that I will be demonstrating below.
How to Access OneDrive Website
Accessing the OneDrive website is done in the same way as you access the other websites that you often visit. Just open your favorite browser and once you are on it, simply enter “onedrive.com or onedrive.live.com” into the web address box and hit “Enter” on your machine’s keyboard. Once the OneDrive website opens, you will need to enter your Microsoft email and Password into the boxes and spaces provided and you’ll be taken right away to your OneDrive account’s main page. For a more detailed steps in accessing the OneDrive website, you can read our previous tutorial that discusses some basic stuff about this free cloud storage by Microsoft.
Now, on the main page of your OneDrive account, you will see some dark blue rectangular thumbnails which represent folders that you can actually store uploaded files into. Try pointing on any of these folders and you will see a small box at the top-right portion of the thumbnail which you pointed on. You can click inside this small box and you should see a check mark that will appear in it. This check mark means that the item has already been selected and at the top most portion of the page, all available options for the selected item will appear.

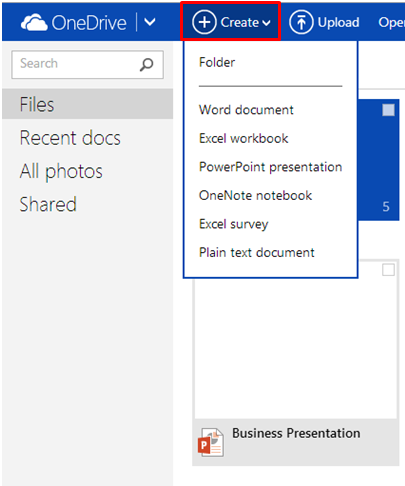
Creating Different Types of Files Using Office Online
While on the OneDrive website’s main page, you can create different types of files like Word, Excel or Powerpoint even without using the Microsoft Office Suite on your computer’s desktop screen. Yes! It is now possible to work on any file quickly while you are in any of Microsoft’s online-based services such as OneDrive and this is done using the “Office Online” apps. To do this, simply click on the “Create” button which is located on top of the screen and after doing so, you should be able to see all available apps which you can use to create a new file. From here, all you need to do is click on the app of your choice and another tab will open which will now let you work on a new document using the app you’ve chosen.
Open a File in Desktop or Online Office App
If you already have some files stored in your OneDrive account then you can explore the options in how you can open any of them. The awesome thing about OneDrive is that it is still perfectly integrated with your Windows machine no matter what web browser you use in accessing your account. Take for instance the ways in how you can open your files. There are actually two ways in doing this. First, you can open and edit a file on any Online Office app or do the same task on each app’s desktop equivalent which is part of the Microsoft Office suite. To do the former, just select a file using the method that I have shown earlier in this tutorial and once it gets selected, you should be able to see an option at the top that says “Open”. Just click on this option and you will be able to see the two available choices in opening the file which are “Open in <App name>” and “Open in <App name Online>”.
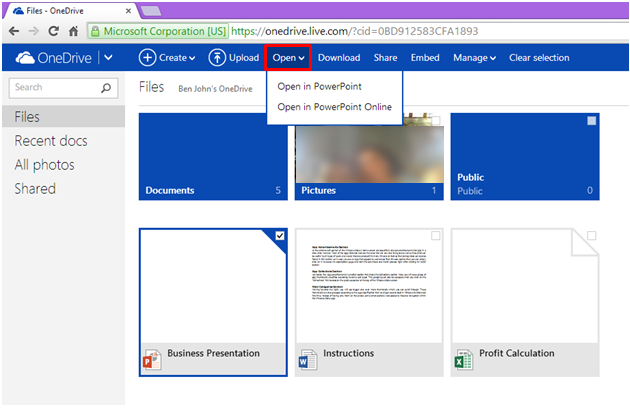
The “Open” options on the screenshot above mentions “PowePoint” and “PowerPoint Online” because I have selected a PowerPoint file from my OneDrive account.
Downloading a File or Folder to Your Computer or Mobile Device
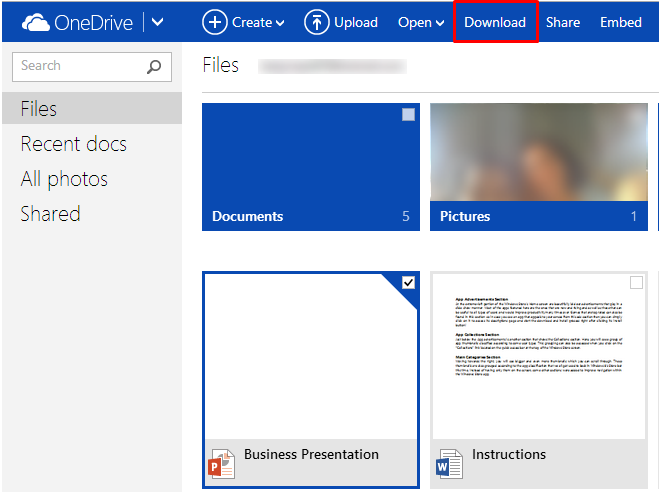
Another option that will appear on the top portion of the your OneDrive account’s main page whenever a file gets selected is the one that says “Download”. You can use this option if you have something that you created using a mobile device and stored in OneDrive which you would like to copy to your computer’s hard drive. To download a OneDrive content, just select the file, picture or any other stuff that is stored in your computer’s hard drive and hit the “Download” option from the top portion of the screen.
Sharing a File or Folder to Other People
Another awesome option that is available in the OneDrive website is the one that says “Share”. As the name itself suggests, it allows you to share any file or folder to the people who are in your contacts list so they too can view a file or download it. It is a perfect way of collaborating with friends who are listed in your social media account. The “Share” option also allows you to get a link towards the specific file that you selected and send it to anyone through a chat message or even in an email. A bonus quick note can also be added and you can even change how recipients can work with the file.
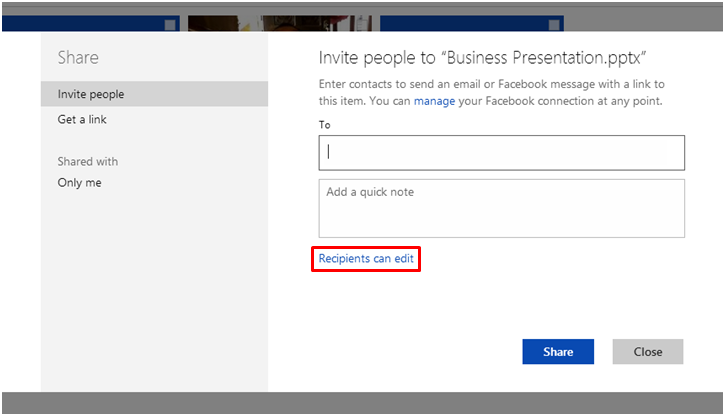
For instance, by clicking on the link that says “Recipients can edit”, you will be able to access two other drop-down options which will let you choose if the one who will receive the file can edit or just view the file and whether he/she would be required to sign in to a Microsoft account in order to view the file. Once you’re done preparing the file and inputting the name of the recipients, simply hit the “Share” button that is found at the bottom.

Embedding a File to Your Website or Blog
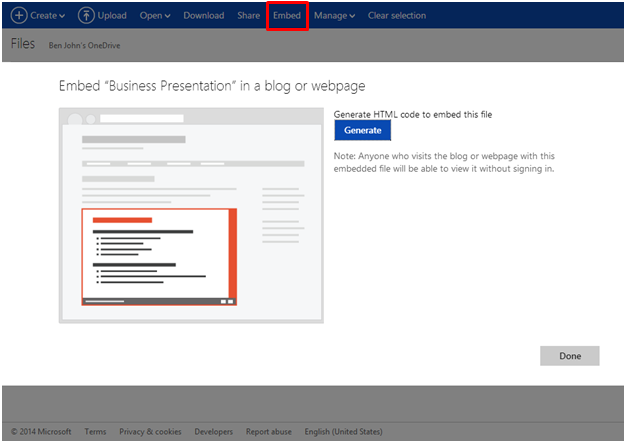
You might have a website or a blog to which you’d like to put the file into. If this is the case then you can easily generate HTML code for the file using the option that says “Embed” which is also found at the top portion of the OneDrive website. After clicking on this button, you will see a message as a screen overlay which explains what it is for and from here, just hit the “Generate” button so you can get the HTML code that you need in order to put a file or folder into one of your website or blog pages and share it with multiple people who are visiting your page all at once.
Managing a File or Folder on OneDrive
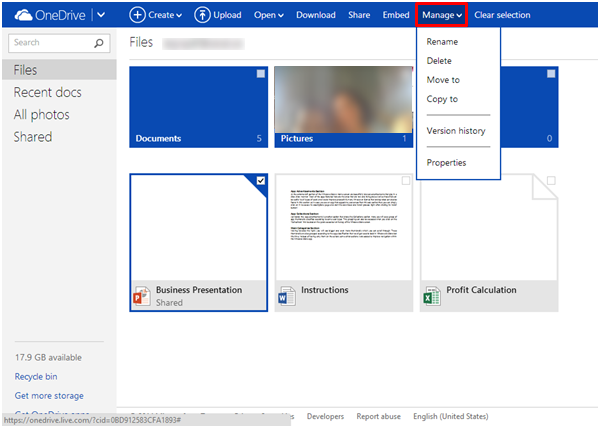
Lastly, you can also do even more things and execute more actions for a specific file or folder in your OneDrive account with the use of the “Manage” option. Try selecting a file or a folder and after doing so, just click on the “Manage” option found at the top and you will see all available options in a drop-down box which includes “Rename”, “Delete”, “Move to” and “Copy to”. There is also an option for viewing the file or folder’s “Version history” which will show the recent changes in the file and lastly, there’s the “Properties” section which contains all information about the stuff that you selected.
At the right part of OneDrive’s main page, you will also see other options such as “Sort by”, “Details or Thumbnail View” and letting the “Details pane” appear. Try playing with these options to tweak how things appear on the screen. As you can see, there really are even more options in the OneDrive website that feel like you are still on the desktop screen. Now that you know all of these things, you can start using this free cloud service from Microsoft so you can have all your important files in a safe place and access them from any of your Windows-based devices anytime.