How to Format Hard Drive, Memory Card or USB Stick in Windows 10
How do you clear certain storage devices using your Windows machine? Learning how to do this is crucial especially when a certain drive needs to be re-purposed in order to contain new set of files. Learning to format and delete everything that is contained in a drive is also important when it gets corrupted by a strong malware.
You might know how to do this in previous Windows editions but what about in Windows 10? Has the process changed in Microsoft’s latest operating system version? In this tutorial, we will be learning the steps in how you can format different storage devices in your Windows 10 machine so if you’ve been wanting to wipe-out the old stuff that are contained in one hard drive partition, memory card or USB stick then you’ll need to follow the steps that we’re going to show in this tutorial.
Learn How to Launch the File Explorer Window First
The very first thing that you need to be able to do if you want to format a hard drive partition, a memory card or a USB memory stick is to learn how to launch the File Explorer Window. File Explorer is also known as Windows Explorer in older Windows versions such as Windows XP, Vista and Windows 7 and its name changed in the modern versions of the operating system starting in Windows 8.
The method in accessing this feature also changed in Windows 8 and Windows 8.1 and we would say that it’s made quite harder to launch in these operating system versions but thankfully in Windows 10, Microsoft has provided different methods in accessing this very crucial feature. Here are the available methods in launching File Explorer in your Windows 10 machine.
Launching File Explorer Using a Keyboard Shortcut Combination
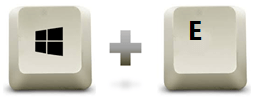
You can easily open File Explorer in Windows 10 simply by pressing a keyboard shortcut combination. This is very useful especially if the quick launch icon for this tool that is found on the Taskbar by default has already been removed or unpinned. To be able to launch File Explorer quickly using key presses, all you need to do is simultaneously press the Windows + E keys and it should open instantly on your computer screen.
Accessing File Explorer from the Taskbar
For newer Windows 10 machines especially those that have just been taken out of the box and no customizations and personalizations have been done on it yet, you should be able to launch File Explorer quickly in it by clicking on its quick launch icon that is pinned on the Taskbar by default as you can see being highlighted on the screenshot below.

After clicking on the icon, the File Explorer Window should open instantly and it would be ready to help you look for the drive that you want to format.
Launching File Explorer from the Start Menu
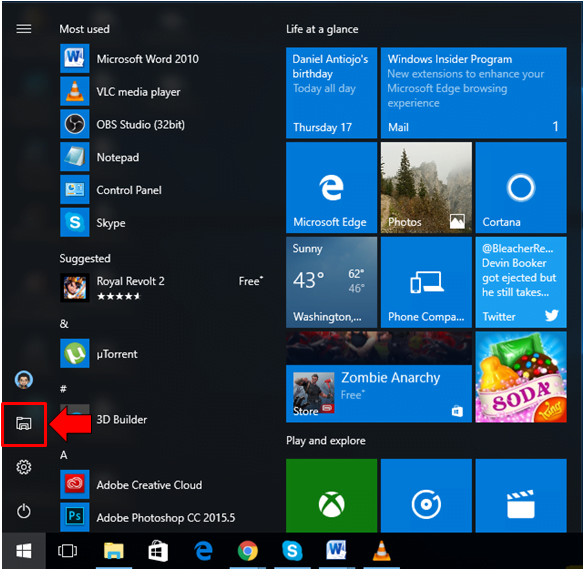
This is the longest method that we can show and is also the last one. Yes! There’s a third method in launching the File Explorer tool in your Windows 10 machine and it is done simply by clicking on the Start Button first or pressing the Windows key in order to open the Start Menu. Once the Start Menu launches, all you need to do is click on the File Explorer icon that is found sitting on a narrow vertical bar at the left hand portion as shown below and voila! The File Explorer Windows should open right away!
Now that you already know the different methods in launching the File Explorer tool in your Windows 10 machine, let us go to the steps that are involved in formatting different storage devices which you can view from the File Explorer Window. Let’s start with the built-in storage device hardware on your Windows 10 machine– the hard disk drive.
How to Format Hard Drive Partitions in Windows 10
Being able to format a hard drive partition on your Windows 10 computer is important especially when the worst thing of virus and malware infection and intrusion happens. To be able to format a specific hard drive partition, you will first need to make sure that you have backed up any important file that is stored in it to a separate storage device preferably one that is separate from the existing hard disk inside your computer if you are trying to clean the drive partition from viruses and other malware that has made their way to it and has infected its contents.
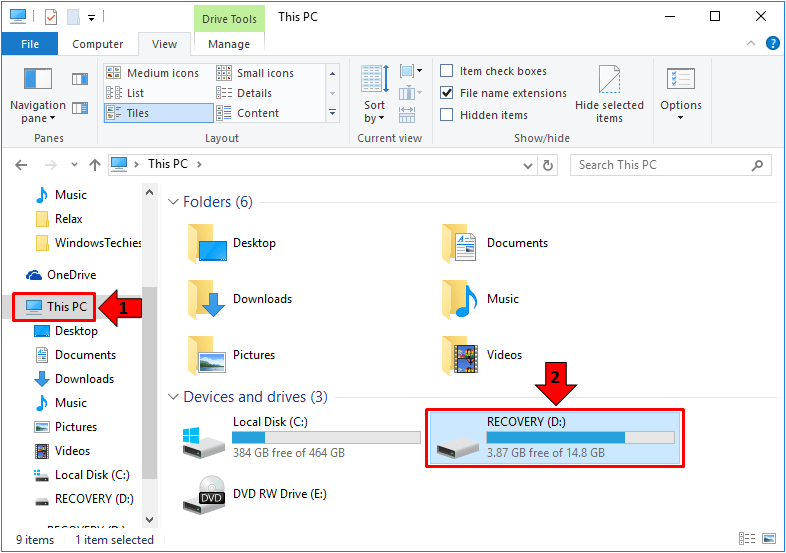
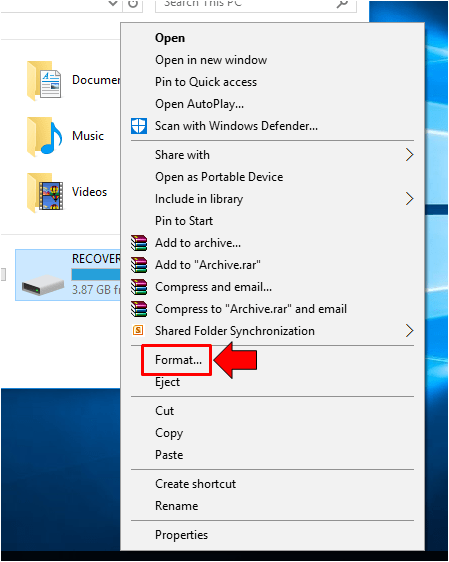
Once you are done backing up the important contents of the hard disk drive partition, you an now proceed to the formatting process which will wipe out all of its contents clean. To do this, just click on the “This PC” link that is found on the navigation pane at the left of the File Explorer Window as shown below then on the contents pane that will display on the wide space at the right-hand portion, just right-click on the hard disk partition that you want to format.

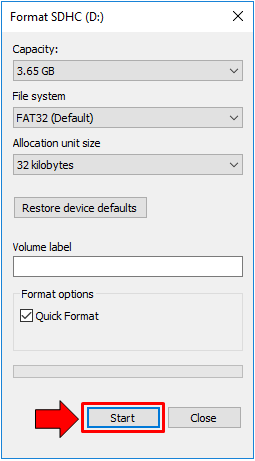
After right clicking the hard drive partition that you want to format, a right-click menu also known as a contextual menu will open and from here, simply click on the option that says “Format…” in order to initiate the process as you can see being highlighted on the screenshot above. A small Window will then open after you do this which is labeled “Format (Drive Name and Letter)” as you can see below. In this Window, you don’t really need to do anything unless you want to revert the device it its default settings in which case, you an click on the “Restore device defaults” button.
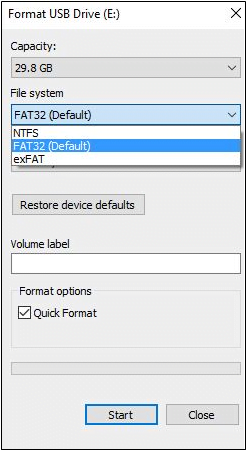
You can also choose to do a “Quick Format” on the hard disk partition that you want to wipe clean from its old possible virus infected contents. You can do this by clicking on the “Quick Format” option which is found under the “Format options” section. Doing a quick format is recommended if you are in a hurry or you still want to access the contents of the drive even after the format process using a file recovery software. However, if you’ve been having corrupted files in the drive before the format process, it is recommended that you do uncheck this option and do a complete format to fix any problem. The process just takes longer than Quick Format but it is the best option to choose if the drive is to be fixed.
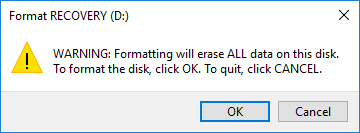
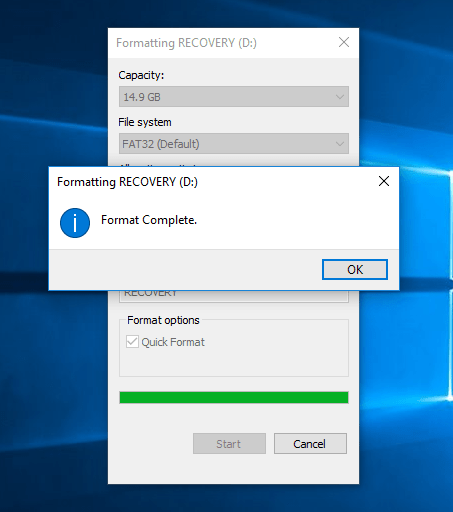
Once you are ready, you can simply click on the button that is found at the bottom-right portion of the screen which says “Start” and after doing so, a prompt will appear telling you that formatting the drive will wipe out all of the files and other stuff that are saved in it. Just click “OK” in this prompt and the process will start right away. Just wait until the tool tells you that the process has already been completed. A prompt telling you that the process has been successful will appear on your screen once the process is done.
How to Format a Memory Card in Windows 10
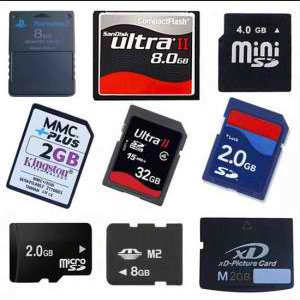
Another storage device that you can actually format using the File Explorer tool that is built within your Windows 10 machine are memory cards. These storage devices are the ones that are used in cameras, smartphones, tablets and other mobile devices that we have at present.
In order to format this kind of storage device in your Windows 10 machine, you will first need to insert it into the Memory Card slot that is found on your computer. The location of this slot depends on the brand of computer that you are using but it should look like the one shown below.
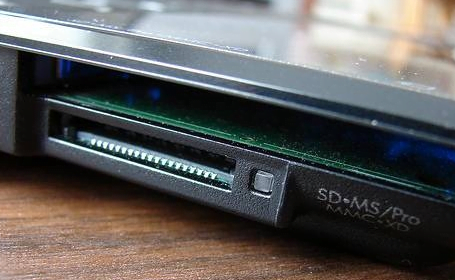
As you can see, it is labeled accordingly with “SD, MMC, XD” and other memory card types that it supports. In other computers, you will only see one label which is “SD” or a memory card icon beside the slot. Just insert your memory card into this slot and most of the time, you will need a card adapter for a small memory card on your phone to fit into this slot. Most memory cards for smartphones and tablets are sold with an adapter included in the package. Just insert your tiny memory card into the adapter then insert the adapter into the memory card slot on your computer then wait until Windows 10 is done detecting the storage device and installing its drive.
Once done, you can now proceed on to the File Explore Window, click on the “This PC” link that is found on the navigation pane at the left then look for the memory card under the “Devices and drives” section as you can see on the screenshot below.
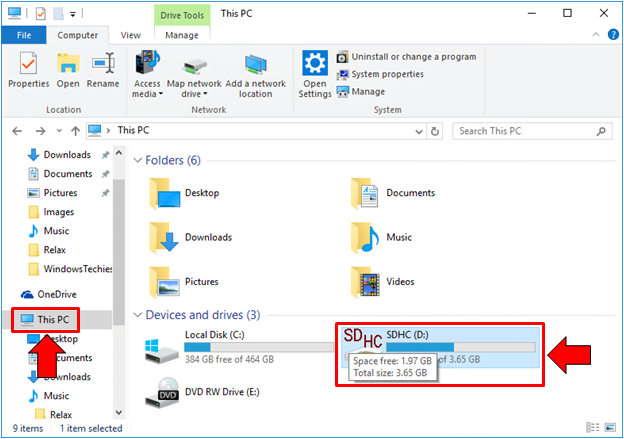
After finding the memory card icon under the “Devices and drives” section, all you need to do is right-click on it in order to open a right-click menu which shows the options and actions that you can do to the memory card. When this menu appears, all that you need to do is look for the option that says “Format…” as shown on the screenshot below.

A small Window will then appear which is labeled “Format (Drive Name and Letter)” as you can see below and it looks exactly like the small Format Window that we’ve shown in the previous step where we’ve shown how to format a hard drive partition. On this Window, you can choose to restore the device to its defaults or you may even assign a new drive label to it. Just do these tweaks if you wish to and you can also check or uncheck the “Quick Format” option.
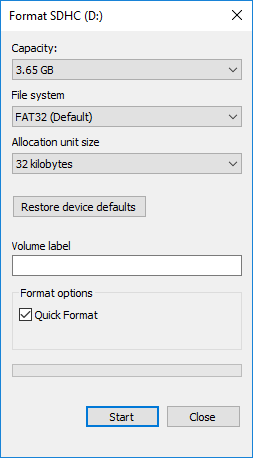
If you are going to insert the memory card back to your smartphone or tablet then we would recommend that you don’t change any setting from this “Format” Window and just click directly on the “Start” button that is located on its bottom-right portion in order to initiate the process. Again, a prompt will appear which informs you that formatting the memory card will wipe-out everything that is stored in it so in case you haven’t saved a backup of the important stuff that are stored in it then you better cancel the format process first and do the backing up.
Doing a quick format does not take too long so and after your memory card is successfully formatted, you should be able to see a prompt that tells you about the success of the process.
How to Format a USB Memory Stick in Windows 10
Finally, we now come to the last type of storage device that you can format in Windows 10 and it is also one of the most popular device that most of us carry in our pockets. These are called USB memory sticks or flashdrives. The name itself gives a clue on how it is done. Yes! It is simply attached to any of your computer’s USB ports and Windows 10 will be able to read it instantly so go ahead and connect the USB flashdrive that you want to format into one of your computer’s USB ports.
Once it gets connected, Windows 10 should automatically detect it and if it is the first time that it gets connected to your machine, drivers will also be installed. Once Windows detects the USB drive and it is done installing drivers, you can then proceed to the “This PC” section of the File Explorer Window and from here, just look for the USB flashdrive under the “Devices and drives section” as you can see below.
After finding the USB drive, just right-click on it in order to display the right-click menu once again just like what we’ve shown in the previous items above and from this right-click menu, simply hit the option that says “Format…”.
The format wizard tool will then open and it should look exactly like the ones that we’ve already shown in the previous items above. From here, you can again choose to change the drive format or restore the device to its defaults. There is also an input box for changing the drive label or the name of the drive itself. Just do any tweak that you want to do to the USB drive and once you are done, you’ll need to choose whether you will do a “Quick Format” which takes a shorter time to complete or you can uncheck the option and format the drive completely which would take longer to complete. Once you are done doing these changes, just hit the “Start” button that is located at the bottom-right portion of the Format tool as shown below.
Then, a prompt that warns you about the consequence of formatting the selected drive will appear. This is the reason why you need to backup any important file that is saved in the USB flashdrive because formatting it will wipe-out everything. Once you’re sure that everything is backed up, just click on the “OK” button that is found at the bottom portion of the prompt and the format process will instantly start.
Once the format process is done, you should be able to see another prompt that will appear on your computer screen and it should look exactly like the one that is shown on the screenshot below. When this prompt appears, it means that the format process has been successful and your USB storage device is now clean from all of the old files that were once saved in it. Just click on the “OK” button on this prompt in order to close the Format tool.
NOTE:
Aside from USB flashdrives, you can also format external hard drives that are attached to your Windows machine using a USB cable. The steps in doing the format process is just the same as shown above so you all you need to do is to follow them to be able to completely wipe out the contents of your external hard drive.
Easily Format Storage Devices in Windows 10 with File Explorer
As you can see, the methods in formatting different storage devices in Windows 10 has not really changed when compared to the steps involved in formatting the same devices in older Windows editions. The only thing that has changed is the name of the file management tool which in old Windows operating system versions used to be called Windows Explorer but in Windows 10, it is now called File Explorer.
The ways in accessing File Explorer in Windows 10 has also changed as we’ve shown in the first part of this tutorial. Have you ever tried formatting a storage device using your new Windows machine? What’s the reason why you did it? Did you have any problem along the way? We’re here to help and if you do have some concerns about your Windows 10 computer, please feel free to describe them using the comments section below.