Getting Familiar with the Share Options in File Explorer’s Ribbon
The ribbon-based options does not only offer some quick buttons for doing the basic tasks in your Windows 8.1 machine such as copying, pasting or renaming files and folders but it also gives users some other easy to access tweaks that involves the ones for sharing a content that you have selected. We’ve already completed all the options available under the “Home” tab so its time for us to move to the next one located to the right of it which is labeled “Sharing”.
But before you can access this options group on File Explorer’s ribbon, you will first need to learn some methods in accessing the File Explorer Window. Though the Start Button has been taken back in the new Windows 8.1 operating system, you might still feel confused because what it opens is a different screen instead of taking you to the Start Menu as what happens back in other previous Windows versions. If you already used Windows 8.1 before then this might be easy to you but for the benefit of those who are not yet familiar with Microsoft’s latest operating system version, I’ll be showing some methods to follow in accessing this important built-in file management tool in every Windows 8.1 machine.
Easy Ways in Accessing File Explorer
Just like all the other Windows 8.1 tools and features, File Explorer can be accessed in many different ways and it all depends on you in which one would you like to use as a method in getting into this very important tool on your Windows 8.1 computer. First, you can easily access File Explorer using the built-in search feature that is perfectly integrated with the operating system. To start, you will need to press the Windows+S keys in order to get the Search screen appear from the right edge of your computer’s monitor and when it you see it, all you need to do is enter the words “File Explorer” into the search input box that is located on its top portion as shown on the screenshot below.

After the search keywords are entered, you should be able to see the File Explorer shortcut from the search results that will start to appear just at the bottom portion of the search input box as shown on the screenshot above. From here, all you need to do is click on the File Explorer shortcut itself and the File Explorer Window should open right away.
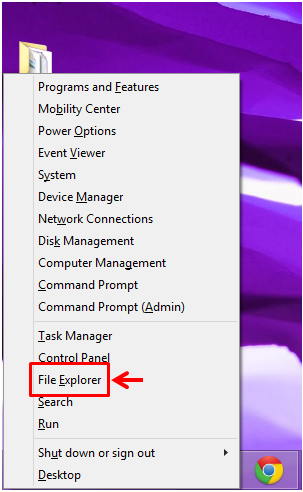
Another method in accessing Windows 8.1’s file management system called File Explorer is through a hidden menu which you can summon with the use of a keyboard shortcut just like the first method shown above. To do this, just press the Windows+X keys and after doing so, you should be able to see a white box which contains a menu in the from of links that will open different tools or take you to some important system locations like the Control Panel and others. From this menu, just look for the link that says “File Explorer” and once you find it, you will need to click or tap on it so you can open the File Explorer Window.
Getting to the Share Options in File Explorer’s Main Window
Now that you’ve learned some ways in accessing the main Window of the File Explorer tool, it is time to learn how you can get to all the options that has to do with sharing the file or folder which you have selected but first, you will need to click on one of the libraries that already has some contents from the navigation pane at the left. You can choose to click on “Documents” or “Pictures” as well as any other folder from the navigation pane.

After selecting your desired folder, just put your attention towards the top portion of the Window where you can find the tabs that contain all the ribbon-based options in the new File Explorer. From these tabs, just click on the one that says “Share” and the ribbon will show all the options which are under it as shown on the screenshot below.

Now, when the options under the “Share” tab opens, you will see two major groups which are labeled “Send” and “Share with”. We will now be checking and learning what each options under these groups in the Share tab are for so you can start using each one of them in doing your tasks while using the File Explorer tool in your Windows 8.1 machine.
The Send Options Group
First, you will see the options under the group that is labeled “Send”. The first one that appears on this section says “Email” and to its right is another one that says “Zip”. You might wonder why they are the only options which are relatively bigger compared to the other ones and this is because they are the ones which we often use and both are also related. For instance, there would be times that you want to send files as an email but when you put them altogether, the size might be bigger than what most email service providers allow, in this case, all you need to do is compress the files using the “Zip” option and your problem will be solved. Just select the files or folders to be sent as emailattachment, hit the “Zip” option and you’re ready to go!

Burning, Printing and Sending as Fax Made Easier!
The other options under the “Send” group are the ones which are labeled “Burn to disc”, “Print” and “Fax”. These options surely sounds familiar to everyone especially if you’re a long time Windows user but for the benefit of the novice ones, I’ll describe the uses of each one of them.
First, the “Burn to disc” option allows you to copy files like music or even documents and folders into a Compact Disk (CD). This does not support other complicated file formats though but the option would surely serve the purpose especially if you want to quickly burn some items into a disc without the help of any third-party software.

Next, if you want to quickly print a file, you can simply click on the “Print” option but before doing so, be sure to connect the printer to a power source and have its data cable in the right place on your computer so that the process will go through. You also need to make sure that you’ve already installed the printer’s software to your computer so it will work.
Finally, you will also find another option that says “Fax” which works just the same as the “Print” option. Just make sure that the device driver has been installed on your computer and check that the device is connected to your machine properly. After checking on all of these things, simply select the file and hit the “Fax” option to finally have the file sent through fax.
The Share With Options Group
The last group of options that you will find under the “Share” tab are the ones that are labeled “Share with”. From these options, you will be able to have any file or folder shared to other users on your HomeGroup (if you’ve set up one) and even choose if they can only view it or view as well as edit. If you click on the arrow down icon, you will see even more items representing the users to whom you can share the file or folder with.

There’s also a handy “Stop sharing” button to its right so you can quickly disable a file or folder from being shared. For even more security settings, you can also click on the “Advance security” option so you can access even more options that will help you protect the files which you enabled for sharing.