Getting Your Hands on the AutoPlay Feature of Windows 7
Windows has been around for a long time but only a few knows all the utilities that it has and what each of these tools are used for. One very familiar feature that the Windows Operating System has is the “AutoPlay” tool which gives you freedom to choose which media player to use when playing movies, burning files to a disk (CD or DVD) and many other media related tasks. The AutoPlay feature is the pop-up Window that you see whenever a disk is inserted to your computer’s DVD-ROM drive or whenever a flashdrive is plugged-in to one of your computer’s USB port. This would always happen if the feature is enabled on your machine. You can also take advantage of this feature if you want to use another program or application in handling your pictures and videos instead of letting the default programs like “Windows Media Player” or “Windows Photo Viewer” to take care of it.
However, as I’ll explain later, having this feature enabled may also become an open door for a virus called “autorun.inf” to spread to your computer’s file system. It is therefore essential to learn how to safely tweak the Autoplay feature so you can enjoy all the things that it offers while still being protected from viruses that can infect your files anytime.
Accessing AutoPlay on Windows 7
The AutoPlay feature on Windows can be accessed in many ways but here are two of the most preferred ways of getting into this feature on Windows 7:
1. Getting to it from the Control Panel
This way of getting into the AutoPlay settings Window is probably the most used one especially by novice and average users. To do this, just follow the steps described below:
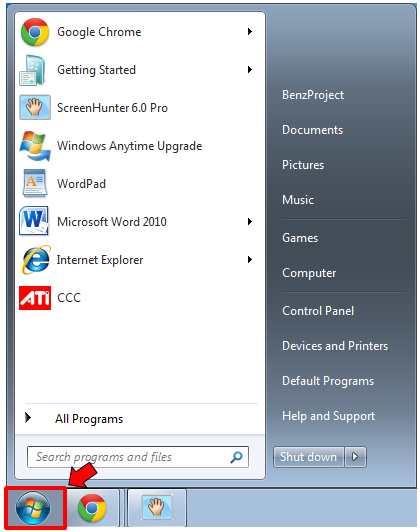
- Just click on the “Start” button on the bottom-left corner of the screen or press on the “Windows Key” on your keyboard to open the “Start Menu”.
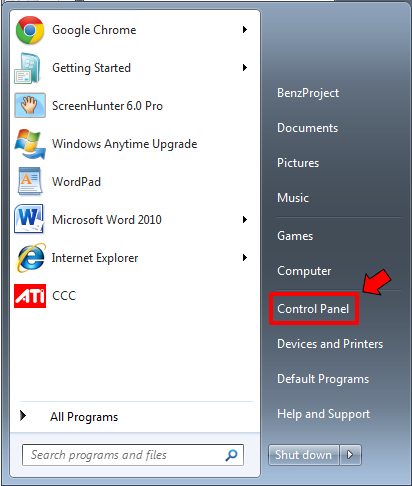
- On the “Start Menu”, click on the “Control Panel” link found on the right-side of it to open the main “Control Panel” Window.
- The Window that follows will show you all the items available on the “Control Panel” section. From here, just click on the link that says “Hardware and Sound”.

- On the “Hardware and Sound” Window, look for the “AutoPlay” link and click on it to open the AutoPlay settings Window.

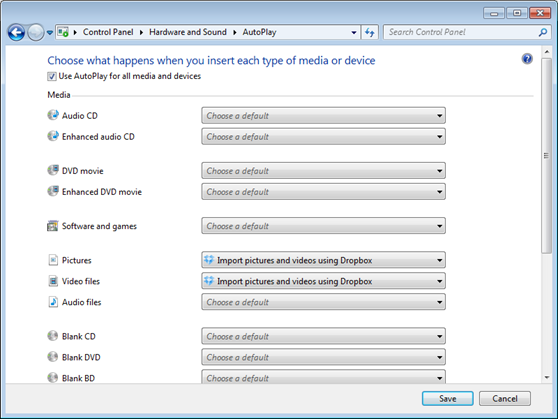
- The screenshot below shows the “AutoPlay” settings Window where you can make adjustments to how your computer handles all your media files.
2. Searching for AutoPlay Using the Start Menu Search Box
Another way of accessing the AutoPlay settings Window is by searching “autoplay” using the Start Menu search box. Here’s how to do it:
- Open the Start Menu by clicking on the “Start” button or by simply pressing the “Windows Key” on your machine’s keyboard then type the word “autoplay” on the search box located at the bottom and after doing so, you’ll see all the search results on top of the box.
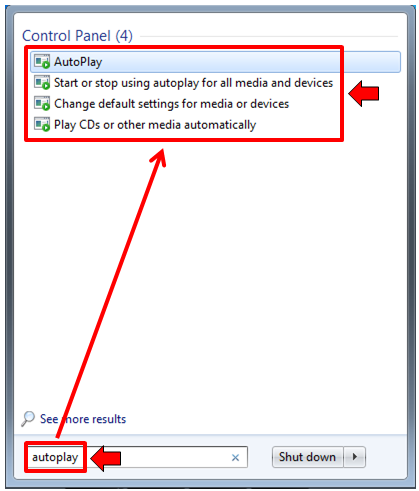
- All the links under the “Control Panel” search results category (AutoPlay, Start or stop using autoplay for all media and devices, Change default settings for media and devices, Play CDs or other media automatically) will lead you to the AutoPlay settings Window so you can just click on any of it to open the AutoPlay settings section on your computer.
How AutoPlay Works
If you take time to observe the AutoPlay settings, you’ll observe that there are boxes assigned to different devices and media with a drop-down arrow located at its extreme-right side. Clicking on this arrow will reveal more options which includes different programs and applications available for use in handling media and devices that are inserted or plugged-in to your computer.
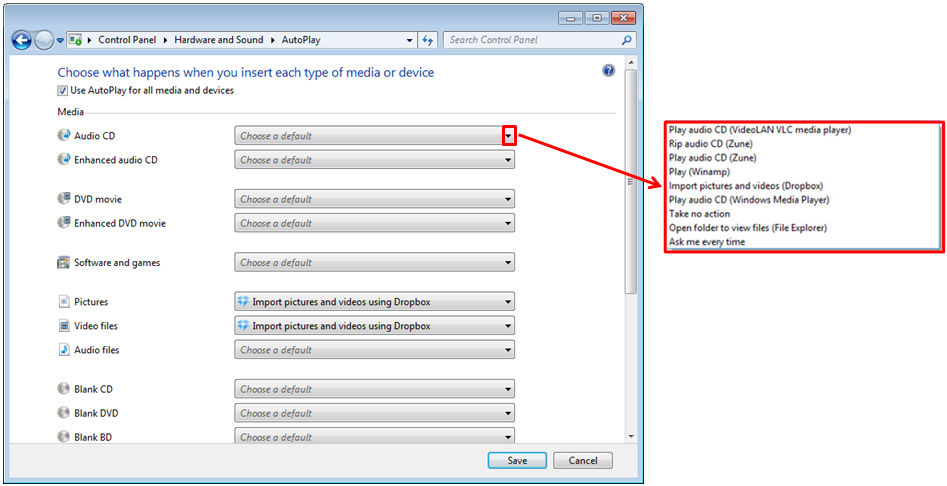
As you can see on the screenshot above, you’ll notice tasks such as “Play”, “Rip”, “Import” and others when the drop-down arrow is clicked. There will also be different programs which are indicated to do these tasks and on the screenshot, you see VLC, Zune and Dropbox. Take note that these programs will not be the same as the ones that will appear when you get into this section on your computer. The list of programs will depend on what you have installed on your machine. To set a program which you want to do handle playing, ripping or opening different media, you just need to simply choose the program from the drop-down list and click on the “Save” at the bottom of the Window. After doing this, you will be able to use the specified program whenever you insert the media or device for which it is assigned to. For instance, if you assigned VLC to play any Audio CD, you will be able to observe that VLC will handle all Audio CDs that you would insert on your computers DVD/CD Drive.
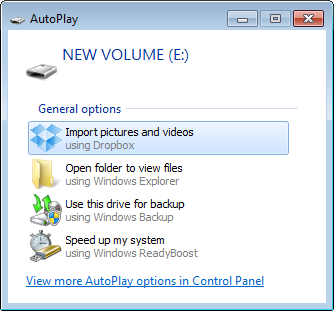
You can also leave every box as they are and just choose the program which you want to handle the task that you want to do to a media or device by simply checking the “Use AutoPlay for all media and devices” option which is located at the top portion of the AutoPlay settings Window as shown by the screenshot below.

After checking this option, you will be able to see the AutoPlay pop-up Window whenever you insert a disk or plug-in a flashdrive on one of your computer’s USB port. The AutoPlay Window will tell you to choose the program which you want to use in handling every media or device that you insert or connect on your machine and it looks like the screenshot below.
What Happens When You Choose “Ask me every time”
At the bottom of the list of options that appears when you click on the drop-down arrow, you’ll see the “Ask me every time” option. When you click on it and set it for a specific media or device, you’ll see that the Window will also appear but there is a bit of difference. Observe the screenshot below and compare it to the AutoPlay Window above.
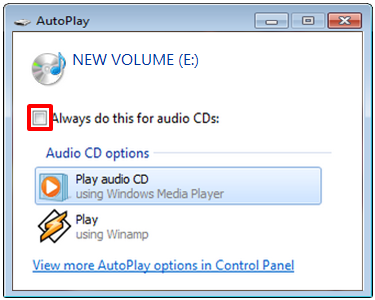
Yes! The AutoPlay Window now has a checkbox which says “Always do this for audio CDs” as shown on the screenshot above and it will allow you to choose a program that you want to handle the task of playing a media every time you insert one. You’ll also notice a link that says “View more AutoPlay options in Control Panel” and clicking on it will take you to the AutoPlay settings Window as I have shown on one of the screenshots above.
Be Careful With Viruses
As I have mentioned earlier, leaving the AutoPlay feature turned on or enabled on your machine may open a wider door to a virus called “autorun.inf” to easily infect your machine’s file system in a snap. This virus commonly spreads through removable storage devices like thumbdrives and other USB enabled storage devices that summons the AutoPlay Window once connected to a computer. The virus masks itself as a component of the device that is needed by Windows to properly read commands stored in it. If Autoplay is enabled, this virus would just easily find its way to your computer if you are not armed with a good virus protection suite which is why I strongly recommend that you don’t leave the AutoPlay feature enabled if you are not confident that you’ve got good security suite to protect you from this tiny yet destructive devil that can infect crucial files and as well as other storage devices that would be inserted or plugged-in to your computer at any future time.
As you can see, the AutoPlay feature can be a very useful tool in helping you manage your storage devices and other files stored on your computer but you need to be careful enough not to leave any breach on your machine that can lead to major problems such as getting infected by the “autorun.inf” virus. If you have questions regarding the topic discussed on this tutorial please feel free to post them as comments on the area provided below.