How to Add Remote Connections and Tweak Settings in Remote Desktop App
We have talked about Microsoft’s Remote Desktop universal app version and discussed how it is set up in order to establish connection between two computers running on a Windows OS that supports remote connections but what we have shown in our previous tutorial isn’t everything yet. Yes! There still are some other things that you need to learn about this app which would truly help you improve productivity many times over. Settings to the Remote Desktop app can also be tweaked so it can work better for the purpose that you want to use it for.
But before anything else, let’s have a brief review on how this app is accessed and installed into Windows 8.1 or Windows 10. Remember that these operating system supports Remote Desktop connections but before you can connect, you will first need to enable Remote Desktop connection in the host computer and take not of the username as well as the password of the computer that you want to connect to. The IP address of the host computer would also be needed in order to ensure that the connection will be established.
To learn how to enable remote desktop connections on a host computer (the computer that you are going to connect to and access using remote desktop), you can read the details on how it is done in this previous tutorial. If you already have installed the remote desktop universal app to your Windows 8.1 or Windows 10 computer and you want a guide on how to set it up, you can find a detailed guide in this tutorial. In case you are using a computer that runs in Ubuntu OS platform, you can also use it in setting up and establishing remote desktop connection to a Windows computer using third party software and you can read our tutorial on how it is done so you can go through the process smoothly.
Now that you know how to download, install and establish Remote Desktop connections in different scenarios, let us get directly to the real meat of this tutorial which is learning how to add other connection sessions from the universal app version of the Remote Desktop tool.
Open the Remote Desktop Universal App
So let’s assume that you have already installed the Remote Desktop Universal app into your Windows 10 computer and you have already set it up for one remote desktop connection. What it would look like is shown on the screenshot below.

As you can see, there is only one remote desktop session that has been set up in the client computer where the Remote Desktop universal app is installed as highlighted on the screenshot above but that doesn’t mean that you can only have one remote connection set up on the computer itself. You can actually add even more if you need to and that’s what we’re going to learn now!
Adding New Connection Sessions to the Remote Desktop Universal App
Now that you have already launched the universal app version of the Remote Desktop tool, it is time to learn how you can add more remote connection sessions to it. Again, this is no different than establishing a remote session for the first time but for the benefit of those who don’t like to be jumping from one tutorial to the other, we will be showing the detailed steps here. Just follow the instructions that are going to be given below.
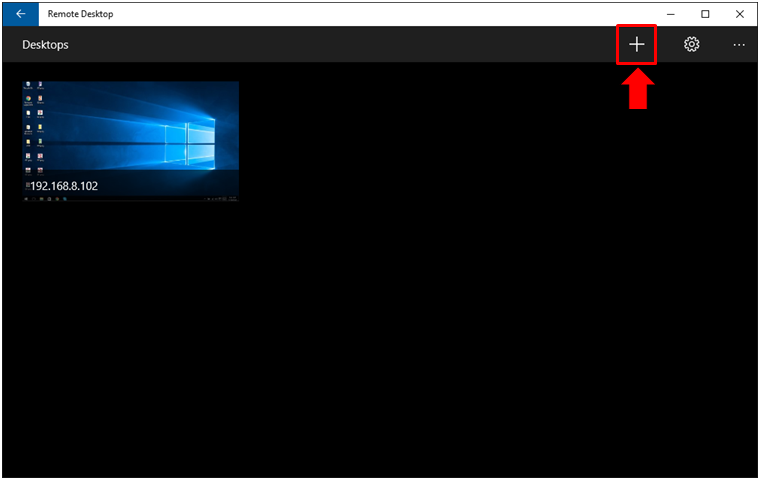
On the home screen of the Remote Desktop universal app, just click on the “+” icon that is found on the top-right portion as highlighted on the screenshot below.
After hitting the icon, you will see a box that will appear on the right portion of the screen which contains options in it. From these options, you will need to click on the one that says “Desktop Connect to a PC” as shown on the screenshot below.

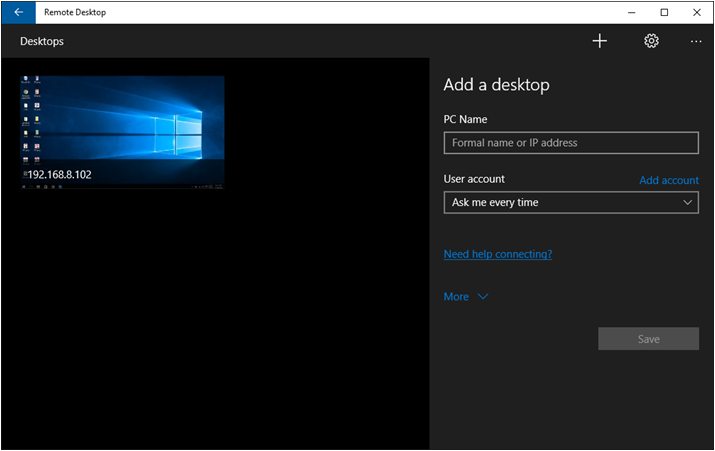
After clicking on the said option, you will be able to open the “Add a desktop” section and from here, you’ll see input boxes for the PC Name or IP address and as well as the User account and these information should come from the host machine or the computer that you want to remotely connect to. After entering the IP address (if you are going to connect via the Internet) or the PC Name (if the host computer is connected to the same network as your client computer), it is time to add the user account on the host computer to which remote connections is enabled for. To do this, you will simply need to click on the “Add account” link.
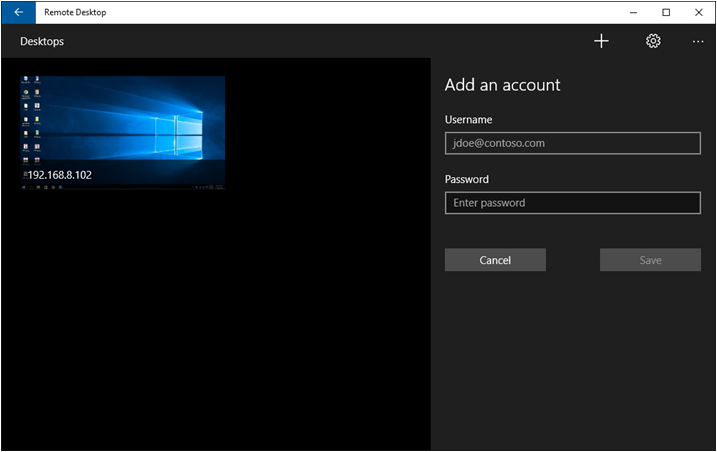
Another new box will appear where you will now be able to enter the username/email and the password for the account on the host computer to which remote connections is enabled for. Email is allowed in the Username box because Windows 8.1 and Windows 10 computers allow user accounts to made through Microsoft email account/email address so if the account on the host computer has Microsoft email as username and its password as the password in order to enter the system then input these information into their designated boxes.
After entering these information, just hit the “Save” button found at the bottom and you will be taken back to the previous screen where you entered the IP address or PC name depending on the connection scenario that you are currently in (connecting to the host computer through the Internet or via a common network where your computer called the client machine is connected to the same network where the host computer is connected).
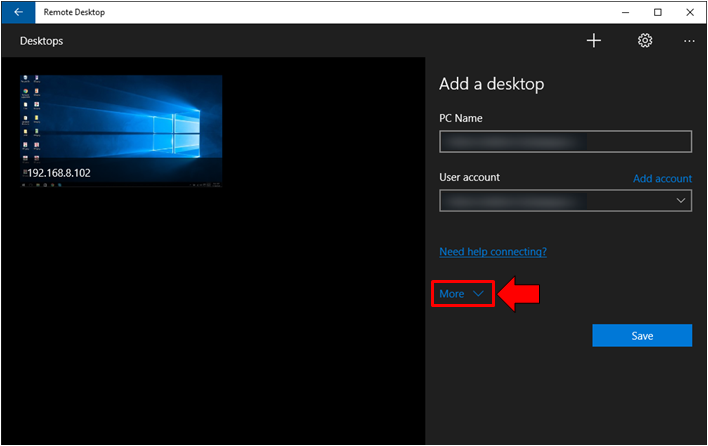
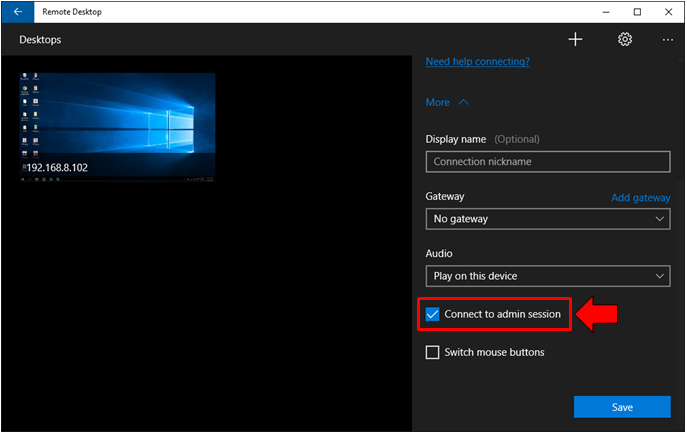
From this section, just hit on the link that says “More” and after doing so, a set of even more options for the Remote Connection that you are setting up will appear. From here, just slide down towards the bottom and click on the checkbox beside the option that says “Connect to admin session”.
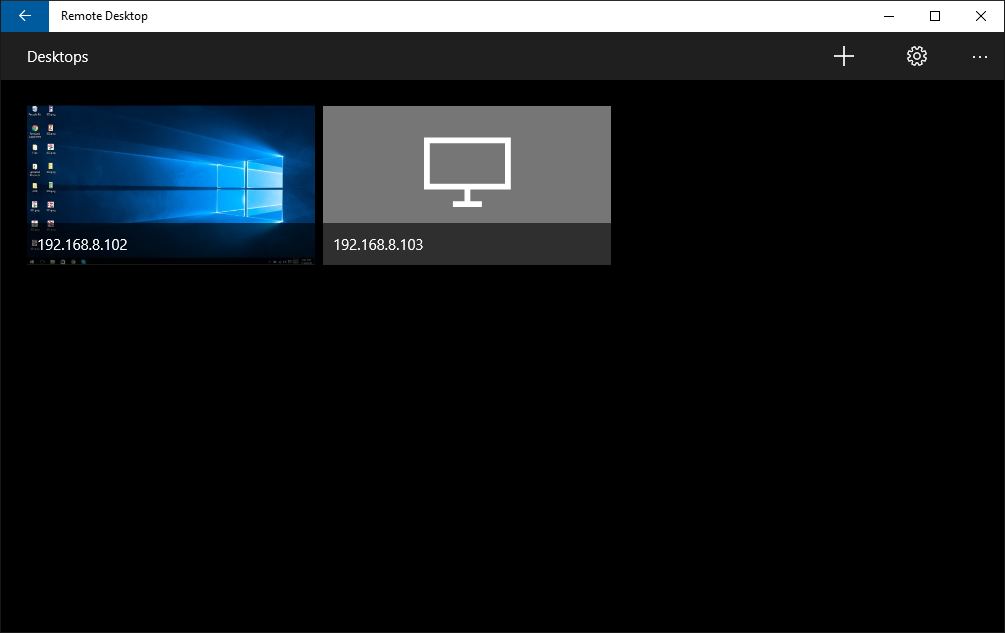
After doing so, just hit the “Save” button and voila! You now have a new Remote Desktop Session that appears on the Home screen of the Remote Desktop universal app as you can see on the screenshot below.
How to Establish Remote Desktop Connection
Now that you have already configured a new remote session using the Remote Desktop universal app, it is time to learn how you can establish a connection. Doing this is really simple. Just click on the Remote Desktop session that you want to initiate and wait for the connection to load as shown on the screenshot below.

Once the connection to the host computer is loaded, you should now be able to see its Desktop screen and fully access all folders in it.
Setting the Remote Desktop Session to Full Screen
Now that you already established the remote connection with the host computer, it is time to learn what tweaks you can do while on the screen. If the remote desktop screen opens in “Restored down” Window, you can make it full screen simply by clicking on the “…” found on the top-center portion of the screen and after doing so, a semi transparent vertical bar will slide in from the right edge where you will simply need the button that is labeled “Full-screen” as highlighted below.
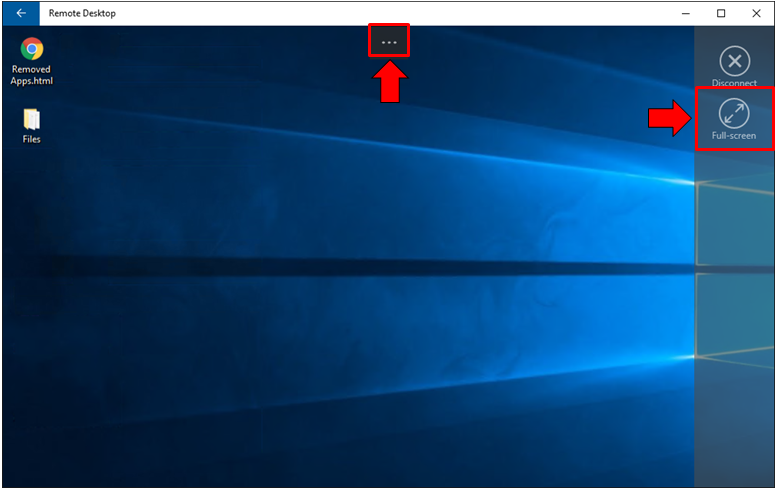
After you do so, the whole Remote Desktop app screen will switch to Full-screen format and it would really feel like the computer you are using is not located in another place. Everything works from the keyboard to the mouse and you can control the host computer in ways that you want. You will only realize that you are actually in a remote desktop session if you pay close attention to the quality of the resolution since it is quite lower than the normal and actual computer screen of your client computer.
How to Disconnect from a Remote Desktop Session
What about disconnecting from a Remote Desktop connection? Doing this is made very simple as well especially when you are using the universal app version of the Remote Desktop tool. To terminate a certain remote desktop session, all you need to do is to click on the “…” button that is found on the top-center portion of the Remote Desktop app screen once again as you did when you switched to Full-screen earlier then on the bar that slides in from the right edge, simply click on the button that is labeled “Disconnect” as shown on the screenshot below.
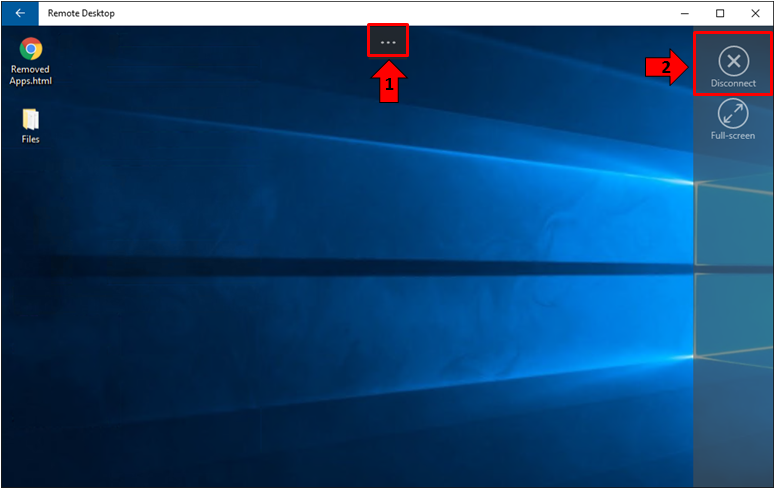
After clicking on the button, you will be taken back to the Home screen of the Remote Desktop universal app and again, you will be able to see the list of remote desktop sessions that you have set up on your computer.
Accessing Settings for the Remote Desktop Universal App
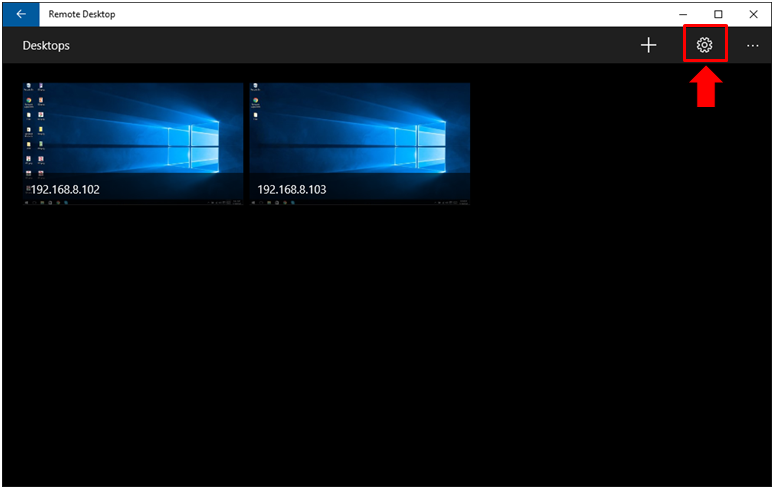
You can also change settings for the Remote Desktop universal app by accessing its Settings section and doing this is pretty simple as well. Microsoft has indeed made things a lot easier by creating modern app counterparts of the traditional tools that are in the Windows operating system and the Remote Desktop feature is one of those that have this modern app equivalent. To access the Settings for the Remote Desktop app, all you need to do is go to its Home screen and click on the Settings button that is located on the top-right portion as highlighted on the screenshot below.
After clicking on the Settings button, you will see the Settings section open and you will notice that there is not much of things to tweak in it as you can see on the screenshot below.
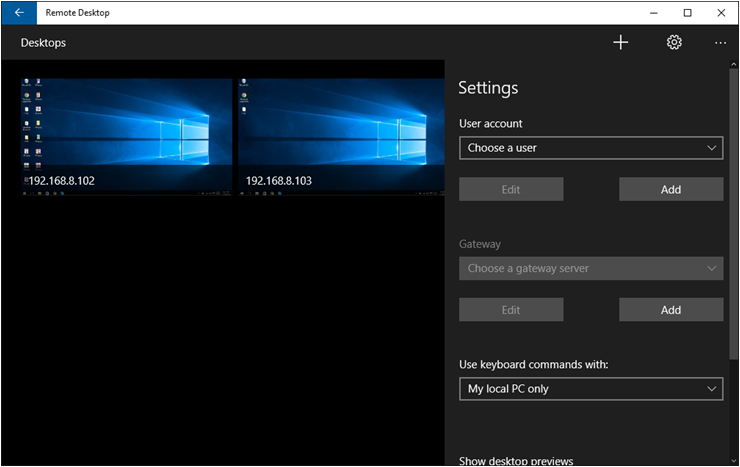
From this settings section, you can choose to add a User account or Edit an existing one and also add a new Gateway or edit an existing one. You can also choose to tweak how keyboard is used during a session or when a session is open in the Remote Desktop universal app simply by clicking on the box that is located under the “Use keyboard commends with:” setting. After clicking on it, you will be able to see three options. These options and their uses are as follows:
- My local PC only- Enables you to use your keyboard only for your client computer even when a remote desktop session is open.
- My remote session when it’s in fullscreen- Allows you to use full keyboard functionalities and commands when the remote desktop session is in fullscreen mode.
- My remote session when it’s in use- Allows keyboard usage with all commands and functionalities when the remote desktop session is active in a Window or in use on the client computer.
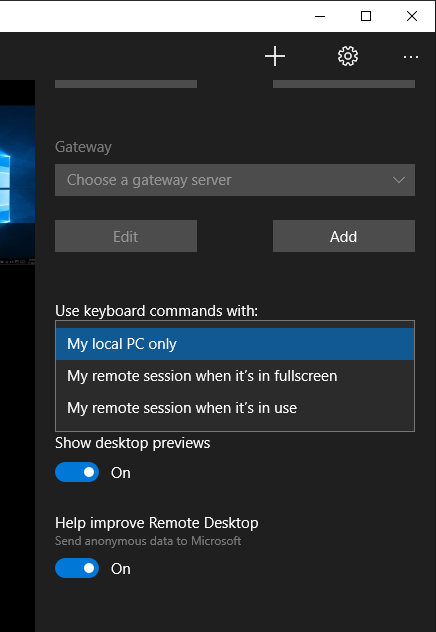
From here, you can freely choose the option that best fits your needs then the next settings are labeled “Show desktop previews” and “Help improve Remote Desktop”. These options are enabled by default but you can choose to turn them off simply by clicking on the switch located below them as you can see in the previous screenshot.
What Else Can You Do With the Remote Desktop Universal App?
Aside from making it fullscreen, you can also choose to restore it back down so it does not occupy the whole of screen or you can as well minimize it in case you need to do something in your computer then get back to it by clicking on its minimized icon from the Taskbar when you already need to be back to the host computer. These are done in the same way as normal program Windows so you should already know the steps in doing them. The Remote Desktop feature is truly something that would help you become a lot more productive with work and any other mundane task that you do in the office or even at home. Just be sure to set it up the right way in both your host and client computers and you’ll surely be able to enjoy the great benefits that it can bring.
Have you ever used the Remote Desktop tool in your Windows computer? We’d like to know about your experience. Tell us how it helped you and share the story to your fellow readers who would as well like to try it. You can also subscribe for our newsletter to get all the latest and the hottest updates, news and tutorials on your favorite operating system. We hope that you’ll join us again in our next tutorial only here at WindowsTechies.com!