How To Change Your Computer’s Boot Order
Can you count the number of times that you started your PC? What happens when you do it? Most of the time and putting it in very simple terms, after the power button is pressed, electricity starts flowing to your machine’s motherboard and the cooling fan starts up. After that, your hard disk will initialize and reading of your machine’s boot section follows. Next, your computer’s operating system loads up from the hard drive but what if you don’t want that to happen.
What if you want to boot from a separate device like an optical drive, an external hard drive, a network drive or a USB stick? Do you know what to do? It may sound very complicated but the truth is it’s as simple as pressing the power button whenever you turn on your computer.
If you want to boot from a different device then you need to change your computer’s boot order. This would require accessing a menu on your machine’s BIOS setup, tweaking the boot order of devices so that your preferred drive for booting up is listed as the primary boot device. To access the BIOS menu and learn how to change your computer’s boot order, just follow the steps below:
How To Access the BIOS Screen
Accessing the BIOS screen can be done in different ways. This process needs a quick finger and requires you to be close to your keyboard before you turn on your computer. You should also make sure that your machine’s monitor is turned on so you won’t miss the instructions that appear for just a few seconds before the Windows splash screen flashes.
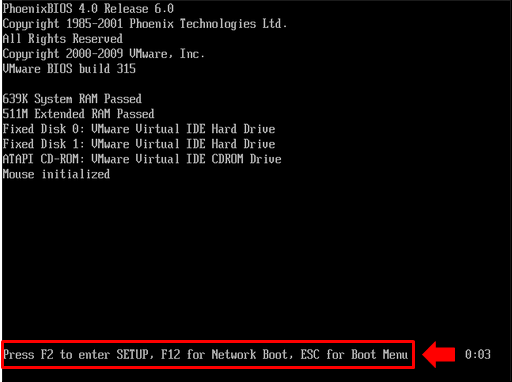
After turning on your computer, you should see a short text that lines across the bottom of the screen telling you which keys to press in order to access the BIOS Menu screen. In most computer models, it could be the F1 or F2 function keys or the Delete/DEL key or any other function keys.
There are also cases that you need to reboot your computer if the process just goes through loading your Windows operating system quickly. It is also recommended that you just wait for Windows to load until the desktop shows up (if you’re not having any problems in the boot up process) instead of pressing the power button for a hard reset since it may cause other problems in the long run. You should also remember that if you enabled a password for your BIOS then you will need to enter it before you can access the BIOS setup menus and other advanced options.
Reasons For Changing the Boot Order
There could be different reasons why you might want to do some tweaks on the boot order of your computer. One possible reason is you might have installed an additional hard disk on your machine and you want your computer to boot from that device and set it as the primary drive. Doing some tweaks to your computer’s boot order will also let you install a new operating system anytime. It can also serve as an alternative in times of system failures where you would need to set a USB or an optical drive as the primary boot device in order to fix problems and recover files that are saved on the hard drive that’s suffering some trouble. You can also do this if you need to repair your machine’s operating system.
Where To Find the Boot Order Menu
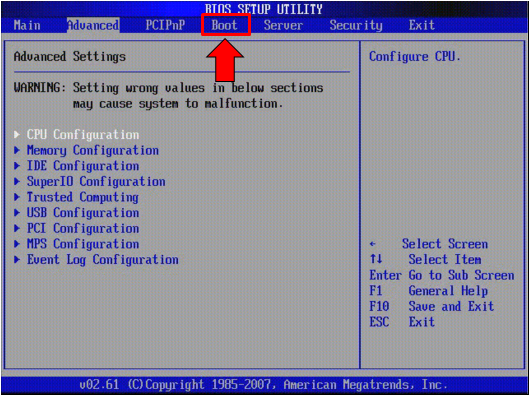
Once you successfully logged into your computer’s BIOS setup, you will need to search for the Boot menu. Most computer models in the past years up to the ones available at present has the Boot menu in-line with the top tabs of the BIOS setup screen. You can select it by using the left and right arrow keys since the mouse pointer is not available on this setup screen. Other navigation controls are also displayed in a legend format at the bottom of the BIOS setup screen.
If you reach the Boot order menu, you will need to use the arrows up and down keys to navigate and select from the available items then press “Enter” on your keyboard once the desired item is highlighted in order to confirm the action. In other BIOS setup menu on other computer models, there is no label which indicates what keys to use to navigate through the items. In this case, you should use the page up and page down buttons to select from the available items. Once again, you just need to see the bottom of the screen for the legend so you can find out which keys to press in order to navigate between options.
Note:
Some brands of motherboard would only display the option for the USB device if a USB stick is connected to it upon booting up. If you want to start your machine from a USB stick (commonly during OS installation or a computer format process), you need to ensure that the USB device is properly connected to your computer before you turn it on.
Once changes are made on the BIOS setup, you will need to confirm and save it. On the BIOS screen where you made some tweaks on, you should see a “Save and Exit” option. You can navigate to this option by using the arrow keys then press the “Enter” key to save all changes and exit from the current screen. Other motherboards contain a keyboard shortcut for the “Save and Exit” option which is often the F10 function key. The computer should reboot after this step is completed and will allow you to access the boot device you’ve just chosen.
Other Boot Options on Windows Advanced Boot Menu
Along with your machine’s BIOS boot menu is your operating system’s own set of options for booting up. This is accessible through the F8 key after the BIOS POST screen disappears.
Going to the Windows Advanced Boot Options is quite a tricky step since there is a very limited time for the command to be detected and there is a narrow chance for it to be responded upon due to the short period of time that the switch for accessing it is displayed on the screen. Once the Menu is successfully opened, a list of options (Safe Mode, Safe Mode with Networking, Safe Mode with Command Prompt, Enable Boot Logging, Last Known Good Configuration, and Start Windows Normally etc.) will appear. There might also be other options that are available depending on the hardware setup of your machine and the version of Windows that you’re using. The screenshot shown above is taken from a computer running on Windows 7.
These options are used in some troubleshooting steps whenever Windows is having problems loading or you need to uninstall a hardware that’s causing some troubles on your system and even malware related problems that can happen at any point in time. Linux Operating systems also has a set of Advanced Boot options but may require different keys to access and execute various setup options.
That’s it! You can now boot your machine from a different device anytime you see the need to do such. This step is very useful for troubleshooting, repairing or installing a new hard disk or any other hardware to your system. You can also do a reformat process easily once you learn how to change your machine’s boot order and you can do it successfully by following the steps explained on this tutorial.