How to Copy a Disk Image to a USB FlashDrive Using Windows USB/DVD Download Tool
In our past tutorial, we have shown some free tools for copying a disc image from a source to a destination disk but what if you are using a relatively small laptop that doesn’t have a built-in DVD-ROM and you don’t have a friend that has a portable one which you can borrow from.
What if you want to re-install Windows into your device but you only have a disk installer and your computer doesn’t have a disk drive? How are you going to do it? It will surely be impossible if you view it from the perspective of installing the Windows OS from the DVD to your computer but if you have a friend who has a bigger laptop that has a built-in disk drive then you can create an image of your Windows DVD installer using any of the tools that we have previously given in one of our tutorials and afterwards, you simply need to secure a USB flashdrive that has at least 8GB storage space in order to create a bootable USB which can be used for re-installing Windows to your machine.
So how is this done? Is it a complicated process that needs some technical know-how for it to be accomplished? In this tutorial, we will be learning the process in creating a bootable USB flashdrive that has a Windows OS installer loaded to it using a FREE tool specially developed by Microsoft called “Windows USB/DVD Download Tool” so be sure to follow the steps below in order to learn this very important skill.
First, Download Windows USB/DVD Download Tool
Now, the very first thing that you need to do is to download the software from Microsoft’s official website. There are other sources which you can download it from but Microsoft is the most reliable one and it is where you can get the latest version. Once you have the installer file, simply run it and follow the setup wizard until it completes.
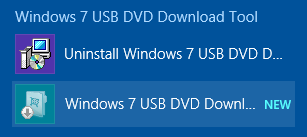
Now, you will notice that the name of the software is “Windows 7 USB/DVD Download Tool” but you don’t need to worry about it not working with other Windows versions like Windows 8, Windows 8.1 or Windows 10 because its name having “Windows 7” in it just indicates that it was developed during the time of Windows 7 but it is proven to work even in later Windows editions with a very small requirement especially in Windows 8 and Windows 8.1 which will actually appear during the installation process as you can see below.
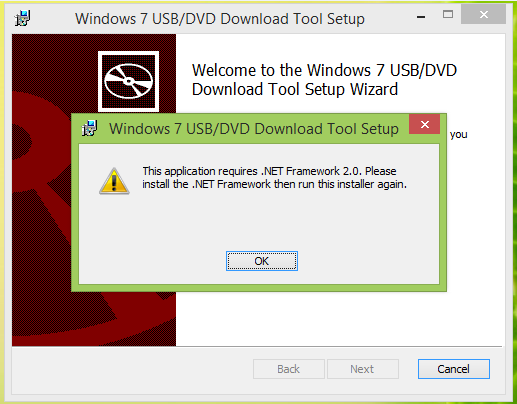
When this prompt appears, you will simply need to click on the “OK” button and be sure to install “.NET Framework 2.0” before installing the software again. Once this small requirement is installed, the setup wizard for Windows 7 USB/DVD Download Tool should now run smoothly and install the software completely to your Windows 8 or Windows 8.1 computer.
Creating an ISO Disk Image File of your Windows OS Installer
Now, as we have mentioned earlier, you also need to create a disk image of your Windows Operating System Installer DVD which will then be loaded into your flashdrive. Doing this is very simple but if your machine doesn’t have a built-in DVD-ROM then you can use a friend’s laptop that has one and create an ISO disk image of your Windows Installer DVD using any of the tools that we’ve given in this previous tutorial. Once you already have the disk image, you will need to copy it into the desktop section of your computer for easier access.
Loading the Disk Image Into a Flashdrive
So let’s now learn how to load the Windows OS disk image installer into a USB flashdrive so you can use it in re-installing Windows to your machine. Again, the process is very simple especially if you already have “Windows 7 USB/DVD Download Tool” installed to your computer, a USB flashdrive that has at least 8GB storage space and the disk image of the Windows OS DVD installer.
To start, you will need to backup all the important stuff that are saved in the USB flashdrive that you’re going to use and since making it bootable will delete everything that is saved in it. After doing so, simply connect it into one of the USB ports in your computer then open “Windows 7 USB/DVD Download Tool”.

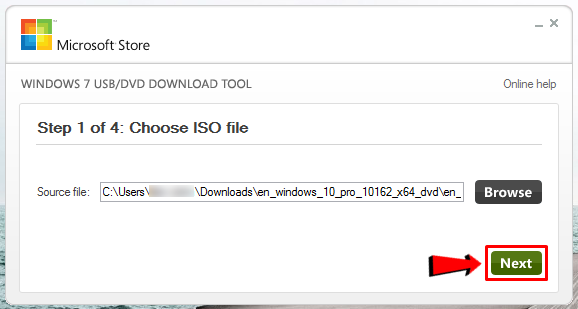
Now, remember the disk image file that you have created earlier from your Windows operating system DVD installer? You will need that in order to create a bootable USB flashdrive and if you used a friend’s computer in creating the disk image, you will need to save it into your computer, preferably on the Desktop section so it will be easy to find it. Once you’ve already saved the disk image (which is in .iso format) in a location that is easy to find, you will simply need to hit the “Browse” button then find the disk image which you want to copy into you USB flashdrive.

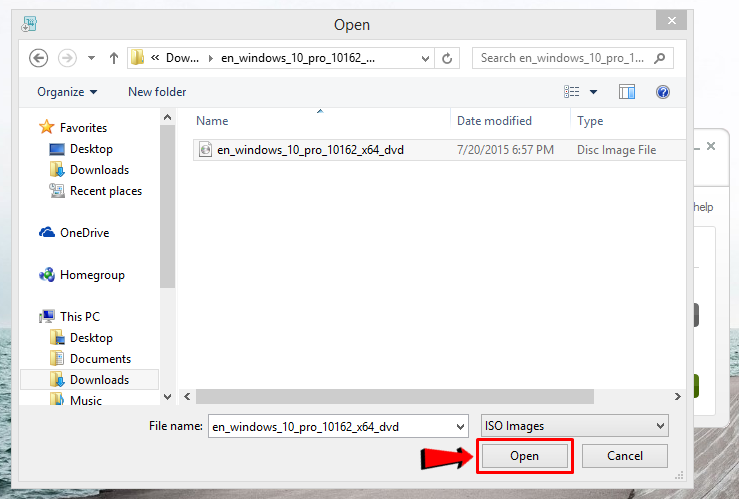
After hitting the “Browse” button, a Window that is labeled “Open” will pop-out of the screen and from here, you will simply need to look for the ISO disk image file that you have created earlier and once you find it, just click the “Open” button that is located at the bottom-right portion of the Window as highlighted below.
After hitting the “Open” button, you will now be taken back to the Windows 7 USB/DVD Download Tool Window and from here, you will notice that the “Source file” box already contains the disk image that you have selected. Now, all you need to do is click on the “Next” button which is located at the bottom-right portion in order to proceed on to the next step.
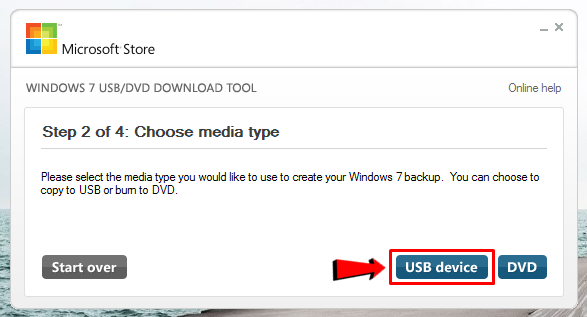
Now, you will be taken to the section where you will be asked where you’d like to copy the disk image that you have created. From here, you will simply need to hit the “USB device” button and make sure that the USB device that you want to save the disk image into is already attached to your computer.
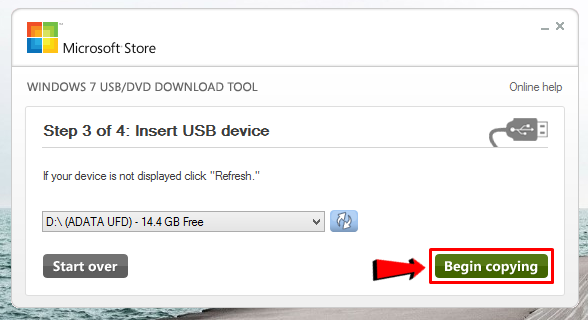
On the next screen, you will be able to select the USB device that you want to save the disk image into (in case you have more than one USB device attached to your computer) and after selecting it, simply hit on the “Begin copying” button.
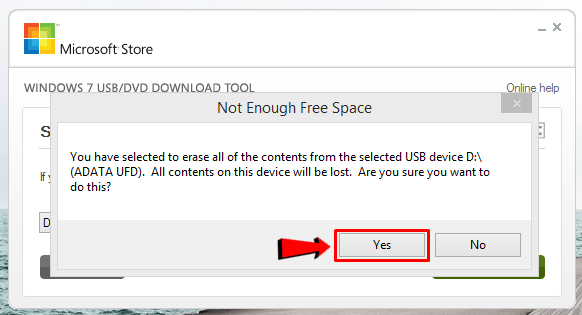
Windows 7 USB/DVD Download Tool will then ask you to erase all contents of your USB flashdrive so it is important that you backup any important file/s that is saved in it before proceeding with the process. Once the important files are backed up, it is time to hit the “Erase USB Device” button.

Next, another prompt will appear on the screen where you will simply need to click on the “Yes” button in order to initiate the disk image copying process.
Right after hitting the “Yes” button from the prompt that is shown above, the copying process will then start and Windows 7 USB/DVD Download Tool will display a bar that shows the overall progress of the process itself as shown on the screenshot below.
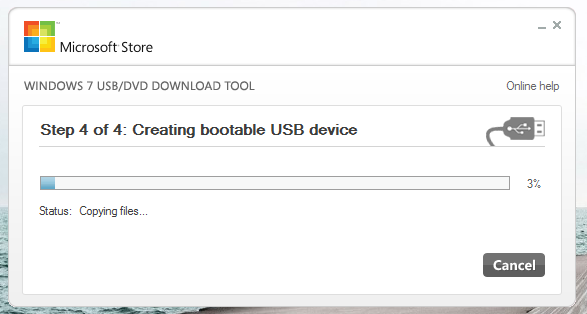
Now, you will simply need to wait until the overall progress reaches 100% and once it does, your bootable USB containing the Windows operating system DVD installer image will now be ready to be used for installing or re-installing Windows even without the actual DVD installer.