How to Create Different Types of User Account in Windows 10
Making your Windows 10 computer more secure can be accomplished in many ways and one of them is by setting up more than one user accounts in your computer. Yes! You can actually create more than just a single administrator account in your Windows 10 machine. There are different types of account that you can set up in your computer and it all depends on you whether you want to grant it access to your crucial stored files or just enjoy the basic functions and features that Windows can offer.
Have you ever tried creating a user account in Windows 10? If you haven’t done yet then we will be showing you all the steps that are involved in this tutorial, so be sure to get your Windows 10 machine ready and follow the steps that we are going to show below.
Accessing the Accounts Section in the Settings Window
In order to successfully add a user account on your Windows 10 machine, you will first need to learn how to launch the Settings feature which is a new and more modern addition to the Windows operating system. It’s like the modern version of the Control Panel feature and serves as the “go-to” place whenever you have to change and tweak something in your Windows computer.
To launch the Settings Window, you can choose to do any of the methods that we’re going to demonstrate below. First, you can access it by first launching the Start Menu and once it opens, all you need to do is click on the Settings icon that is found on the narrow vertical bar at the left as you can see being highlighted on the screenshot below.
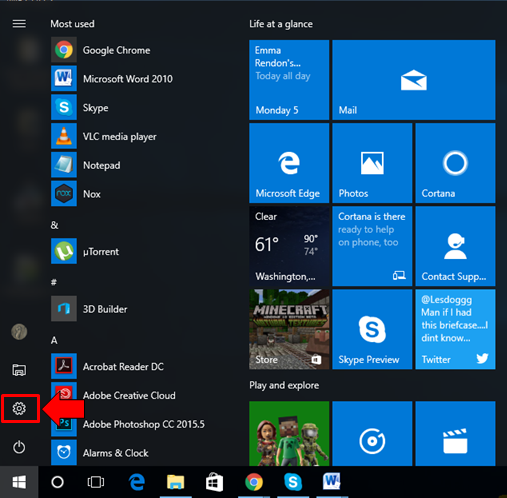
After clicking on the icon, you should be able to open the Settings Window in an instant. If you want a quicker and easier method in launching Settings, you can do so by using its keyboard shortcut Windows + I. Right after you press on these keys, the Settings Window should launch instantly on your computer screen.

The Settings Window looks like the one shown on the screenshot below. From here, all you need to do is click on the settings category which is labeled “Accounts” so you can enter the section where we will find the first point that will help us set up new user accounts on your Windows 10 machine.

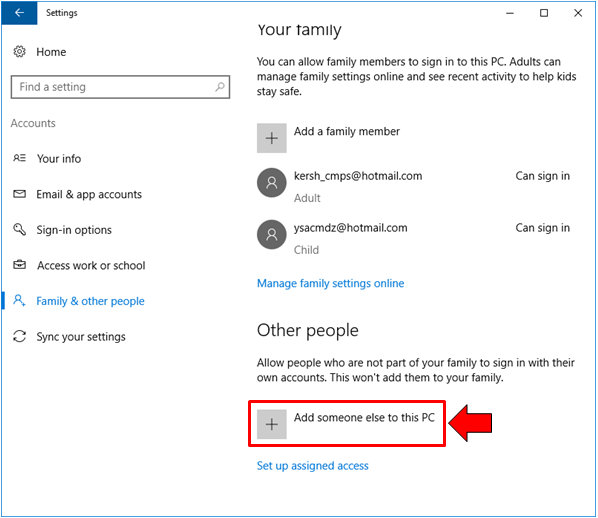
After clicking on the Accounts settings category, you will now be taken to a new Window which displays a navigation pane at the left and its contents on the right. These are the settings which belong to the tweaks that you can do to your machine’s account-related stuff. From here, you will need to click on the “Family & other people” link that is located on the navigation pane at the left as you can see below.
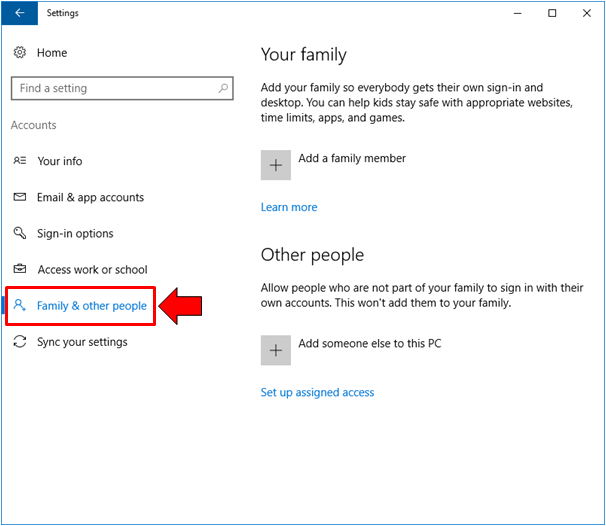
After clicking on the link, you should now be able to access the location where creating a new user account can be initiated. There are two types of accounts that you can setup on your Windows 10 computer. You can setup one for a friend, colleague at work or someone you know but is not part of your family and you can also create an account for your son, daughter or an adult in your family. Doing this is pretty straightforward so you should be able to accomplish it easily! Let’s go to the steps involved in doing this so be sure to get your Windows machine to the location that we have just shown above.
Creating an Account for a Family Member
One of the great features that you can choose to apply in your Windows 10 machine is the possibility of creating a user account for one of the members of your family. It could be a child like your little son or daughter or it could also be an adult in case you have a teenager at home or you want to create an account for your wife. These two types of accounts are different in the sense that for the former, you can impose parental controls such as the time your kids are allowed to play games or browse certain sites and as well as set the time when Internet would be available on the device. These features are part of Microsoft’s Family Safety tool which aims to help parents get better control on their children’s PC usage in each day. To set up a child’s account on your computer, just follow the steps below.
Setting Up a Child Account
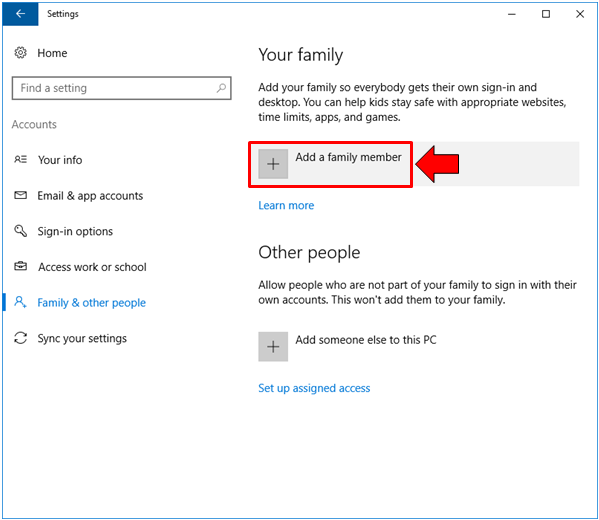
The very first type of account that we’re going to create is the one that you can control using your admin or parent account. It’s a child account and as the name itself suggests, it is the type of account that you need to set up in case you have your little one who is interested in browsing the Internet and using your Windows PC. To start, you will need to click on the “Add a family member” option as you can see on the screenshot below.
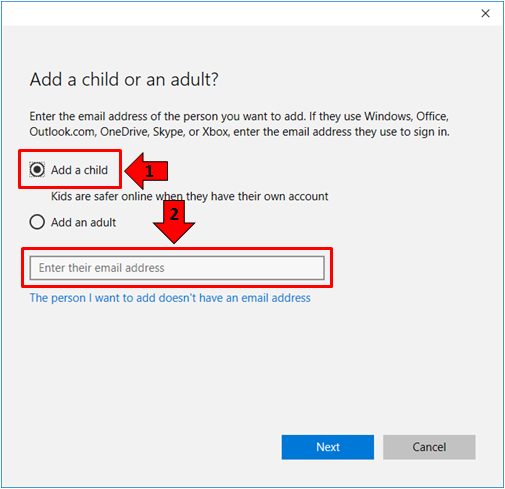
After you do so, another Window will open and load the options that are available in creating an account for a family member. Once it fully loads, you will need to click on the first option which says “Add a child” as you can see on the screenshot below. Be sure to prepare the email that you have created for your child so you can save time since you’re just going to enter it into the email input box that is found at the bottom of the Window.
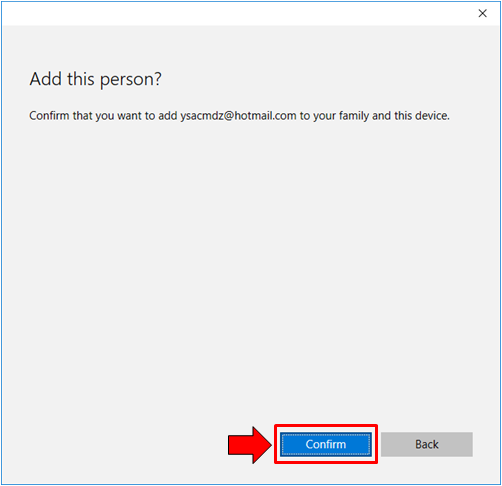
After entering your child’s email address into the designated box that is found near the bottom of the Window, all you need to do is click on the “Next” button in order to proceed on to the step that follows. On the next Window which is shown on the screenshot below. You will be asked if you are sure to add the person and create a user account with the email you have just entered. From here, simply click on the button which is labeled “Confirm” at the bottom of the screen in order to get to the next step.
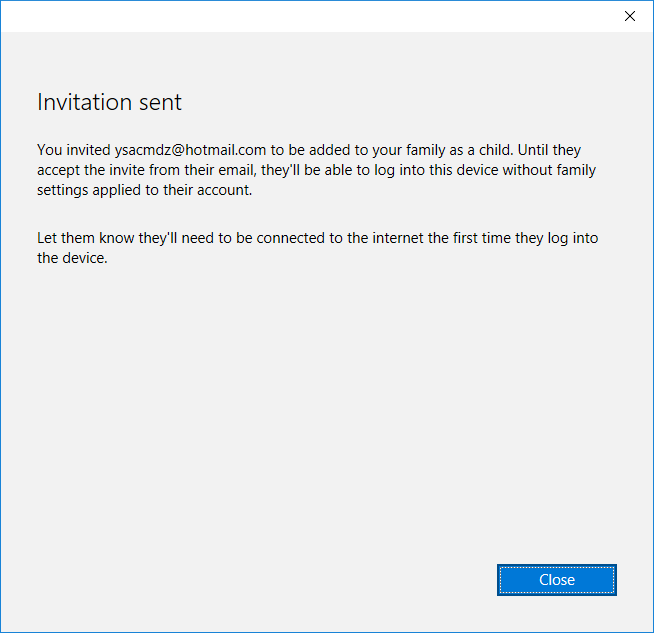
Once you are done confirming the action of creating a child account for the email address, the next Window will now display a message telling you that an invitation has already been sent to the email address itself so you will need to open your child’s email in order to continue on with the setting up of the account.
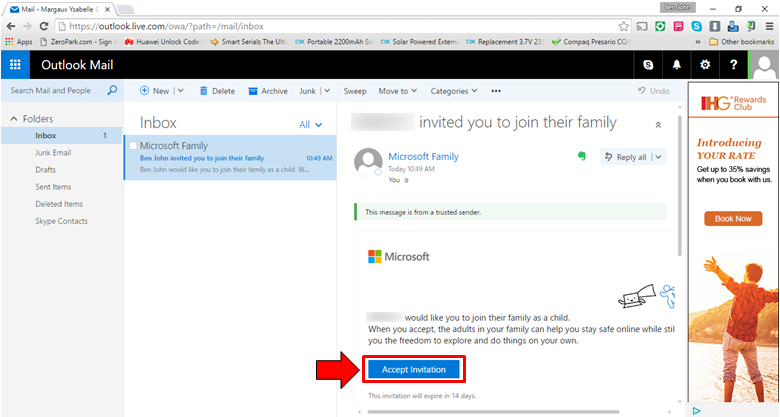
Now, you need to head to your child’s email and from there, simply open the invitation that you have sent to it in order to continue with the account creation process. The email should come from “Microsoft Family” and in it, you need to find a button that says “Accept Invitation” as highlighted on the screenshot shown below.
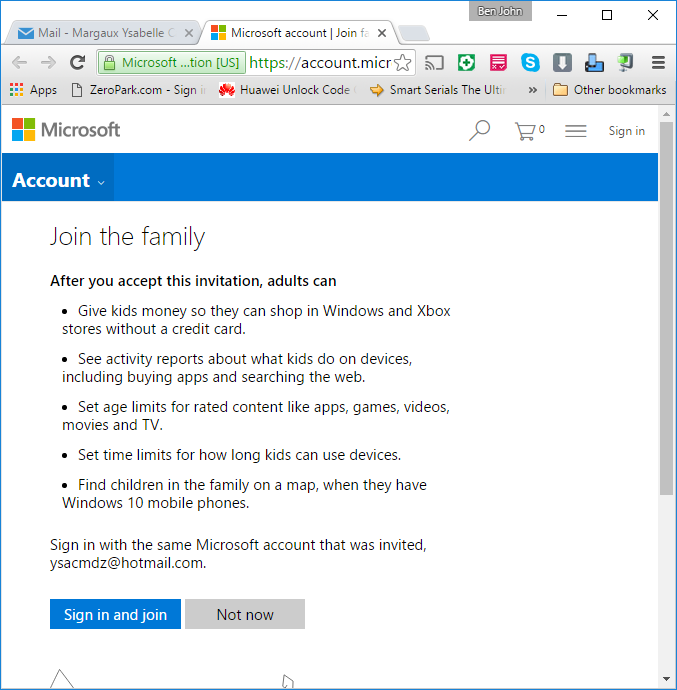
Another tab will then open up after you click on the “Accept Invitation” button inside the email sent by Microsoft Family and from this new tab, you should be able to read all the controls that an adult account can have over a child account. From here, you will simply need to click on the button that is located on its bottom portion which says “Sign in and join” in order to get to the next step.
Once the invitation is accepted and right after you click on the “Sign in and join” button, a notification will appear on the bottom-right portion of your computer screen telling you that the child account has already been created and the email you used has successfully joined as a child. This basically completes the process in creating the account for your child and you will then be able to control certain aspects of your little one’s PC, app, browsing and Internet usage online which we will be discussing in greater detail on our next tutorial.
Setting Up an Adult Account
Now that you already know the process in creating a Child account on your Windows 10 machine, it is time to proceed on to the next type of account that you can set up in your computer which is called an Adult account. To start the process in creating it, you will need to go back to the “Family & other people” section of the Settings Window and from here, you will need to click on the “Add a family member” option once again as we’ve done earlier when we created a Child account.
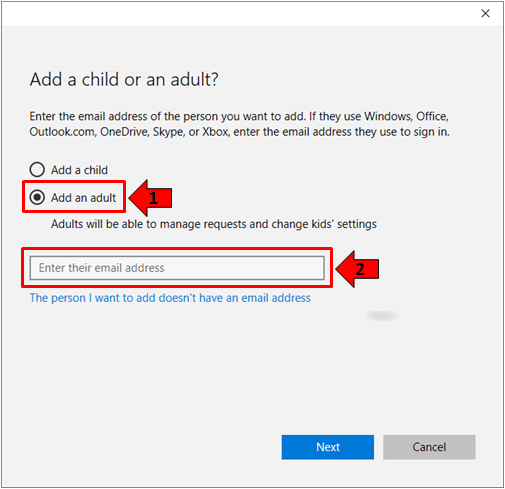
On the Window that would follow, you will now need to click on the second option which says “Add an adult” instead of clicking on the first one. After choosing the option, you will need to enter the email address of the adult that you want to add the just hit the “Next” button which is located at the bottom-right portion of the Window.
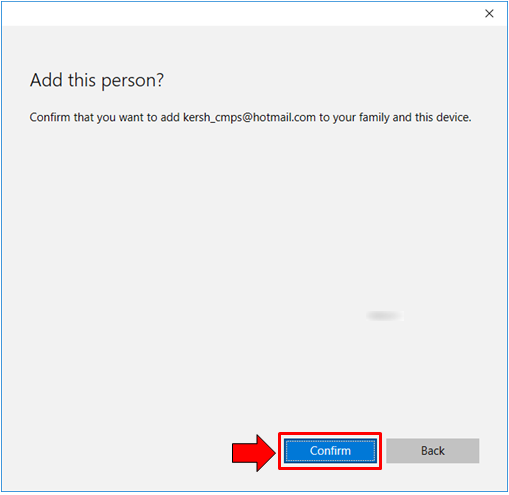
Again, you will be asked to confirm that you really want to add the email address to your family as an adult user. From here, all you need to do is click on the button which says “Confirm” located at the bottom-right portion in order to send an invitation email to the person that you want to add.
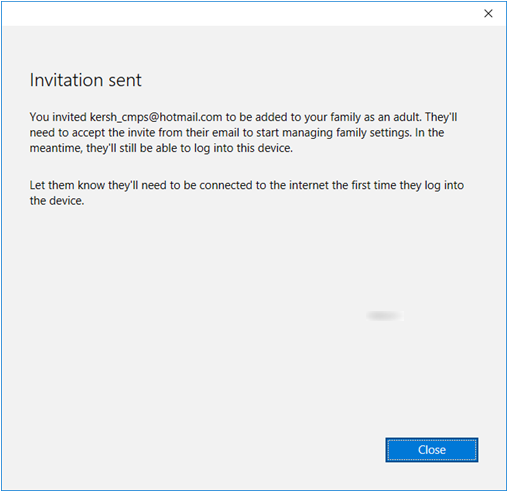
Once an invitation email is sent, the recipient email must then open it up and accept the invitation then sign-in in order to confirm the account addition process and he/she can start signing in to your computer using his account logins which are his/her email and its password.
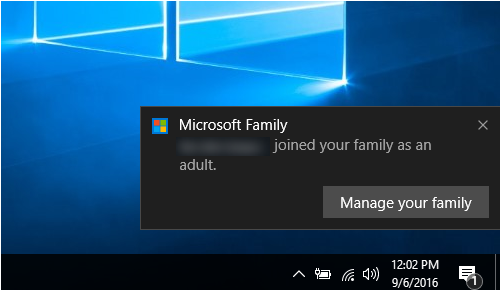
The email should contain a button that is labeled “Accept Invitation” which looks the same as the one we’ve shown earlier when we create a child account. After it is clicked, a new tab will open and from here, you will see an itemized explanation of what the adult account can do. From this tab, just click on the “Sign in and join” button in order to complete the account creation process. The owner of the device who sent the invitation will then receive a notification on the Action Center feature which informs that the invited user has already accepted and joined the family and can start using the device using his/her logins.
Creating an Account for Other People
Now that you’ve learned how to create an account for your child as well as for one of your adult family member, it is time to get to the next type of account that you can create in your Windows 10 machine and it is neither for a child nor for an adult family member. Yes! You can also create an account for other people who needs access to your computer. To do this, you will again need to go back to the “Family & other people” section of the Accounts settings and from here, just click on the option that is found at the bottom which says “Add someone else to this PC”.
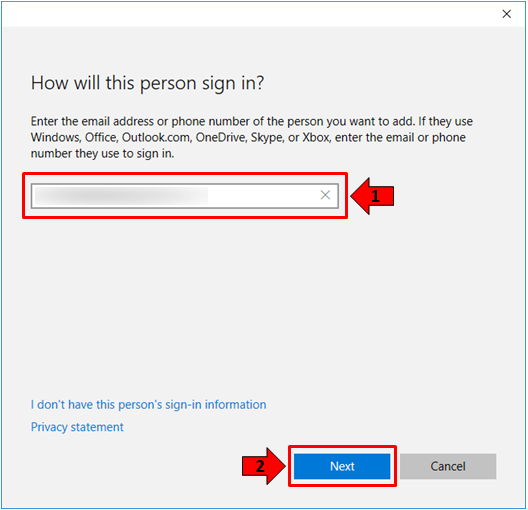
After clicking on the option, you should be able to open a new Window which will now ask for the email address or phone number of the person that you want to add a user account for in your Windows PC. Just enter this required information into the designated box and after doing so, simply hit the “Next” button that is found at the bottom as you can see on the screenshot below.
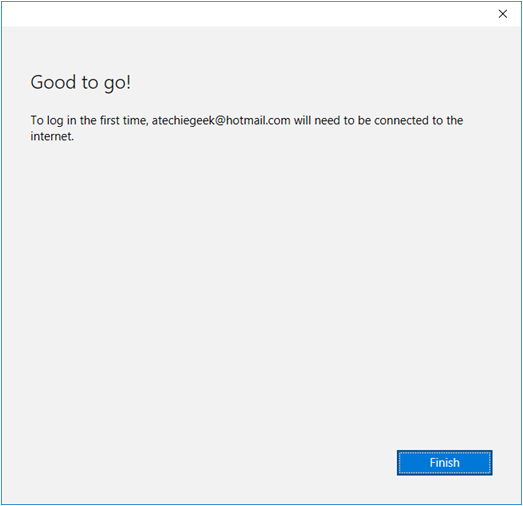
The next Window will then inform you of the instructions for the newly created user account to be able to log in to your computer. Be sure to get your Windows 10 machine connected to the Internet and let the person open his/her user account using his/her password. From this Window, simply click on the “Finish” button in order to close it.
Creating a Local User Account in Windows 10
Now, what if you don’t have the email address or the phone number of the person that you want to create a user account for? Is it still possible to create a user account for him/her? The answer is “Yes” and in order to do so, you will need to create a different type of account which is also known as a “Local account”.
This type of user account can still be used to log in to your Windows 10 PC however, it won’t be able to access apps in the Windows Store and as well as take advantage of some other features such as email, and other additional perks that a person who is logged in with a Microsoft account can enjoy. To create this type of account on your computer. All you need to do is go back to the “Family & other people” section of the Settings Window and again, you will need to click on the “Add someone else to this PC” option found at the bottom.
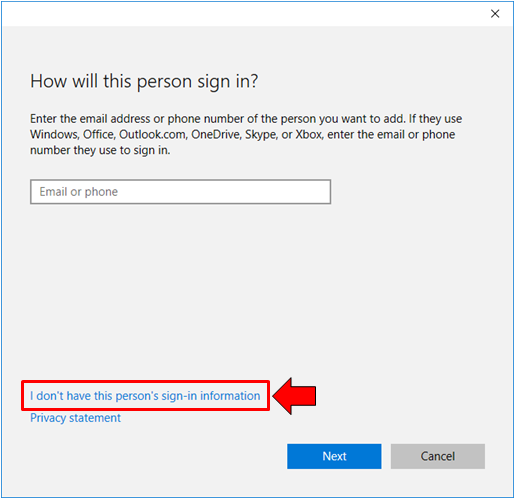
On the Window that follows, you will need to click a link that is found at the bottom portion which says “I don’t have this person’s sign-in information” as you can see being highlighted on the screenshot below. Doing this will help you skip the email or phone number input box which is needed if you want to create a user account that uses a Microsoft account as its login details.
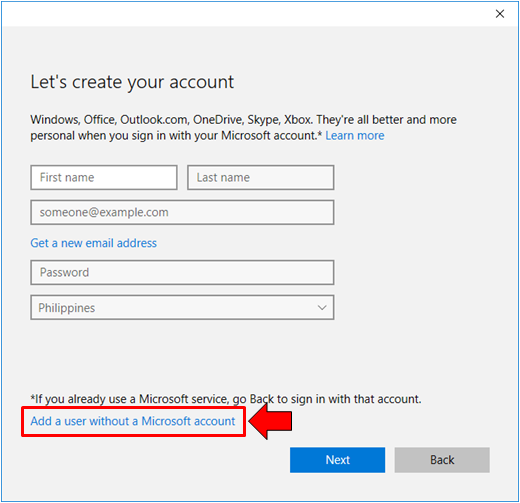
On the Window that would follow, you will be asked to enter the person’s name as well as your desired email address but we will be skipping this step and setup a Local account instead so just click on the link that is found at the bottom of the Window which says “Add a user without a Microsoft account” as highlighted on the screenshot that is shown below.
On the Window that follows, you will then be asked for your desired User name and Password to be assigned to the account that you want to create on your Windows 10 PC. From here, all you need to do is enter the User name, the password and re-enter the password to make sure that you did not type it by mistake then you can also assign a password hint which serves as a clue just in case you forget what the password of this Local account is the next time you log in to it. Once you are done entering the required information, just click on the “Next” button to proceed on to the step that follows.

After hitting the button that is labeled “Next”, the Local account should not be created and if you go back to the “Family & other people” section of the Settings Window, you should be able to find the newly created account under the “Other people” section together with the other account which we have created earlier which uses a Microsoft account while the Family accounts that we have set up are now found under the “Your family” section.

Create a More Secure Windows 10 PC by Setting up Different User Accounts!
As you can see, the latest version of Windows 10 now allows users and owners to make their machines a lot more secure by creating user accounts for different people. This feature is also aimed at making your children more secure while they are browsing online using your computer. It can’t be denied that the Internet is an open media and anyone can access even those age specific websites anytime so it is always a plus to have control on which websites as well as apps and programs your children can have access to every time.
Do you know how to control a child account from your adult account in Windows 10? If you haven’t tried this yet then we recommend that you read our next tutorial which would basically discuss all the steps that are involved in doing this tweak in your PC. If you want all our latest tutorials sent to your inbox, you can choose to subscribe to our newsletter or join our email list and we will make sure that you get all of the latest stuff that we fill-in to our website sent straight to your email. You can also suggest any topic about the Windows operating system that you want to be discussed in our next tutorial by posting them as comments on the space provided below.