How to Download and Install Universal Apps from the Windows Store (Windows 10)
The Windows operating system has gone through many transformations especially in the past 3 or 4 years of its existence. We’ve all seen how this operating system had its very humble beginnings and became an all-time favorite to millions if not billions of users and businesses around the world. 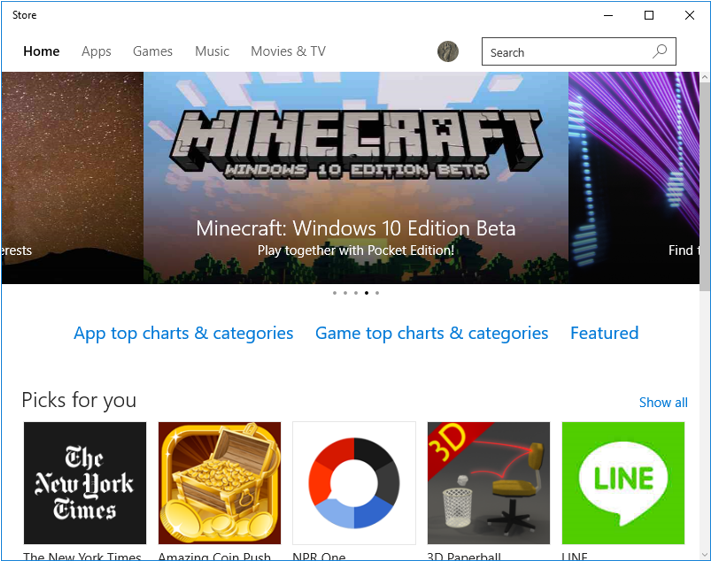 Microsoft has continued to be very successful in terms of the changes and innovations that they did to this software which has become their flagship product and starting in 2012 when the modern version called Windows 8 was finally given out to the public, users have seen a new breed of operating system that is now designed to run not just the traditional Desktop programs but also the mobile apps that is gaining popularity even to our present day. Yes! The company finally decided to get into the track with its competitors and started their new mobile app marketplace we now call as the Windows Store. In our previous tutorial, we’ve talked about setting up your Microsoft account and logging in to the Windows Store app using it. We have also discussed about the settings and tweaks that are available for your Windows Store account and learned how to navigate through the apps that are available in it so this time, we’ll get into the details on how you can download and install apps from the Windows Store so you can start enjoying the new and improved mobile environment in your Windows 10 machine. If you have not yet upgraded to Windows 10 then just follow the steps that will be shown here from your Windows 8.1 computer. There are aspects that might look a little bit different but the principle is basically the same. If you already have installed Windows 10 then be sure to get your computer started up and get ready to delve into the process of installing universal apps into your device.
How to Open the Windows Store App
There are several ways in launching the Windows Store app in your Windows 10 computer and we will show the most basic ones here. If you have just upgraded your computer to Windows 10 then you can access it simply by clicking on its icon that is pinned on the Taskbar as highlighted below.  In case you don’t see the Windows Store icon on the Taskbar, all you need to do is open the Start Menu and once you are on it, simply scroll down on its right portion and once you see the “Play and explore” app tiles category, just look for an item that says “Store” then click on it in order to launch the Windows Store universal app.
 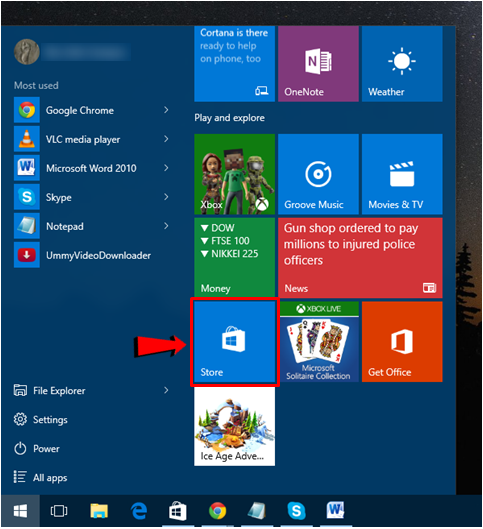 As you can see, launching the Windows Store app in Windows 10 is very simple. Once you have this universal app opened, you will now need to search for the app that you want to download and install into your computer.
How to Search for the Exact App in Windows Store
Now that you have already opened the Windows Store universal app Window, you will now need to start looking for the app that you want to download. We’ve discussed how to search for apps in out previous tutorial but in order to make it more comfortable for you to find the app that you need without getting into another webpage just to read a separate tutorial, we’ll show the steps in how this is done here.
Use the Search Box
What’s good about Windows 10 is the presence of the Search feature from almost any location of the operating system. For instance, you will find Search in File Explorer, on the Start Menu and even on other built-in Windows 10 tools. In Windows Store, you will be able to find this box on the top-right portion of the screen as highlighted on the screenshot below. 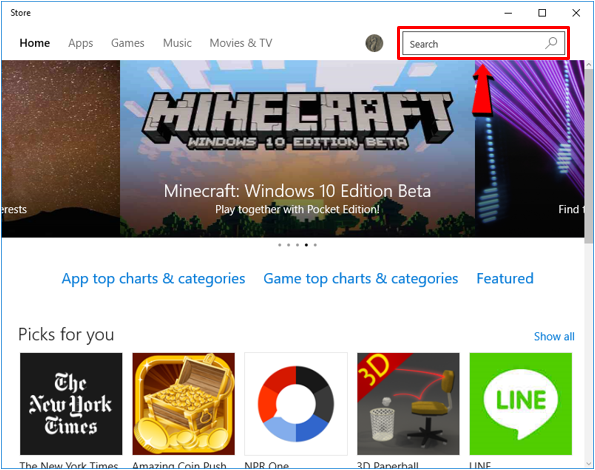 To search for a specific app, you will simply need to enter its name into the Search input box and wait for the search suggestions to appear just below the box itself. If you have entered the exact name of the app that you are trying to look for, the suggestions should display exactly the right app/s that you are looking for and you can simply click on its icon from the search suggestions box.
 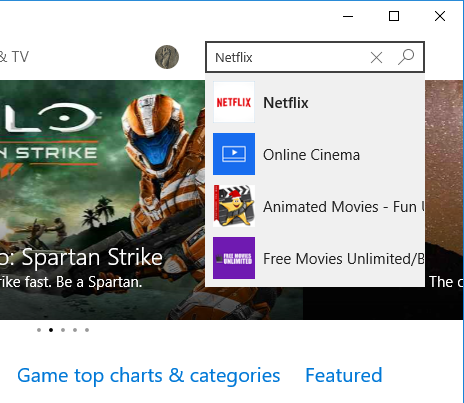 If you don’t know the exact name of the app that you are planning to download and install into your Windows 10 machine, what you’ll need to do is type in the name that you remember into the Search box and after doing so, simply click on the “Search” icon that is located on the right portion of the search box as highlighted on the screenshot below.
 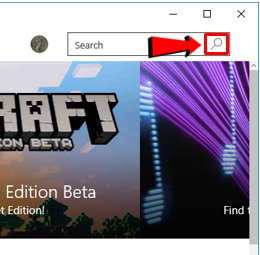 After the search icon is clicked, you will be taken to a new Window that shows all available apps that matches the name which you have typed into the Search box. From here, you can scroll through them until you find the exact app that you want to download and install into your Windows 10 machine.
 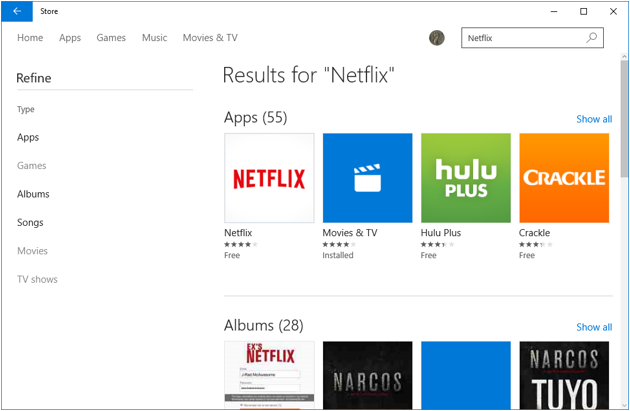 If you’re still having a hard time finding the exact app that you’re looking for, you can use the sorting rules which are located on the “Refine” section at the left-hand portion of the same Window. By clicking on these sorting rules, you’ll be able to group the apps according to the categories/sorting rules that are listed. By doing this, you’ll be able to find the exact app a lot easier than looking for it manually by browsing through the different app categories that are available in the Windows Store Home section.
Free and Premium Apps, How to Identify Them
If you’ve already been able to use Android or iOS devices then you will at least have an idea on how to identify free and premium apps. Identifying free and premium apps in the Windows Store is quite similar. You can even see this information when viewing apps that are grouped under certain categories. The screenshot below shows a free and a premium app from the Windows Store. 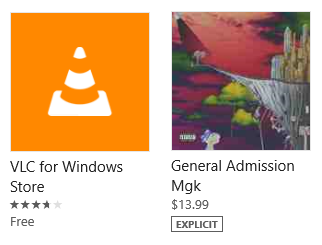 As you can see, a free app will have a label that says “Free” on its bottom portion where its description is found while a paid app will have its price (in dollars) displayed on its bottom portion.
Learning More About an App Before Downloading It
Now that you already know how to look for apps in the new and improved Windows Store found on your Windows 10 machine, it is time to learn the steps in downloading it. Again, after finding the right app, you will simply need to click on its tile that is displayed on Windows Store and after doing so, its information page will display. Before getting into the process in downloading the app, let us first see what information are available from here. 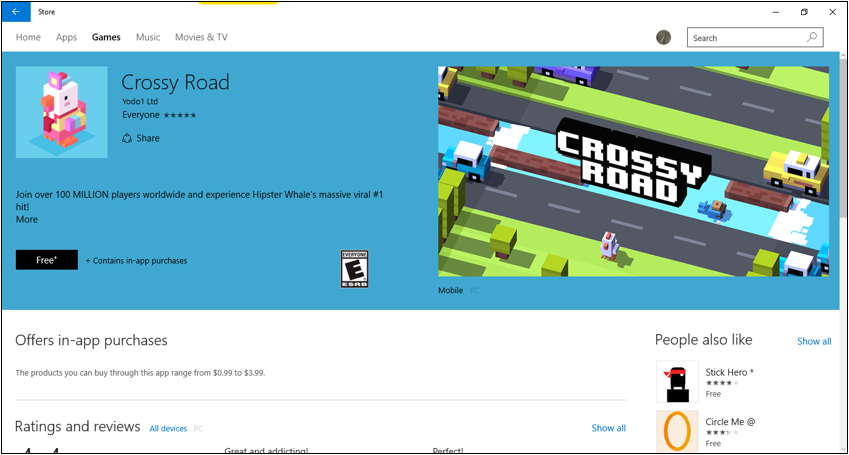 If you want to learn more about the background information and description about the universal app that you are going to download, all you need to do is click on the “More” link that is found right after the short description at the bottom of the app name and icon.
 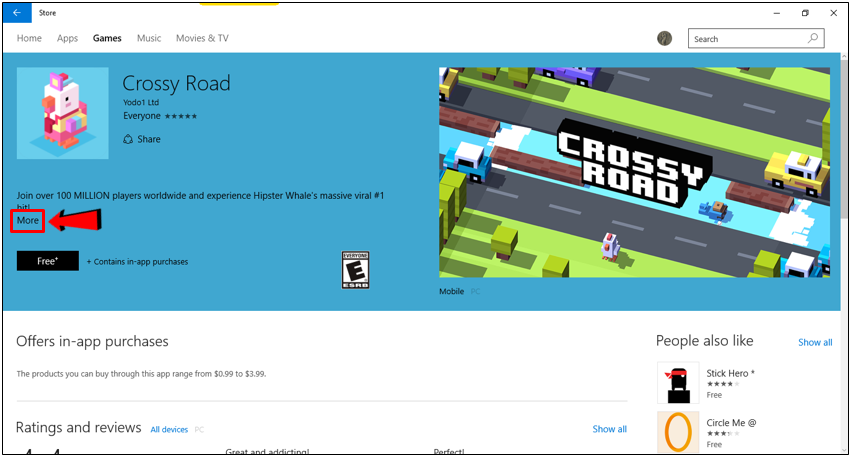 To the right of the app icon itself, you will see its name, the company that developed it and the user ratings in the form of 5 stars. Moving on, below the “More” link is a button that says “Free” and on its right portion is an information that tells you whether the app offers upgrades that need to be purchased. If a certain app has these upgrades, you should be able to see “+ contains in-app purchases” right beside this “Free” button.
 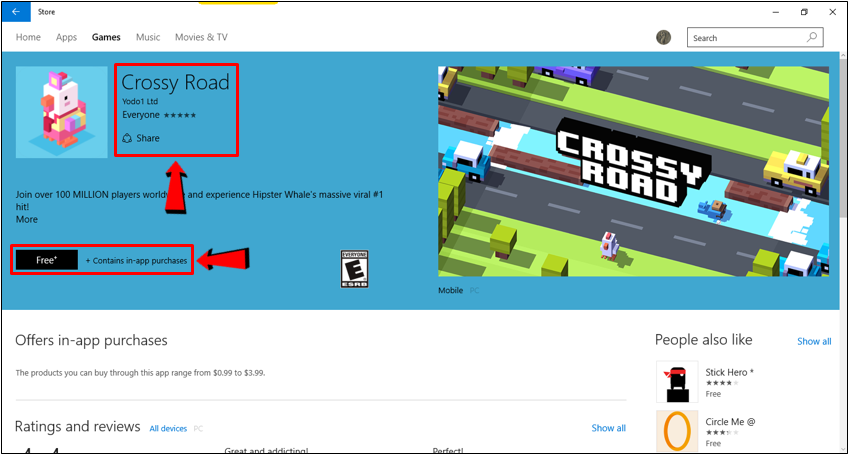 Moving on further to the right, you will also see a section that is labeled “People also like” and this section shows a list of apps that were also downloaded by the users who also installed the same app that you are about to install. If you want to see an extensive list of these apps, you can simply click on the “Show all” link as highlighted on the screenshot below.
 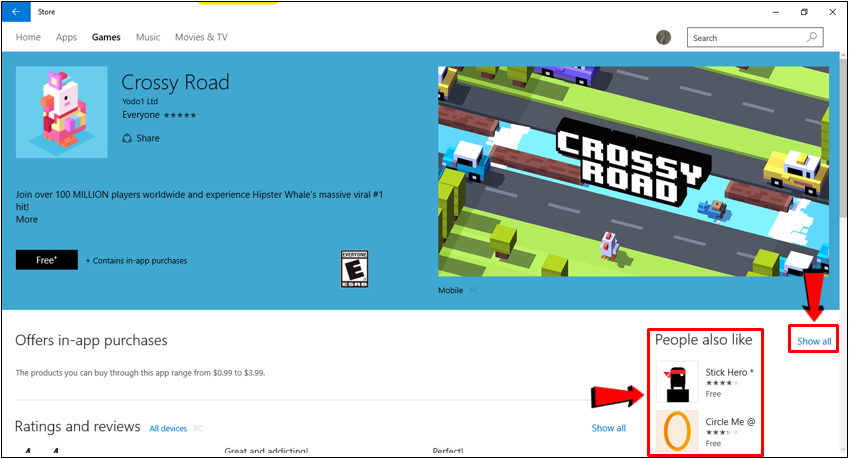 On top of the “People also like” list and the “Show all” link is the app screenshot section. From here, you can scroll through and view some screenshots that were taken from the app itself. This will let you have a glimpse on what the app is all about and what kind of environment you will actually encounter once you already have the app installed into your Windows 10 machine.
 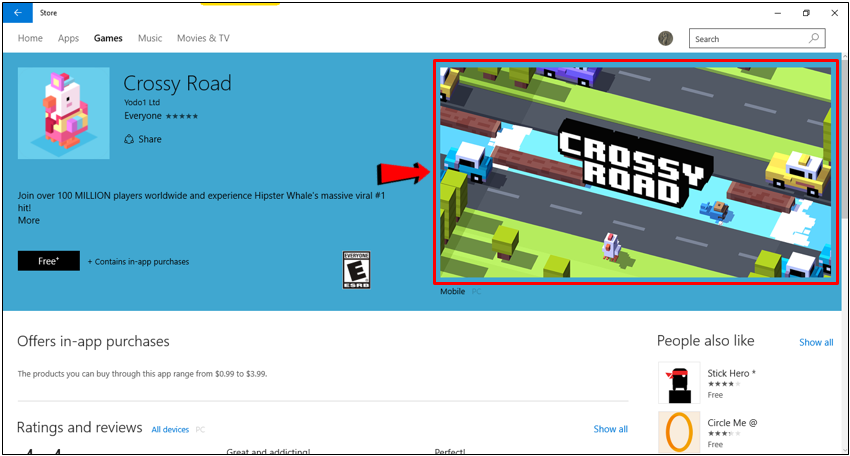 Now, if you want to know how much the in-app purchases would cost you the all you need to do is read the description that is found under the “Offers in-app purchases” item as highlighted on the screenshot below. This section displays an information on the price range of products and upgrades that can be found in the app and this is very common especially in games that are offered for Free.
 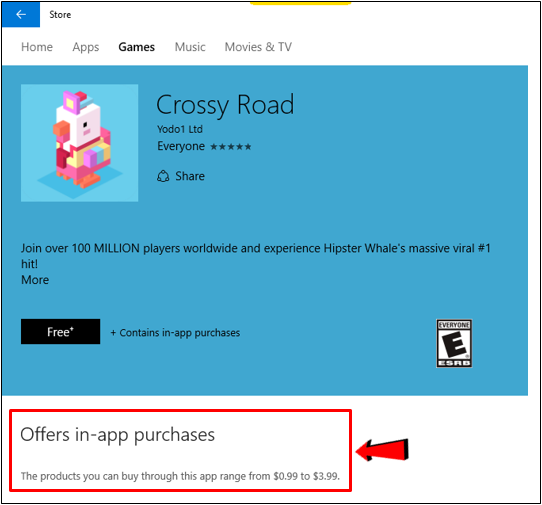 If you’re already satisfied with the amount of information that are displayed on this portion of the app description screen then you can simply download and install it into your Windows 10 machine. However, if you want to learn even more by seeing what the other users who have downloaded, installed and used the can say about its performance and other aspects then you will need to scroll lower into the “Ratings and reviews” section as shown on the screenshot below.
 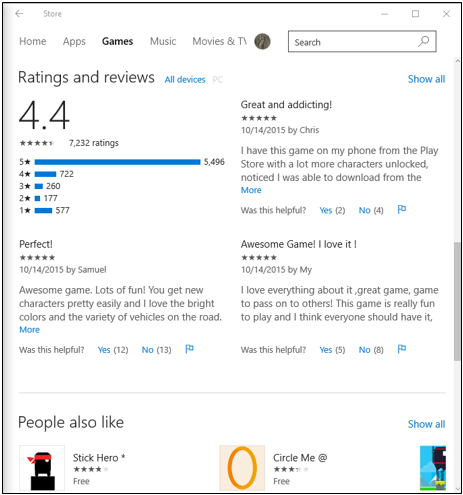 From this section, you will see a big number that represents the overall rating of the app. Rating system works the same as how apps are rated in other online app marketplace platforms like Google Play where 5 is the highest and 1 is the lowest. There’s decimal point system of course to make it a lot easier for prospect users to see the difference between apps according to their ratings. If you’d like to view all ratings from users no matter what type of Windows device they’ve installed the app on then all you need to do is click on the “All devices” link as highlighted below.
 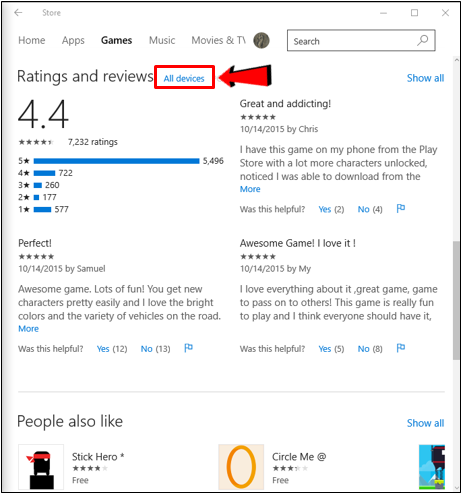 Below the big number that represents the overall rating are 5 stars which indicates the rating score in a more visual manner. From here, you will see that the stars are highlighted according to the overall rating score. Beside it is the total number of users who have rated and reviewed the app and had their review published in their Windows Store account.
 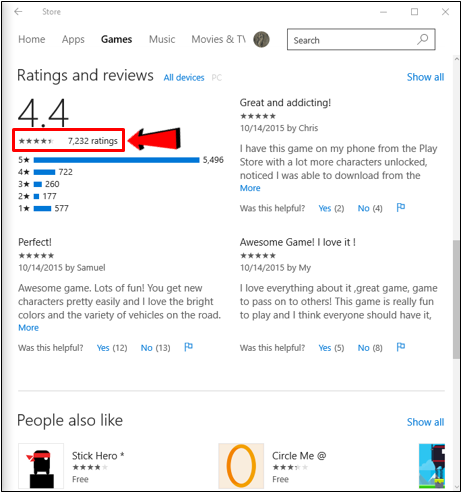 If you want even more details and numbers that are related to the rating that users have given to the app then you can view them just below the 5 star rating representation and total number of users who rated the app as shown below. From here, you will be able to know a breakdown of the users who rated the app according to 5 different scores and with a bar that solidly shows the difference between the numbers. This is a good way to really help you decide whether an app is worth downloading or not.
 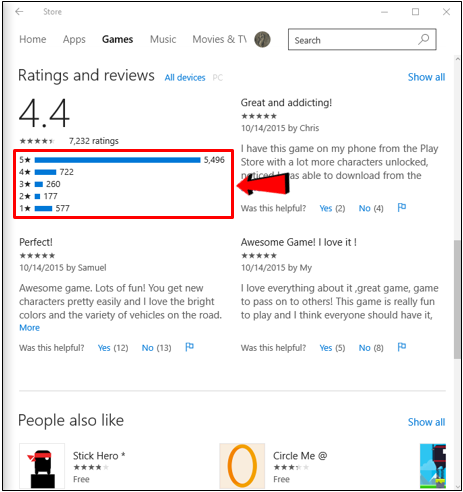 Now, if you really want to view all of the ratings and reviews that users gave to a certain app that you are about to download then all that you need to do is click on the link that says “Show all” which is located at the top-right portion of the “Ratings and reviews” section in-line with the “All devices” link that we’ve talked about earlier.
 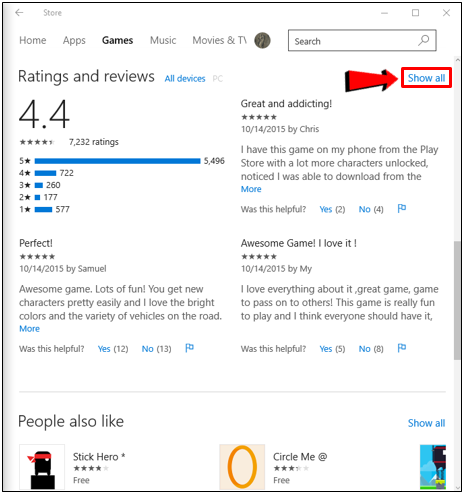 Now, while reading some reviews, you might have noticed that each review has a “Yes” and “No” link below them and each of this link has numbers that are enclosed in a parenthesis . The clue on what these links are for is found on their left side where a question that says “Was this helpful?” is found. These “Yes” and “No” links are actually the possible answer to this question and the numbers that are inside a parenthesis on their right represents the number of people who found the review helpful and clicked on the “Yes” link or didn’t find the review helpful or relevant at all and clicked on the “No” link.
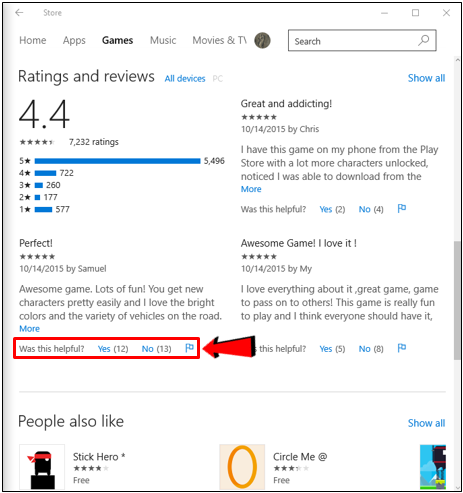
Learning Some Additional Information About an App
If you want even more information about a certain app just to make sure if it’s really worth downloading and if you want to know what things is it allowed to do when it gets installed into your Windows 10 machine then all you need to do is scroll even more to the bottom portion of the app details screen and you’ll find a section that is labeled “Additional information” as shown on the screenshot below. 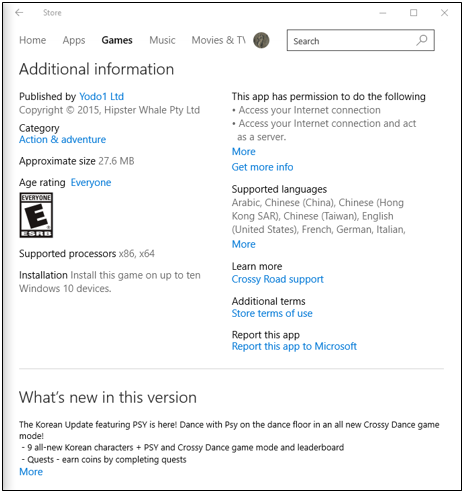 From here, you can find the company that developed the app, the category into which the app belongs for instance “Action & adventure” or “Simulation”, its “Approximate size” and the “Age rating” which will tell you if the app is safe for very young users or not. If you want to know some technical details then you will also find an item from this section which will tell you whether the app would work on 32-bit (x86) or 64-bit (x64) processors. You will also know the exact number of devices to which the app can be installed. Moving on, if you’d like to know what the app is capable of doing or what it would be allowed to do when it gets installed to your computer then all you need to do is read the items (in bullets) that are found under the “This app has permission to do the following” portion and in order to view all the items that are listed under it, you can just click on the “More” link as shown below.
  Moving even lower towards the bottom, you will also find a link that says “Get more info” which when clicked would actually open a webpage that shows Microsoft’s explanation on what the app really does based on the permissions that are listed on its description page in Windows Store.
  that shows more information and details about the app that you are about to install into your Windows 10 machine. If English is not your native language, you can also download the app and use other languages for it and you’ll find the details on which language it supports under the “Supported languages” section. To view the list of all the languages that the app supports, you can just click on the “More” link that appears just below the list of languages that readily appears. These items are highlighted altogether on the screenshot below.
 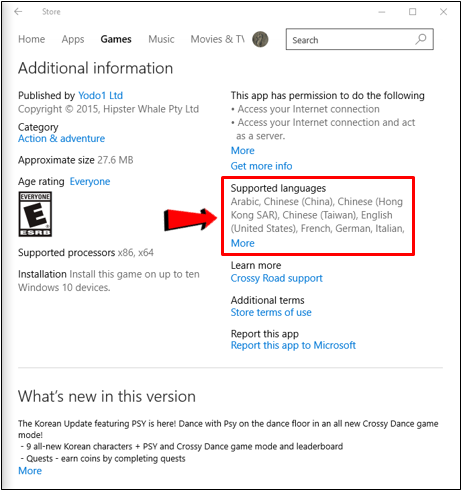 Below the “Supported languages” section are other items such as “Learn more”, “Additional terms” and “Report this app”. Under the “Learn more” section is a link that says “Crossy Road support” and when you click on it, you will be able to open your email app where you can type in your message that you want to send to the Crossy Road support website. Under the “Additional terms” section, you will find a link that says “Store terms of use” and if it gets clicked, you’ll be able to launch a new webpage which would open to Microsoft’s Services Agreement. It is basically just a long article explaining your rights as a user and Microsoft’s side in providing you some services such as Windows Store and other Microsoft-owned services.
 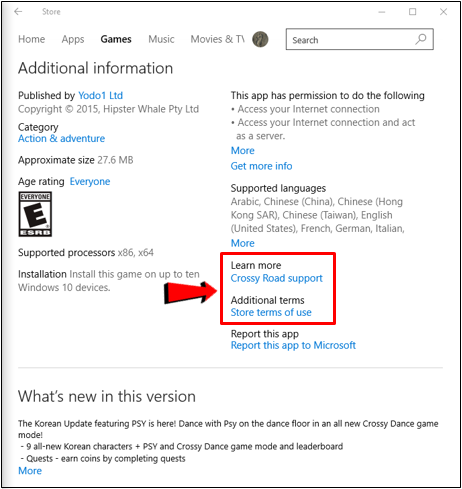 Finally, if you something that’s a little bit spammy or suspicious while using an app, you will need to remember that you can actually report about it to Microsoft. You can do this by clicking on the “Report this app to Microsoft” link that is located under the “Report this app” item as highlighted below.
 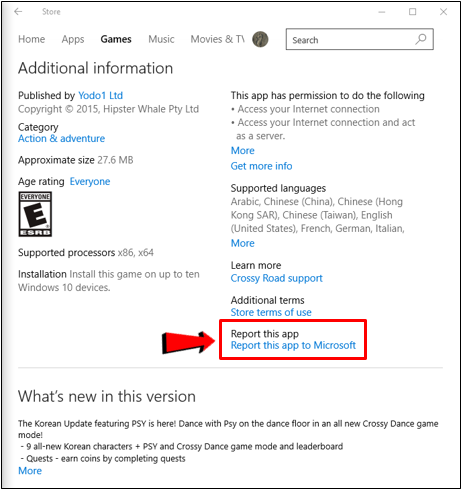 After clicking on the link, you will be able to open another Window where you can now select the reason why you are reporting the app and include some useful info on how you found out about the violation that would not exceed 500 words. Once you are done entering these details, all you need to do is click on the “Submit” button that is found at the bottom of the Window.
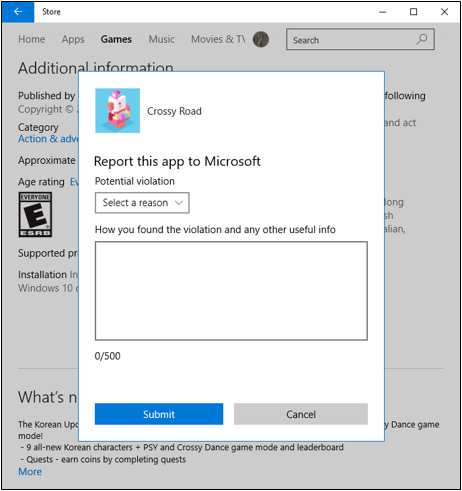
Learning What Changes Were Made to Latest App Versions
Just like any other program, universal apps also receive updates from their developers. These updates would include new levels in a game, new controls, new features or even bug fixes. If you want to know the deeper details about a certain app update then you can find them under the “What’s new in this version” section as highlighted on the screenshot below. 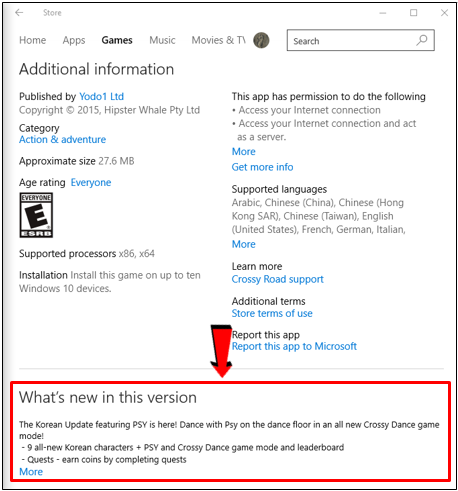 However, this list is collapsed by default so if you really want to view all of the changes and revisions then all you need to do is click on the link that says “More” which is located just below the initial list of app version revisions as you can see on the screenshot above. So that’s basically what the app details screen contains and as you can see, the information being provided just from this section alone of an app is really extensive so with Windows Store, it’s really impossible for you to make mistakes in choosing to install the right app for your need.
Installing a Universal App
Finally, we now come to one of the most important point in this tutorial. After learning some basic and as well as deeper information about an app that you wish to install into your Windows 10 machine, it is now time to learn how to install them. First, we will try installing a FREE app from the Windows Store and in order to do this, you will of course need to open its details page and after doing so, simply click on the button on it that is labeled “Free” as highlighted on the screenshot below. 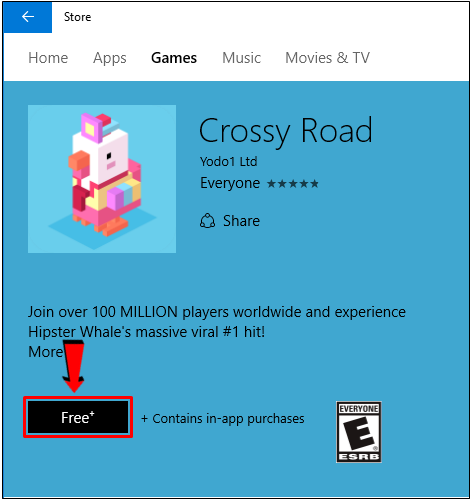 After the “Free” button is clicked, you will then see a prompt that says “Working” then “Starting download” then “Acquiring license”. After these prompts, the download will then start and you will see a progress bar which indicates the overall download process and an indicator which displays the total size that has already been downloaded (in MB).
 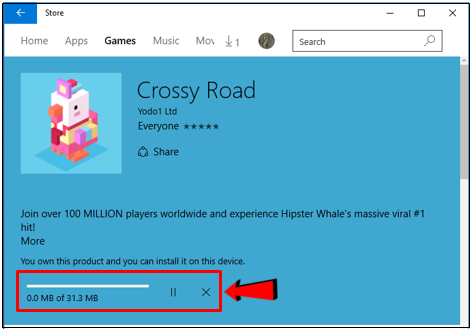 Now, if you changed your mind and you want to discontinue or cancel the downloading process of the app, all you need to do is click on the “X” icon that is found at the right of the progress bar as highlighted below.
 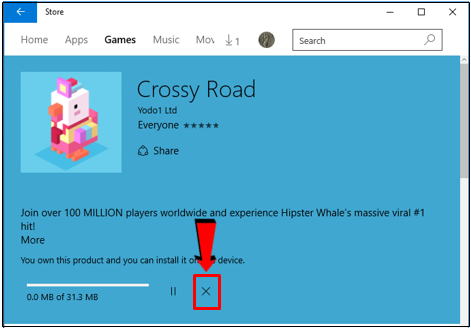 Or, in other instances, if you’re going to go somewhere and you need to bring your device with you then you can just pause the download process and start it once you get connected to the Internet once again. You can do this simply by clicking on the pause icon that is found just beside (to the left) of the the “X” icon as shown below.
 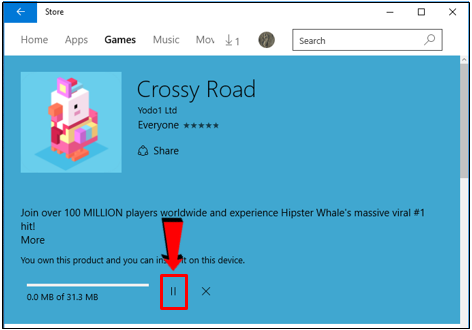 If you didn’t cancel or pause the download process and you just let the app download completely, Windows will automatically install it after the download process is done so you don’t need to do anything else. Just wait for a few minutes until Windows 10 shows a notifications that will pop-out of the right edge of the screen telling you that the app has already been installed into your computer. The process is actually just as simple as that and it works basically the same as the process involved when you download apps for your Android device from the Google Play Store.
How to Open the Newly installed App
Once an app gets completely installed on to your Windows 10 computer, its tile will automatically be displayed on the Start section or the right portion of the new and improved Start Menu and in order to launch it, you can simply click on the tile itself and wait for a few seconds for the app itself to open on a Window. 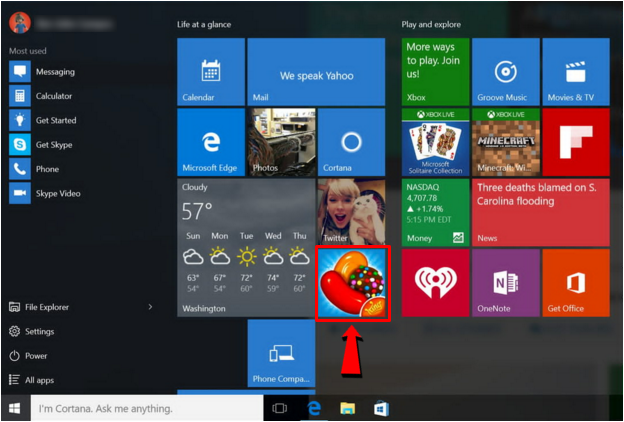 You can also access the same app tile/shortcut from the “All apps” list which opens when you click on the “All apps” link that is found at the bottom-left portion of the new Start Menu as highlighted on the screenshot below.
 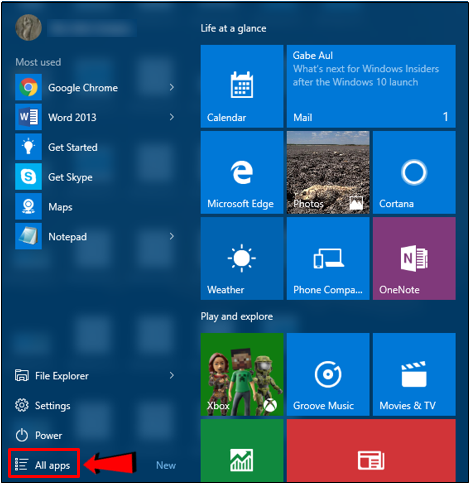 After clicking on the link, the “All apps” list will open and from here, you will see all the apps and programs that are installed on your Windows 10 machine which are arranged in alphabetical order. In order to find the newly installed app, all you need to do is scroll towards the letter group where it is located, click on its shortcut and the app should open instantly. What’s good about the modern/universal apps in Windows 10 is that they can already be controlled in the same way as traditional Desktop programs are controlled. This means that they can already be dragged to the left or right of the screen and they can be minimized or maximized as well. Their icons also appear on the Taskbar just like all of the active traditional Desktop programs on your computer. Windows 10 is truly a big step forward from its predecessors we all know as Windows 8 and Windows 8.1. How far would Windows 10 go? No one really knows but we can expect even more from this latest Windows operating system edition as Microsoft improves it through Windows Updates. Having problems with your newly upgraded Windows 10 machine? We’d love to hear from you so we can extend a helping hand in solving the problem. Just feel free to contact us or use the comments section below to tell us about the details of the problem and we’ll do our best to get back to you with the solution.