How to Make the File Explorer Ribbon Disappear in Windows 10
There has been a lot of changes that were made to Windows 10 and most of us are already enjoying it as of this time but for those who have just upgraded to this latest operating system edition from Microsoft, these changes can often prove to be misleading and confusing especially if older Windows editions were used for a very long time before switching to Windows 10.
One of the changes that really made Microsoft’s latest operating system a lot better is the ribbon-based options found on the File Explorer tool previously known as Windows Explorer in Windows XP, Vista and Windows 7 but just like any other change whether it is on Windows or in any other aspects of life, there really some parts of it that seems to be inconvenient at certain points and the same is true for these ribbon-based options.
If you prefer to just go the old-fashioned minimalist way in terms of the File Explorer’s appearance then you can freely do so by hiding the ribbon from it. Now, the question is it done and we know that you’re going to ask this anyway so in this tutorial, we will be showing the steps that are involved in turning off the ribbon-based options in File Explorer so if you want to do this tweak in your Windows 10 machine, be sure to have it fired-up right now and follow the steps that we’re going to show below.
How to Launch File Explorer
Before going into the steps that are involved in disabling the ribbon-based options from displaying in the File Explorer Window, you must first know how to launch File Explorer. This can be done in many ways on your Windows 10 computer and if you the latest build of Windows 10 installed on your computer. You’ll be able to launch File Explorer quickly by clicking on its quick launch icon that is pinned on the Taskbar as you can see being highlighted on the screenshot below.

In case someone has already unpinned this quick launch icon from the Taskbar, you can simply go to the Start Menu in order to be able to launch it. First, you will need to click on the Start Button or press the Windows key and after you do so, the Start Menu should launch on your computer screen. From here, all you need to do is click on the File Explorer icon that is found on the narrow vertical bar at the left as you can see below.

Right after clicking the icon from the left hand portion of the Start Menu, you should be able to launch the File Explorer Window quickly. It is also possible to access the File Explorer Window using a keyboard shortcut combination. To do this, all you need to do is press the Windows + E keys simultaneously and File Explorer should launch right away no matter where you are within the Windows 10 operating system.

Lastly, you can also launch the File Explorer Window from the “All apps” list in the Start Menu. Just launch the Start Menu using any of the methods that we’ve shown previously then scroll down through the “All apps” list which is found just beside the narrow vertical bar that was shown earlier containing the File Explorer icon. The apps are arranged in alphabetical order in this section so just scroll towards the “F” apps group and click on the “File Explorer” shortcut. This only applies to older versions of Windows 10 and not on the latest build which is also known as the “Anniversary Update”.
How File Explorer Looks Like with the Ribbon On
In order to really have a good grasp on what we are about to disable from your Windows 10 computer, we felt it a need to show you how File Explorer actually looks like when you have the ribbon-based options displayed. Go ahead and open File Explorer Window on your Windows 10 machine and it should look exactly like the one shown below.
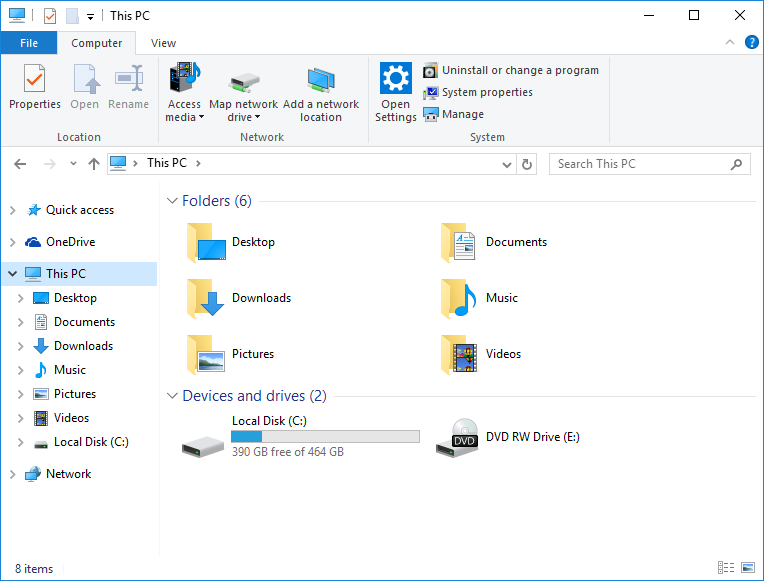
As you can see on the top portion, most of the contextual menus already lie in an area that stretches from left to right. The options in this menu change depending on the item that you have selected on the contents pane. This is how the ribbon-based options look like on the new File Explorer and as you can see, it really is a great tool that will help you work a lot faster with the files and other stuff that are saved in your Windows 10 machine. If you want to avoid this ribbon, you have two options, you can simply hide it or completely remove it. We will show you how the do the former.
How to Hide the Ribbon
As we have mentioned earlier, you can choose to just hide the ribbon-based options on top of the File Explorer Window if you think you’ll need to use it on a later time. To do this, just go the top-right portion of the Window and look for an arrow-up which is located just below the “Exit/Close” button as highlighted on the screenshot below.
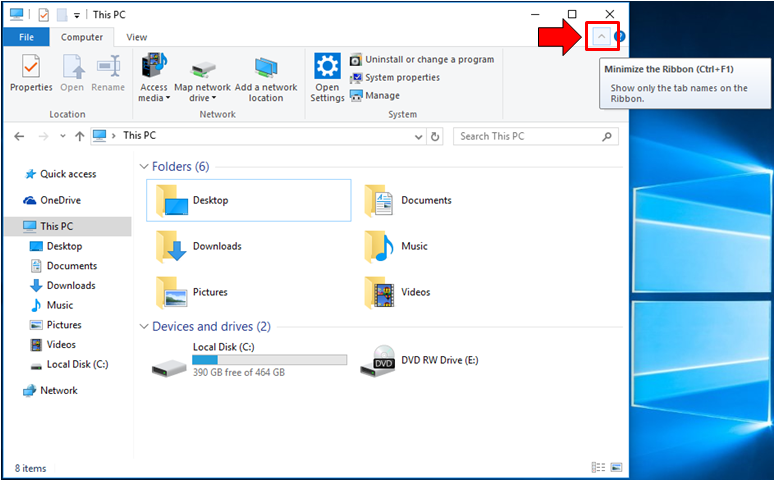
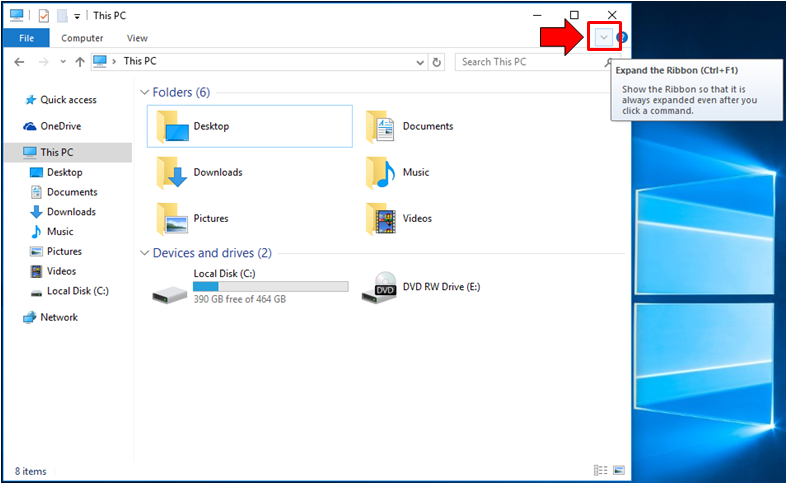
After you click on the icon, the ribbon should slide up and be hidden from the top portion of the File Explorer Window so everything should now look like the one shown on below. If you want to bring the ribbon-based options back and display them again on the top portion, all you need to do is click on the same icon at the top-right portion of the Window which should now become an arrow-down button.
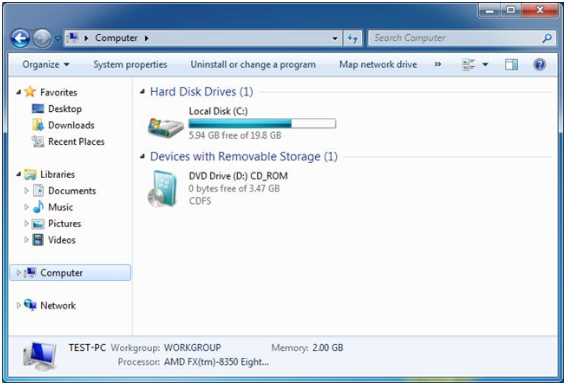
The File Explorer Window looks like Windows Explorer back in Windows XP, Vista and Windows 7 when the ribbon-based options are hidden and there still are people who really would prefer this appearance of the tool rather than the latest one with the ribbon. However, you need to take note that this solution only hides the ribbon-based options and does not really remove it from File Explorer. If you want to completely get rid of the these options so you can have a wider space for displaying the contents of your machine then you’ll need the help of a software which we are going to discuss further as we move along in this tutorial.
How to Totally Remove the Ribbon in File Explorer
If you really want to make Windows 10’s File Explorer look exactly like the old Windows Explorer in previous Windows versions then you will need to use a software that will help you do this tweak easily. The software is really a small one so you don’t have to worry about the size that it might eat up from your machine’s available space and it is called the “Ribbon disabler”.
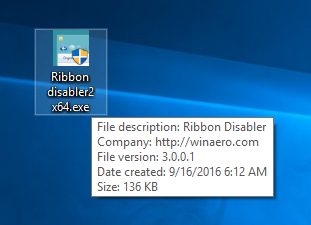
It is a tool that has been developed by geeks at Winaero so go ahead and access its download page then have it downloaded to your computer. The file doesn’t even need to be installed. All you need to do is extract it since it comes in a .zip format and you should be able to see 2 versions of it being extracted (one for 64-bit operating systems and the other for 32-bit operating systems) as shown on the screenshot below.
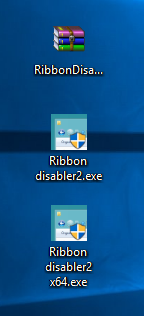
If you are using a a 32-bit version of Windows 10, you will need to use “Ribbondisabler2.exe” while if your Windows 10 version is 64-bit, simply click on “Ribbondisabler2x64.exe”. The twist is you can only use the Ribbon Disabler for the 32-bit version if your operating system is a 32-bit type while it is possible to use both the 32-bit and 64-bit version of the software for 64-bit operating system types. Being able to use both 32-bit and 64-bit versions of software is actually one of the big advantage of using a 64-bit type Windows OS.
Now, you will need to run the tool and the “User Account Control” will display a prompt that looks exactly like the one shown below.
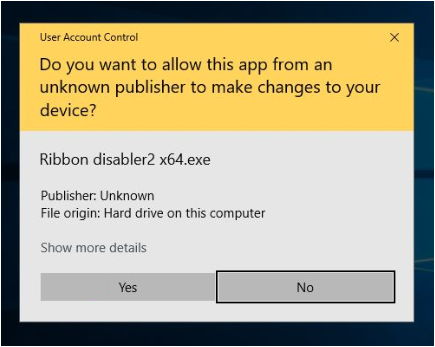
From here, you will need to click on the button that says “Yes” and after you do so, Ribbon Disabler should be launched in an instant and it should look exactly like the one shown below.
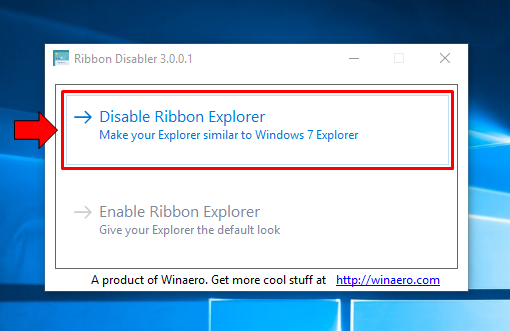
Again, disabling the ribbon will make File Explorer look like the old one which is called Windows Explorer found in Windows 7 as shown below. It is a simple one without all the items sitting on a bar expanding from the left to the right at the top of File Explorer.
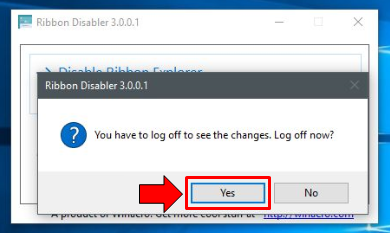
If you are sure that you want to make File Explorer look like Windows Explorer in your Windows 10 machine, all you need to do is click on the button that says “Disable Ribbon Explorer” from the Ribbon Disabler software and it will ask you to log off so that the changes would be applied. Once this prompt appears, simply hit the “Yes” button that is found at the bottom as highlighted on the screenshot below.
You will then be logged off and after logging in again to your computer, the File Explorer Window should look exactly like the one that is shown below and as you can see, the ribbon-based options is now completely gone!
Getting Back the Ribbon-Based Options into File Explorer
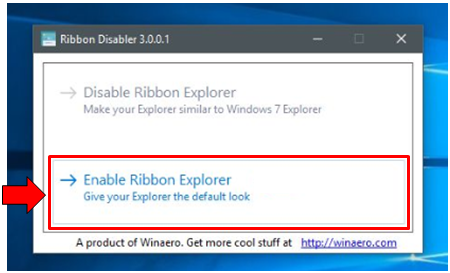
Now, if you change your mind and decide that you want the ribbon and all of the options in it back on the File Explorer tool in your Windows 10 computer, you will simply need to open “Ribbon Disabler” once again and once it launches, simply click on the “Enable Ribbon Explorer” option that is found just below “Disable Ribbon Explorer”.
After you do so, you will again be asked to log off from your computer and after you log in again, the File Explorer should now be back to its normal look bearing all the ribbon-based options.
Toggling from Two File Explorer Types Made Easy!
The ribbon-based options in Windows 10’s File Explorer tool might be a very useful addition to you but there still are others who really prefers the minimalist look of the old Windows Explorer. If you want to try it then you can use “Ribbon Disabler”. This software makes toggling to and from the new style of File Explorer and the old minimalist (minus the ribbon) style a lot easier.
And the best thing about this tool is it’s “FREE”! Did you find this tutorial helpful or interesting? Be sure to share it with your friends! You can also tell us any problem that you’ve experienced in your Windows 10 machine using the comments section below. The steps shown in this tutorial also works in Windows 8.1.