How to Mount or Unmount ISO Disk Images in File Explorer
The Windows operating system has long been in existence and it has evolved through the years since it was first released decades back. The success of this computer operating system is really undeniable but amidst all the positive features that it has, any skeptic can still find a lot of weak points in it especially in older Windows versions that Microsoft seemed to have left out as they advance from one Windows OS version to another.
One such negative point is the lack of a built-in feature that can deal with ISO disk images which is very important especially when dealing with smaller devices like netbooks that has no optical disk drives. Since the only way of installing a software or even Windows itself into a device that doesn’t have a disk drive is by using disk images also know as “ISO image files”, a built-in feature that can deal with these file types would have been very helpful if it were incorporated in Windows XP, Vista or Windows 7 but sadly, there’s none.
Thankfully, there are several third-party software that are offered for free that can be installed back in the days of these Windows versions but how did Microsoft deal with this weak point in Windows 8.1? As you will see in this tutorial, Microsoft’s latest operating system (at least before Windows 10 gets released) actually has a new and built-in feature that can deal with ISO image files and in this tutorial, we will be learning how it works and how you can use it so be sure to follow the steps that are shown below on your Windows 8 or Windows 8.1 computer!
What are ISO Files?
Before proceeding on to the real meat of this tutorial, it is important to know a basic knowledge in what you’re actually dealing with. What exactly are ISOs? If you have signed up for the Windows Insider Program then you probably have encountered the Windows 10 ISO disk image which you were told to download if you’re planning to install the Windows 10 Technical Preview Build to a different computer.
An ISO disk image file is simply a copy of the original disk. This means that it contains everything that the original Windows 10 DVD installer disk has and it also works in the same way as the actual DVD installer works. ISOs are created to be used in smaller devices such as netbooks that doesn’t have an optical drive built-in with then therefore, using DVD installers will not work so the only solution is to create a bootable media using a USB flashdrive and loading the Windows Installer disk image into it so it can be used in installing Windows upon boot up.
Getting Started
Now, let’s start by first making sure that File Explorer is set as the default tool that opens ISO files. It is very important to do this especially if you have installed other third-party applications for working with ISO files such as ImgBurn and many others that are freely available all over the Internet.
To do this, you simply right-click on any ISO image that is saved in your computer, point the mouse to the “Open with” option then on the next option box that appears, hit “Choose default program…” as highlighted on the screenshot below.

After hitting the “Choose default program…” option, a prompt will appear and from here, you will need to click inside the small box that is located at the left of the “Use this app for all .iso files” option just above the list of programs then hit “Windows Explorer”.

So Windows Explorer or also known as File Explorer is now set as the default program that will deal with ISO files in your computer. Now, let’s learn how to mount or unmount ISO files using the built-in File Explorer feature in your Windows 8.1 computer.
Mounting an ISO File Using File Explorer
Let’s say you have an ISO disk image file of a certain software but you don’t have a USB flashdrive to load it into. If you’re still using Windows 7 then you probably would need to download a third-party software to mount the ISO disk image but in Windows 8.1, the built-in ISO feature will help you deal with the situation smoothly.
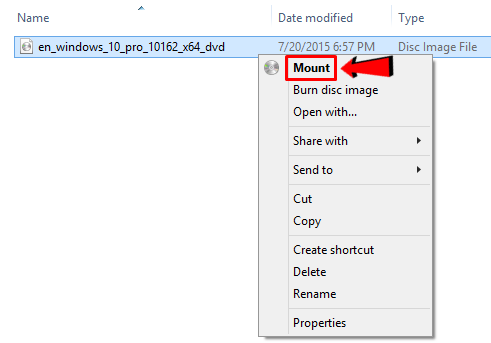
To do this, you will simply need to right-click on the ISO disk image file of the software that you want to install into your computer then on the right-click menu that will appear, just hit the option that says “Mount”.
Now, if you have set File Explorer as the default application for opening ISO files then you can just double-click on the ISO disk image file that you want to mount and it will automatically be mounted without needing to do the right-click gesture on the selected ISO disk image file.
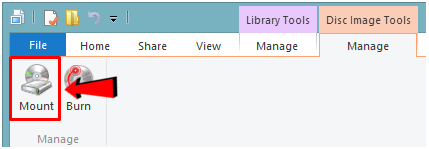
Another method of mounting an ISO disk image file is by clicking on the “Manage” tab located on the options ribbon at the top of the File Explorer Window and on the options that would appear, simply click on “Mount” as highlighted below.
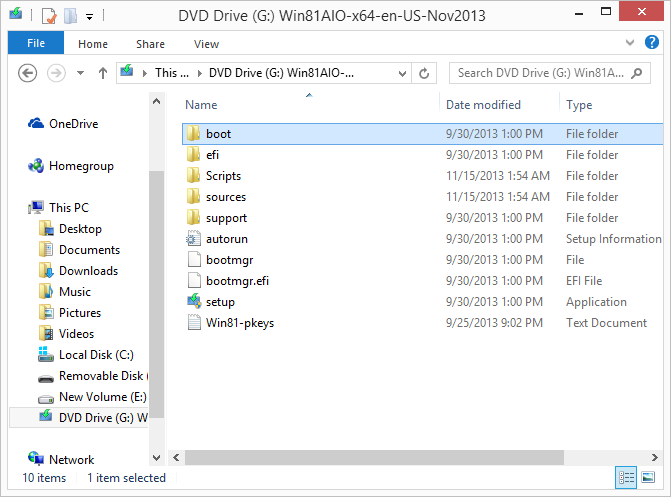
After doing any of the mounting methods shown above, File Explorer will mount the ISO file and display its contents on the screen. If AutoPlay is turned on in you computer, you should also be able to view the AutoPlay menu where you can see all available actions that you can do with the mounted ISO disk image file.
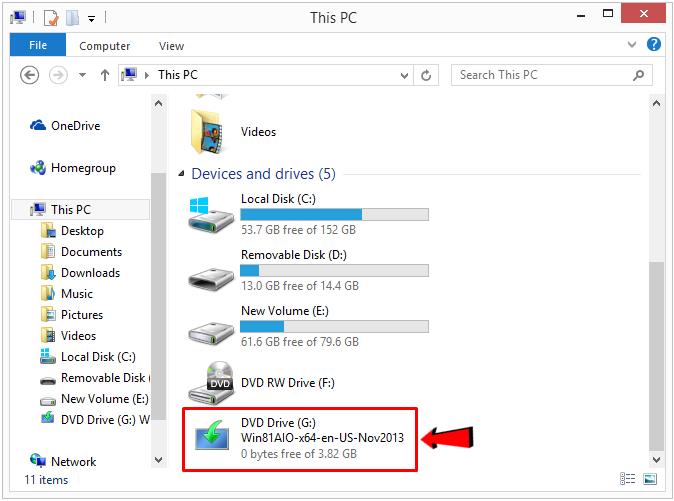
The mounted ISO disk image file will also appear as a virtual drive under the “This PC” section of the File Explorer Window right under the “Devices and drives” portion.
Unmounting an ISO Disk Image File that is Mounted in File Explorer
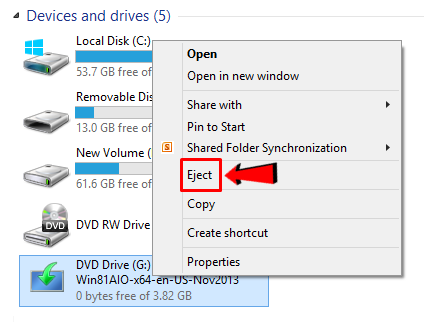
After learning how to mount a certain ISO disk image file for a software or application, let’s now learn how to unmount it. To do this, you can simply open the “This PC” section of the File Explorer Window and from here, you will simply need to look for the mounted virtual drive that appears under the “Devices and drives” portion.
After finding the drive, simply right-click on it then on the right-click menu that would appear, just hit the option that says “Eject” as highlighted on the screenshot below.
Another method for unmounting or ejecting a mounted ISO disk image file is by first selecting it from the list of “Devices and drives” under the “This PC” section of the File Explorer Window then hit the “Manage” tab located on the ribbon at the top.
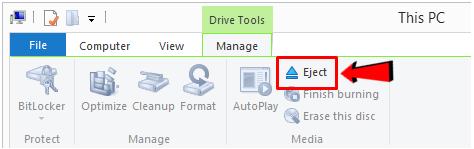
Afterwards, there will be options that will appear under it and from here, you will simply need to click on the only clickable option in it that says “Eject” as highlighted on the screenshot above. After you do so, the virtual drive that has the mounted ISO disk image file should now disappear from the “Devices and drives” portion which means that it has already been unmounted/ejected.
A Very Useful Feature for the Modern Windows Version
As you can see, Windows 8 and Windows 8.1 has a very useful feature that has been included with it which are nowhere to be found in its predecessors. There’s also a big possibility that it will be included in the final Windows 10 release which will be out in July 29 since it can still be found in all Windows 10 Technical Preview Builds that came out in the past months.
With this brand new feature for dealing with ISO image files and all the other awesome features that is going to be included in Windows 10, it surely is going to be the “Best Windows Yet” as it claims it is so what are you waiting for? Be sure to reserve your FREE Windows 10 Upgrade now and it will automatically be downloaded once it becomes available starting the 29th of July this month and of course, always stay tuned-in with us here on WindowsTechies.com to learn all the latest news and get the coolest tips and tricks that you can do with your favorite Windows operating system version!