How to Remove and Uninstall Programs and Applications on Windows 7 and Windows 8
Programs and Applications that are left installed on any Windows machine even if they are not used anymore can be a cause of problems and system slowdowns in the long run but how can you deal with these programs and applications if you can’t even find the uninstall file or shortcut for it? This becomes a very big problem especially when it reaches the point that you can’t install any other programs and Apps on your machine or save other files and media contents in it because it has already run out of memory. In this tutorial, I would like to share some ways to totally remove a program from your computer especially the ones that you don’t need any longer. The methods and steps that will be explained on this article works on Windows Vista (for the first part) then Windows 7 and 8 (for some later part).
1. Using the “Uninstall a program” Link on the Control Panel
Clearly, most of us knows this method. This applies to most of the installed programs on Windows Vista and Windows 7 but not on the Apps installed on Windows 8. This could sound a bit redundant to those who already knows this process but for the benefit of the novice ones, I’ll show how it is done in a step-by-step manner:
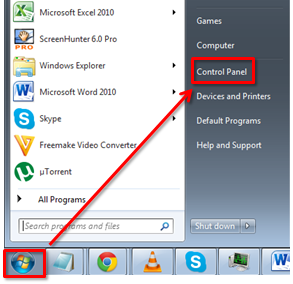
- On the bottom-left corner of the screen, click on the “Start” button or the “Windows Orb” then choose “Control Panel” from the Start Menu.
- You will then be directed to main Window of the Control Panel. From there, you need to click on the “Uninstall a program” link under the “Programs” section of the Control Panel.

- Next, you’ll see the list of all the installed programs on your machine. From this list, you need to click on and choose the one that you’d like removed from your computer then click on the “Uninstall” button at the top portion of the programs list. This button would also appear and labeled as “Uninstall/Change” depending on the program that you wish to remove from your computer.
![]()
2. Using the “.MSI” Setup File of a Program that You Want to Uninstall
There are programs that have 64-bit versions like the 7-zip archiver which does not make use of a setup.exe file but another one with a “.msi” file extension. This is a special file format used on a Windows installer created by Microsoft for the later versions of the Windows Operating System (Windows Vista, Windows 7 and Windows 8).

When you encounter this type of program, you need to remember that you can uninstall them easily without using the Control Panel method. You just simply need to right-click on the setup file for the program then select the “Uninstall” option from the right-click menu that appears.
The uninstall process can also be initiated by using a command line on Windows Command Prompt. Just open the Command Prompt on your computer and be sure to start it with administrator rights. Next, you need to type the “msiexec /x” command on command prompt followed by the file’s “.msi” extension file so you can initiate the uninstall process for it.
3. Making Use of the Uninstall Shortcut for the Program that You Want to Uninstall
After installing a desktop application on your Windows Vista or Windows 7 computer, it also leaves an “Uninstall” shortcut together with all the install files that it saves on your machine . To remove a program using this method, all you need to do is find the program’s folder on the “All Programs” section of the Start Menu and click on the “Uninstall” shortcut that you’ll find in it. On Windows 8, you’ll find this shortcut on the program’s folder on the Start Screen. On the screenshot below, you’ll see how it appears on Windows 8 for a specific program like Dropbox.

There are also times that a program leaves an “Uninstall” shortcut on the Desktop screen of your machine after you installed it. If this happens, all you need to do is click on the shortcut in order to initiate the uninstall wizard.
4. Using the Uninstall.exe File in Uninstalling a Program
Programs that install and leave an uninstall shortcut also leaves an executable “uninstall.exe” file or anything else that somewhat resembles it. This file can also be used to remove a program from being installed on your computer and is always found within the programs installed folder.

All you need to do is run this program and follow whatever instructions that you see from the uninstall Wizard.
5. Removing Apps and other Desktop Applications and Uninstalling Them from the Start Screen (Windows 8)
The steps that I discussed above applies on programs and Applications that are traditionally installed on your computer like how it all happens on Windows Vista and Windows 7 but what if you’re using Windows 8? Do you know how to uninstall the apps that you have installed on Windows 8? If not then I’ll teach you how.
Unfortunately, if you’re using Windows 8, you are only left with one way of doing this and it is a very easy step. All you need to do is right-click or press and hold on the icon of the App that you’ll find on the Start Screen and wait until a context menu appears at the bottom of the screen. You should be able to see an “Uninstall” option on the contextual menu. Just click or tap on it to remove the Application from your computer. If in case you don’t find the icon for the App on the Start Screen then you need to type the name of the program on the Search box then right click on the icon or link of the program that you can see on the search results and click or tap on the “Uninstall” option from the menu that appears.

You can also do this on some desktop applications that are not used anymore but unlike Apps, desktop applications will not be removed right away after you click on the uninstall option- instead, you will be directed to the “Programs and Features” section of your machine’s Control Panel where you will be able to click on the “Uninstall” button located on top of the programs list. After doing so the uninstall wizard of the program should start and the uninstall process should already look and feel like doing it on Windows Vista and Windows 7.
6. Use Specialized Software in Uninstalling Apps and Desktop Programs
If you feel like going through the steps that I discussed above is a bit hassle and you don’t have the time to do such then you can download or purchase a software that does the job for you in one simple click. Once you already have the install file on your computer or you have the installation disk of the program, you just need to install it and start using it for the purpose that you want it to do. If you are undecided of which program you should choose then you can refer to our software reviews section for PC optimizers which does more than just cleaning and fixing errors butt also clean clutters on your disk and the registry and above all, manage any uninstall process that you wish to do automatically!
That’s it! You now learned six different ways of uninstalling any unused program and application installed on your Windows machine. I do hope that this has somehow added to your technical know-how so you won’t be needing the help of anyone else the next time you want to remove a program from your computer.