How to Use the Optimize Drives Tool in Windows 8.1
Windows has always contained more than enough features that help users maintain or even improve in many aspects such as productivity and performance and through the years, these tools have also evolved and went through changes all geared towards improving the Windows OS platform and as well as your user experience many times over!
One of these tools is called “Disk Defragmenter” which has been face-lifted and was given a new name in Windows 8 and Windows 8.1. But what does this tool do and how can you start using it in improving your computer’s performance? These questions are what we’re going to answer as we move towards the end of this tutorial so just read on and follow the steps that we are going to show below.
New Name, Better Performance
As we have mentioned earlier, the “Disk Defragmenter” tool has been renamed and had some improvements made to it. It is now called “Optimize Drives” in both Windows 8 and Windows 8.1 and in case this is your first time to hear about this built-in tool that is meant to help users declutter their hard disk drives and improve system performance then you will first need to read our previous tutorial that demonstrates all of the available methods in launching this tool.
However, if you don’t want to jump to a separate tab and open a different tutorial just to learn a single method in accessing the “Optimize Drives” tool then we will show you one of the easiest ways in launching it and as well as explain how this tool works.
Launching the Optimize Drives Tool
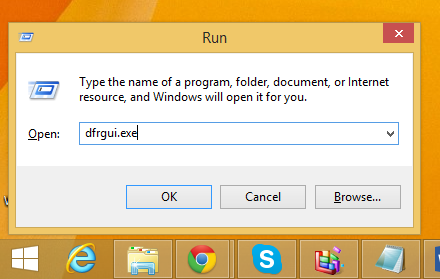
There are several ways in accessing the “Optimize Drives” tool in your Windows 8 or Windows 8.1 computer but the simplest one that you can use is through the “Run” box tool. This small box helps you launch some built-in Windows accessories and software tools by entering their .exe file name. To launch the “Run” tool, simply press the “Windows + R” keys

After doing so, you should be able to see a small box that will appear at the bottom-left section of your computer screen which looks like the one shown on the screenshot below. Inside this small Window, you will see a text input box where you will simply need to type-in “dfrgui.exe” (excluding the quotation marks) then hit the “OK” button and you should be able to launch the “Optimize Drives” tool instantly!
What Does Optimize Drives Do?
Now, it would be hard to convince users to use something if they don’t even know what it is for or realize the benefit that they would get if they use it. If this is your first time to hear about the “Optimize Drives” tool and you have not experienced using it even in previous Windows edition like Windows 7 then chances are you also don’t know yet what this tool is used for.
Well, simply think of the “Optimize Drives” tool as the one that organizes everything on your computer’s hard drive when all the cluttered stuff starts affecting your machine’s performance making it become slow or unresponsive in some cases. If your computer uses a hard disk drive then this is highly possible and in order to organize all the scattered data that is written on your hard drive, you will need to use the “Optimize Drives” tool.
“Optimize Drives” groups and organizes related data and files together into sections or packets on your hard drive making it a lot easier for the system to access certain stuff. This process is also known as decluttering and we will shown you how this is done using the “Optimize Drives” tool as we move on in this tutorial.
How to Use the Optimize Drives Tool
After learning the basics about the “Optimize Drives” tool in your Windows 8/Windows 8.1 machine, it is time to go deeper into the details and see how it is used. First, you will need to summon “Optimize Drives” using the method that we have demonstrated earlier or you can also choose from the different methods that we have shown in our previous tutorial.
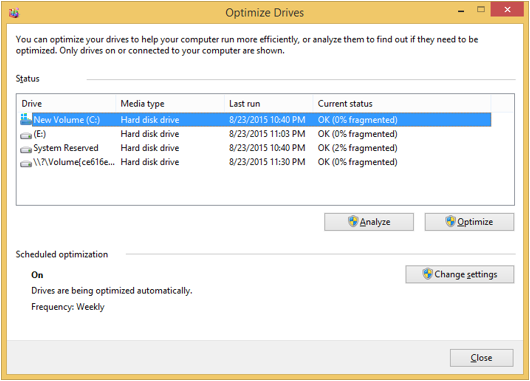
Once the tool opens, you will see a list of drives and drive partitions that currently exist on your computer as shown on the screenshot below. On this list, you will notice that most of the drives has 0% fragmentation under the “Current status” column.

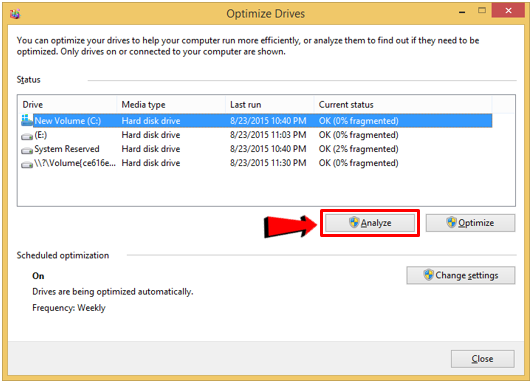
To update the information that is found under the “Current status” column for the drive that you want to defragment/optimize, all you need to do is select it then click on the “Analyze” button that is found at the bottom.
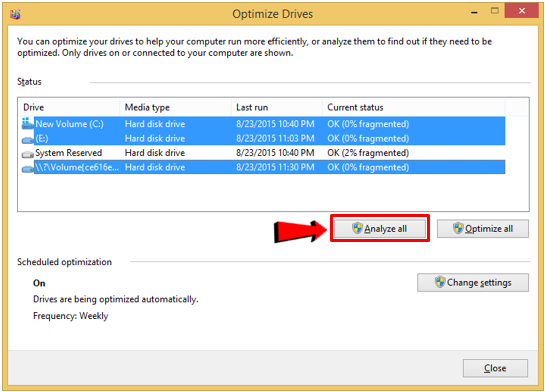
After hitting the “Analyze” button, “Optimize Drives” will not start checking if the drive that you have selected needs to be optimized in order to improve its performance, you can also choose to analyze multiple drives that display on the “Optimize Drives” Window simply by holding the “CTRL” key and clicking on each drive that you want to be analyzed. Once the drives are highlighted, all you need to do is click on the “Analyze all” button that is located at the bottom.
While the Analyze process is on going, you will see under the “Last run” column whether Optimize Drives has already completed the process or not. If it has not been completed yet then you will see “Running” while for drives that have already been analyzed, you will see the date and time when the the process happened.

Once “Optimize Drives” is done analyzing a certain drive, you will see the overall fragmentation percentage of it under the “Current status” column. Take note that a fragmentation percentage that is below 20% is safe and doesn’t need optimization while if it is above 20% then you need to optimize the drive.
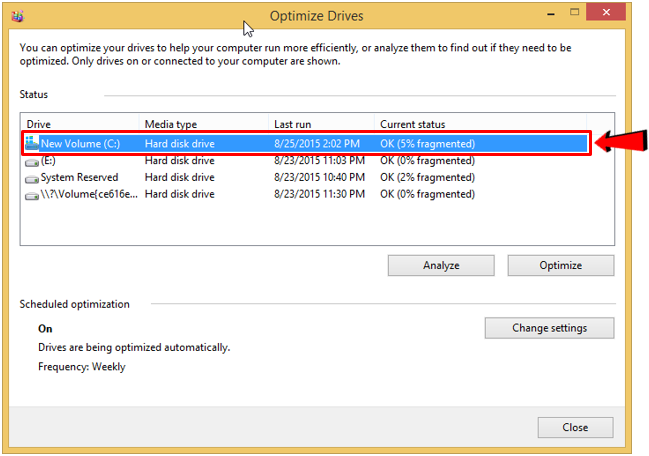
On the screenshot above, you will see that drive (C:) is only 5% fragmented which means that you don’t really need to optimize it although you still can if you prefer to do so out of curiosity.
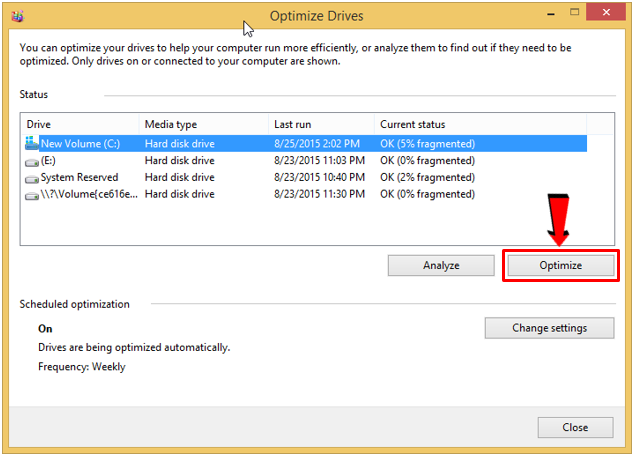
The more fragmented a drive is, the more time it will take for it to be defragmented and it would even take longer if you chose to defragment multiple drives at once. To defragment a drive, all you need to do is select it from the list then hit the “Optimize” button as highlighted on the screenshot below.
How to Schedule Drive Optimization
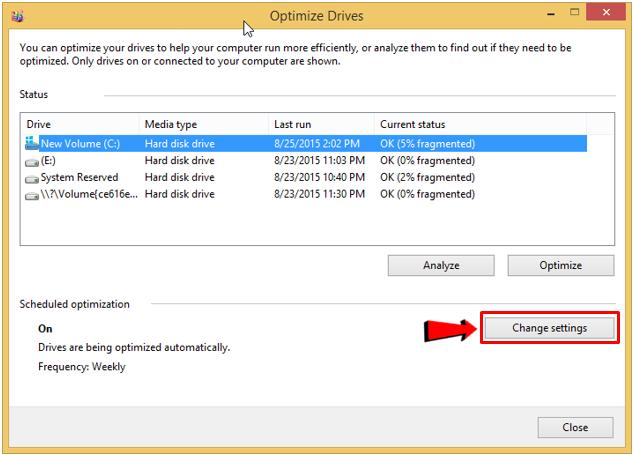
Just like most of the other available tools in Windows, “Optimize Drives” can also scheduled and doing this is very simple. To start, you will need to click on the “Change settings” button that is located at the bottom-right portion of the “Optimize Drives” Window as shown below.
After the button is clicked, a small Window that shows the settings for the “Optimize Drives” tool will appear and from here, you can change the “Frequency” to “Daily, Weekly or Monthly”. “Weekly” is the default setting in this section.
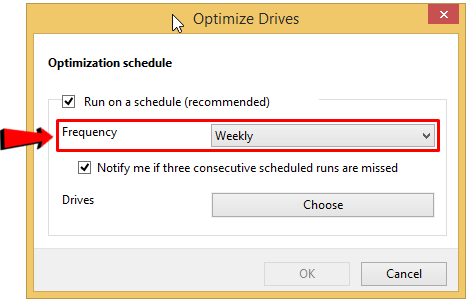
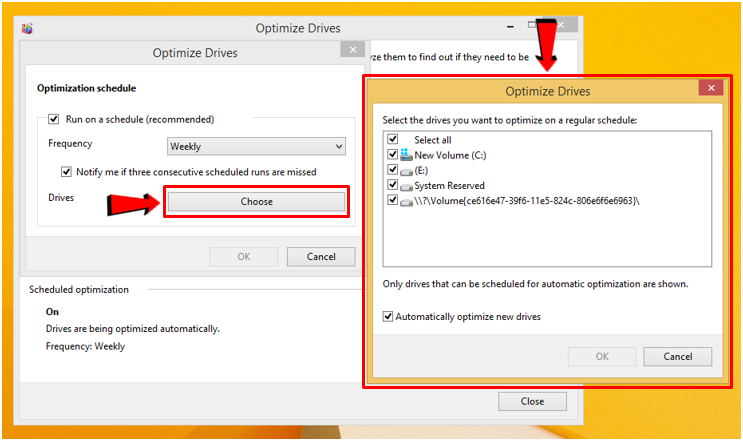
Next, you can also choose which drives are optimized/defragmented on the schedule that you have selected, to do this, you will simply need to click on the “Choose” button as highlighted on the screenshot below and a new Window which displays all available drives will appear and from here, just select the drive/s that you want to be optimized regularly and click the “OK” button!
The schedule for optimizing the drive that you have selected will then be applied and will be executed regularly once the schedule comes. Optimizing/defragmenting your drive should solve the noticeable decrease in responsiveness that you’ve been having and if the problem still persists then it is time to do something else that would now check for malware and other forms of viruses.
Did the “Optimize Drives” tool help you restore your computer’s processing speed and responsiveness? We would like to hear from you. Please feel free to post your story using the comments section below.