How to Use the Remote Desktop Universal App in Setting Up Remote Connections
We have been talking about one of the awesome features that is found in the Windows operating system which is called Remote Desktop Connection in our previous tutorials and there is still more to discover and learn about this tool which we are going to discuss deeper in a series of other tutorials including this one.
Now, let us say for example that you are using a Windows 8.1 or a Windows 10 computer as a client and you want to connect to a host computer using Remote Desktop Connection. Aside from the traditional tool that is readily available from the Control Panel, is there any other way in getting access to this tool?
The answer is yes and if you have been using these latest versions of the Windows OS then you will surely be familiar with the Universal Apps! Most of the tools that we love in Windows have their equivalent universal app and this includes the Remote Desktop Connection feature.
Yes! There is actually a modern app version of this tool and in this tutorial, we will be discussing the steps in how you can install and use it into your Windows 8.1 or Windows 10 computer so be sure to get your Windows machine fired up and follow the steps that we are going to demonstrate below.
Accessing and Installing the Remote Desktop Universal App
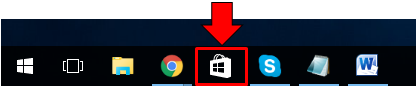
The first thing that you need to do if you want to use the Universal App version of the Remote Desktop tool is to first open the Store app. To launch it, you can simply click on its quick launch icon that is pinned on the Taskbar as highlighted on the screenshot below.
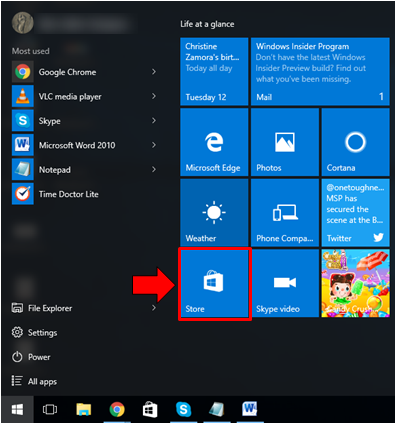
In case the quick launch icon for the Store app has already pinned removed/unpinned from the Taskbar, you can go ahead and click on the Start Button or press the Windows key in order to open the Start Menu and from here, just click on the Store tile that is found on the right portion as shown below.
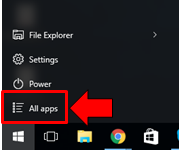
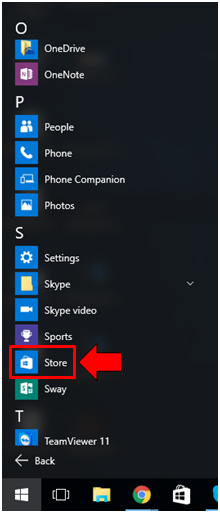
If the Store tile is still not found on the Start Menu because it has already been unpinned from it then you can go ahead and click on the “All apps” link that is found on the bottom-left portion as highlighted below.
After you do so, the list of all the apps and programs that are installed as well as the ones that are built-in with Windows will appear and they are arranged in alphabetical order. From here, just scroll towards the “S” group section and look for the “Store” shortcut as shown on the screenshot below.
Install the Remote Desktop App
Once the Windows Store app opens, you will simply need to put your focus on the search input box that is found on the top-right portion and in here, simply type the words “remote desktop”.
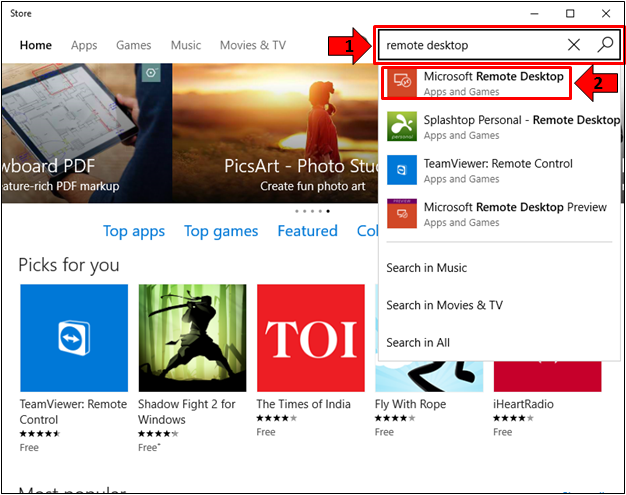
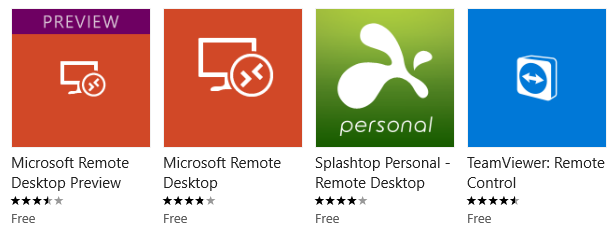
After typing in “remote desktop” into the search input box, the Store will then give you search result suggestions which will appear in a white box just below the input box. From here, you can simply click on the item that is labeled “Microsoft Remote Desktop” as highlighted on the screenshot above. In case these suggestions don’t appear, you can simply press the “Enter” key on your computer’s keyboard or click on the “Search” button in order to view the search results.
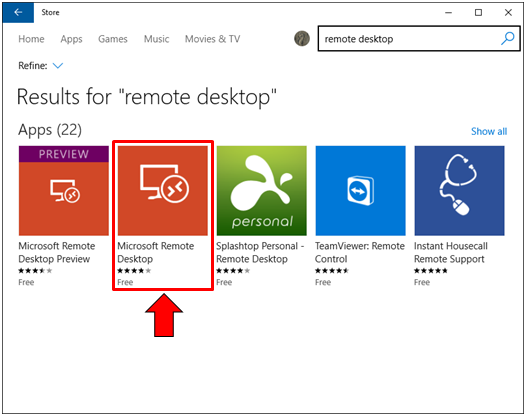
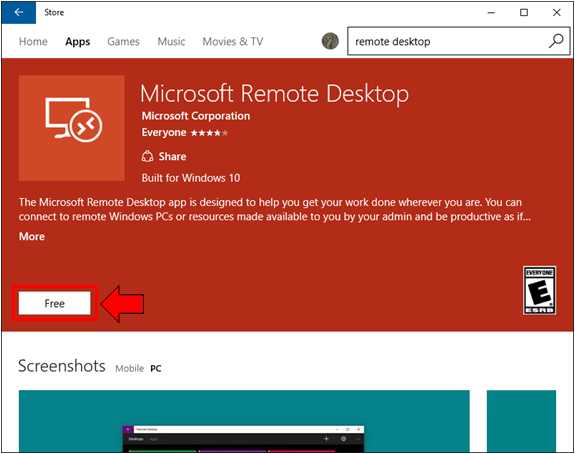
From the list of search results, just click on the one that is labeled “Microsoft Remote Desktop” in order to view the information page of the app. Once you are on it, just click on the button found at the bottom-left portion which is labeled “Free” in order to initiate the installation process.
The download and installation process for the app will then start and you will see a progress bar that shows the overall progress as you can see on the screenshot below. Just wait until the download and install process is done or if you are doing something else on your computer, you can get back to it and just check if the app is already installed in a later time. The length of time for the whole process to complete depends on how fast your Internet connection is. If you have faster Internet then the process will be completed in around 2-3 minutes.

Once the app is already installed, the “Free” button which you clicked earlier in initiating the install process will now become “Open” so just click on it or if you want to use the app at a later time then you can just close the Store app Window and go on with what you have been doing on your Windows computer.
How to Launch the Remote Desktop Universal App in Windows 8.1
Now that you’ve already installed the universal app version of the Remote Desktop tool, it is time to learn how it can be launched. It is important to note that universal apps don’t create a Desktop shortcut once they are installed so you need to access them in a different way. If you installed the app in a Windows 8.1 computer, you can use the Search feature by pressing the Windows + S keys and once the Search screen slides in from the right, just input the word “remote” into the search box that is located on top and the Remote Desktop universal app shortcut should appear almost instantly just below the box as shown below.

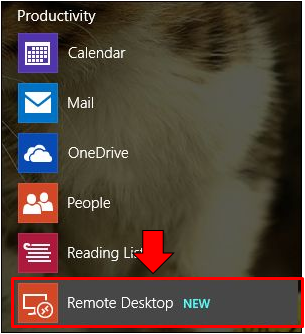
Another way in doing this is from the All Apps screen. To access this section, just open the Start Screen first and once you are on it, simply slide the screen upwards and you should be able to view a list of all the apps and programs that are installed and built-in with your computer. From here, simply go towards the group that is labeled “Productivity” and look for the “Remote Desktop” app shortcut under it as shown below.
You can choose from these two available methods in launching the Remote Desktop universal app in a Windows 8.1 computer. Now, what if you are using a Windows 10 machine? Do you know how to launch the Remote Desktop universal app in Microsoft’s latest operating system version? If you you don’t know yet then just follow the steps that are going to be shown below.
How to Launch the Remote Desktop Universal App in Windows 10
After the Remote Desktop universal app is installed in a Windows 10 computer, the next step that you would need to do is to launch it so you can start using it. Launching this app in Windows 10 is quite different from the methods in how it is launched in Windows 8.1 so if you’ve been trying to figure out how to get the app fired up in your Windows 10 machine then here are the steps.
First, you can actually launch it in an quick and easy way simply by pressing the Windows key or clicking on the Start Button in order to launch the Start Menu. Once the Start Menu opens, just put your attention on the list of apps, shortcuts and links on the left portion and from here, look for the “Remote Desktop” app shortcut as you can see being highlighted on the screenshot below.
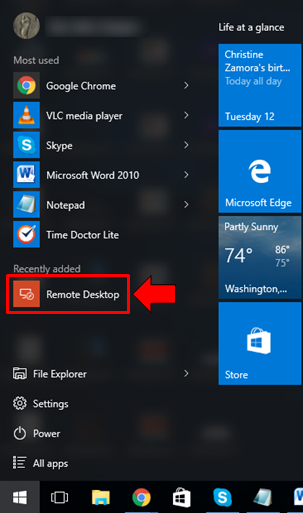
Since the app has just been installed into your Windows 10 computer, you will see that it is located under the “Recently added” section. Now, in case you don’t find the app shortcut on the Start Menu screen, you can simply click on the “All apps” link at the bottom-left portion of the Start Menu in order to access the list of all the apps and programs that are installed and built in with Windows 10.
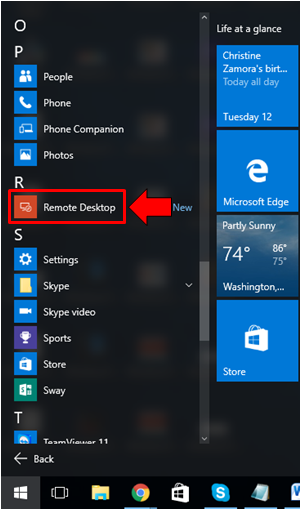
From the list of apps and programs that will appear, just scroll down towards the “R” section (since the apps and programs are arranged alphabetically) and click on the “Remote Desktop” shortcut as shown on the screenshot above. You will also notice that the app shortcut itself is easy to recognize since there is a label on its right portion which says “New”.
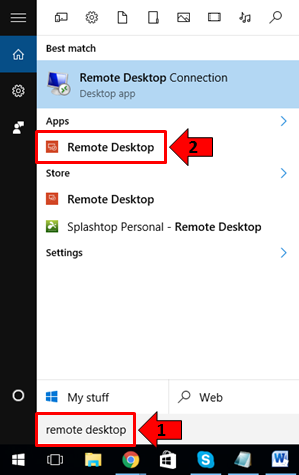
If you want a newer method in launching any app, program or setting in Windows 10 then you can choose to use the Search feature. To launch this very useful tool, just press the Windows + S keys and you will see it pop up at the bottom-left portion of the screen. Once it appears, simply input the words “remote desktop” and just click on the Remote Desktop app shortcut that will appear just above the search input box.
Connecting to Another Windows Computer/Device Using the Remote Desktop App
Now that you know how the Remote Desktop app is launched after it gets installed on your Windows 8.1 or Windows 10 computer, it is time to learn how you can set it up so you can initiate a Remote Desktop session. But before we start, you need to remember that you can instantly initiate remote desktop sessions if you are using Windows 8.1 or Windows 10 machines however, you can only connect remotely to computers that runs the following Windows OS editions.
- Windows 10 Pro
- Windows 10 Enterprise
- Windows 8.1 Pro
- Windows 8.1 Enterprise
- Windows 8 Pro
- Windows 8 Enterprise
- Windows 7 Ultimate
- Windows 7 Professional
- Windows 7 Enterprise
- Windows Vista Business
- Windows Vista Enterprise
- Windows XP Professional
If the computer that you want to connect to runs Ubuntu or Mac OS X, you cannot remotely connect to it using the Microsoft Remote Desktop Universal App so you will need a third party software to do this.
In order to connect to a computer remotely, you will first need to enable Remote Desktop Connections on it and be sure to remember the login credentials of the account to which you have enabled Remote connections for since it will be needed later on. To learn more about enabling Remote Desktop Connections in any of the Windows OS versions we’ve given above, you can follow the steps that we have shown in our previous tutorial.
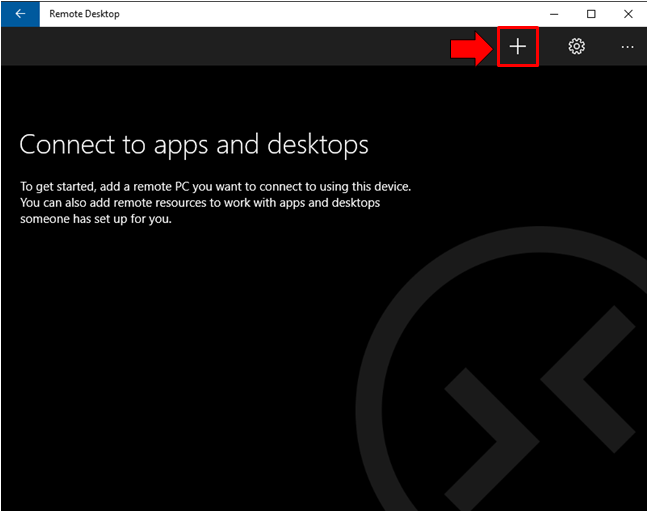
Once you are done setting up the Windows computer which you want to connect to (also known as the host computer), it is time to fire up the Remote Desktop app on your client computer or the computer that you will be using to establish the remote connection from. When the app launches, you will need to put your focus on top-right portion where you will need to click on the “+” icon in order to view the options that are available.
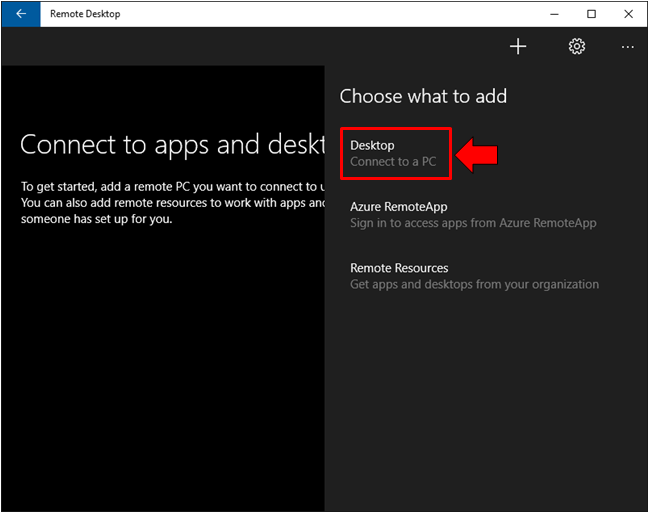
After the “+” icon is clicked, you will be able to see as screen that will pop out of the right portion which says “Choose what to add”. From this screen, all you need to do is click on the first option in it that says “Desktop” as highlighted on the screenshot below.
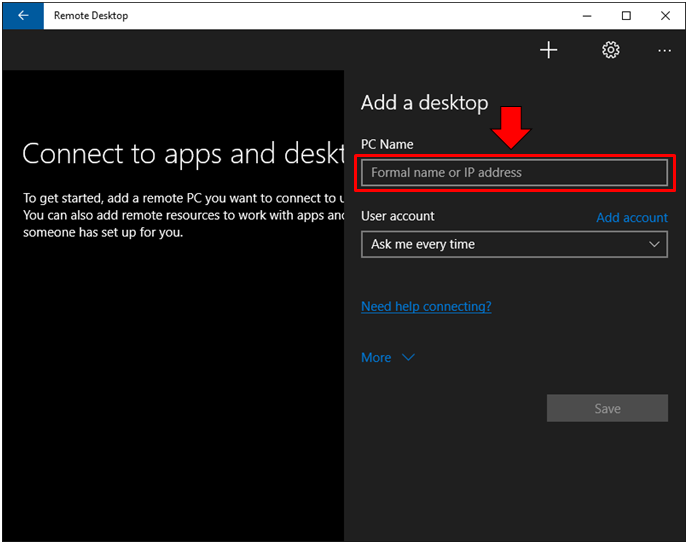
After hitting on this option, you will be able to access the section where you can enter the computer name of the host computer in case it is connected to the same network that your client computer is connected to or its IP address in case you are connecting to the host computer that is located in a different place via the Internet. This information should be accurate so be sure to enter the right computer name or IP address.
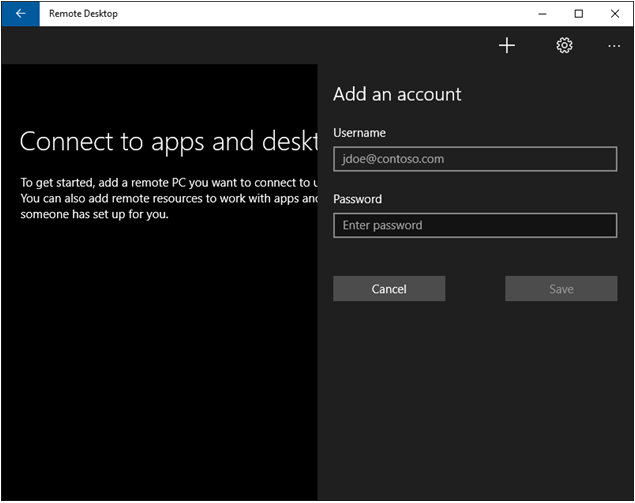
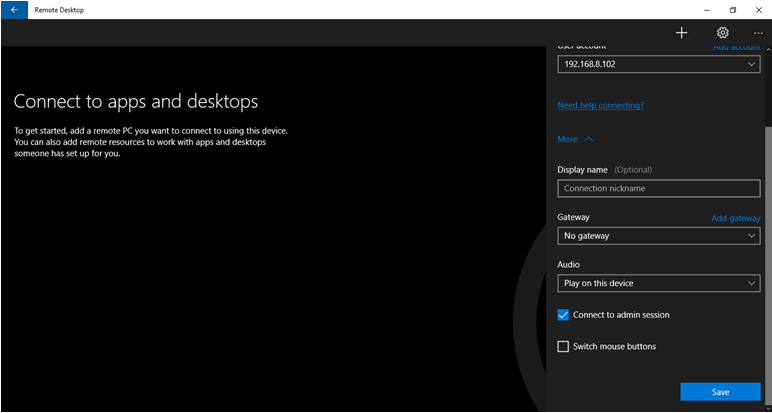
Next, you will now need to remember the account logins on the host computer to which Remote Desktop Connections is enabled. This information is also needed in order to make the session secure. To input these credentials, you will simply need to click on the link that says “Add account” and you will be taken to a screen that looks exactly like the one shown below. Just input the needed information then hit the “Save” button.
On the next screen after hitting “Save”, you will again see other settings and tweaks that you can set for the Remote Desktop session. We recommend that you just leave these settings as they are and just check the option that is found at the bottom which says “Connect to admin session” then hit the “Save” button.
You will then be taken to the home screen of the Remote Desktop universal app and as you can see, there will now be a new item on the screen which is now your added and saved Remote Desktop session as you can see on the screenshot below.
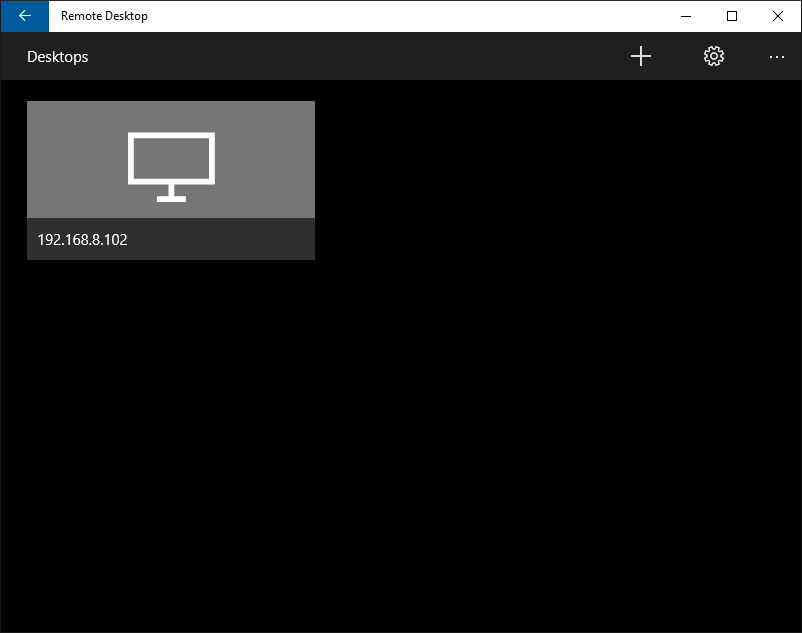
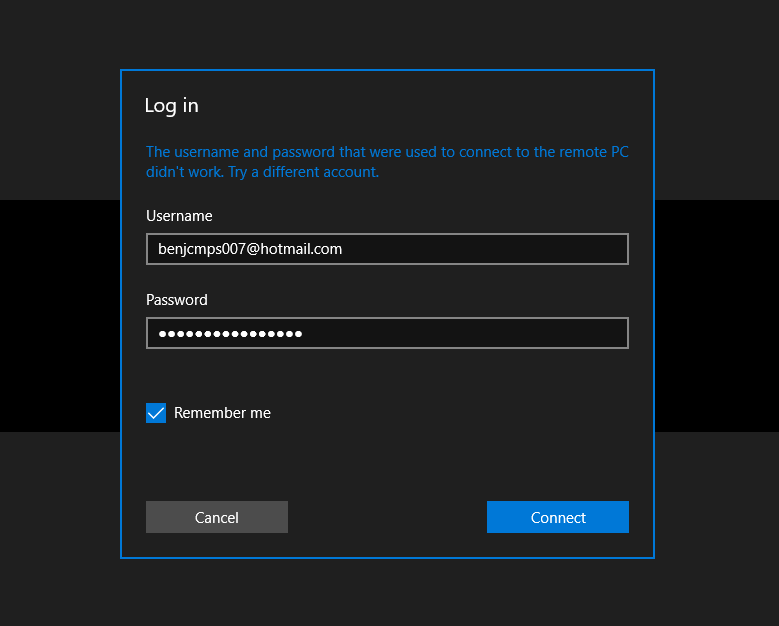
In order to connect to it, all you need to do is click on the session tile and you will then be asked to enter the password for the user account on the host computer to which Remote Desktop Connection is enabled for. After entering this information, just check the “Remember me” option so you won’t be asked to input the password again the next time you connect then hit “Connect” button.
Now, just wait for a few seconds and voila! You will now be able to view the host computer’s Desktop screen all ready for your tweaking!
Try it and Be Amazed!
As you can see, setting up a Remote Desktop session using the new Remote Desktop universal app for Windows 8.1 and Windows 10 really works like magic! It will surely be of help to you especially if you need to access your work computer in the office even if you are just at home anytime! Have you tried using this tool in your Windows computer before? We’d like to know how it worked some magic for you. Please feel free to share your Remote Desktop experiences using the comments section below.