Exploring the Insert Options in Microsoft Word
Just like WordPad, Microsoft Word also has an option for inserting objects to a document that you are working on in it but instead of just dedicating one section of the ribbon, there’s a whole tab on the top portion of the software’s Window dedicated solely for the insert options and you’ll surely be overwhelmed with the number items that are lining up from left to right. In this tutorial, we will be identifying what objects you can insert into a Microsoft Word document and learn the steps in accessing the app so be sure that you have installed the Microsoft Office Suite into your Windows 8.1 machine.
Getting Microsoft Word Installed
If you are using a brand new Windows 8.1 computer then chances are the latest Microsoft Office Suite is already installed in it but if you just installed the operating system into an old machine which has enough specifications to accommodate it then you would need to install the Office Suite to it by purchasing an installation disk from your nearest computer store or purchasing it online from the Microsoft website. In this tutorial, I will be using the Microsoft Office 2010 suite which I am more comfortable with but you don’t need to worry because the options that are available here are just the same with the ones on the latest Office suite version so you won’t really be confused along the way.

Accessing Microsoft Word from Apps View
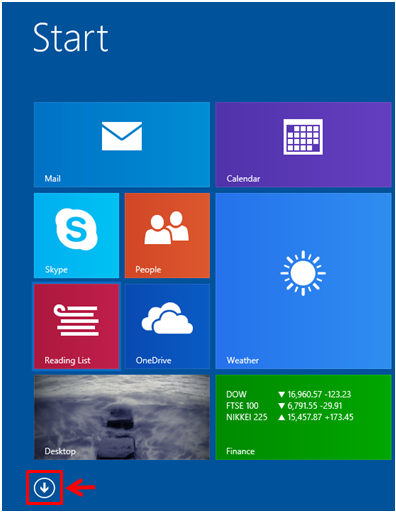
Once you’re sure enough that Microsoft Word is already installed on your computer, it is time to learn how you can access it and because the Start Menu has already been removed in Windows 8.1, all of your desktop apps can only be accessed from the Apps view screen or by using the Search feature. In using the former, you will need to first click on the Start Button or press the Windows key in order to open the Start Screen and from here, just make a little movement with the mouse or touch an empty area to summon a round button with an arrow- down icon in it that will appear at the bottom-left portion of the screen.
Once the Apps view screen appears, simply scroll to the right using the arrow right key on your computer’s keyboard or by clicking on the arrow right scroll button located at the bottom right corner of the screen until you find the “Microsoft Office” apps category, under this section, you should be able to find the shortcut for Microsoft Word and when you’re able to locate it, just click or tap on it and the desktop app will open.

Accessing Microsoft Word Using Search
An easier way in accessing any desktop app such as Microsoft Word is by using the Search feature which is perfectly integrated with the Windows 8.1 operating system. To do this, you can either click on the Search button located on top of the Start Screen lying just beside the Power Button and your account name and picture and once the Search screen appears at the right hand portion, simply input “Microsoft Word” into the search input box then wait until the Microsoft Word shortcut appears right under the box.
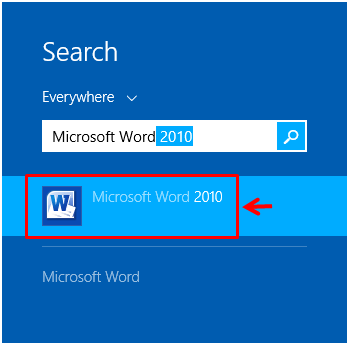
You can also use the Search feature without clicking on the Search button and this is done simply by accessing the Start Screen first and once you are on it, just type “Microsoft Word” on your computers keyboard then you will see the Search screen appear and the words you typed will automatically be in the search input box while the shortcut will appear underneath it just like the screenshot shown above.
Accessing the Insert Options
All of the available insert options are found under the “Insert” tab which you can find at the top of the Window just below the “Quick Access Toolbar”. Once you are able to locate it, simply click on it and all of the available options under it will open on the ribbon as shown on the screenshot below.

The Insert options are divided into 7 groups which are “Pages”, “Tables”, “Illustrations”, “Links”, “Header and Footer”, “Text” and “Symbols” and each one of them contain a unique set of options which we will be getting to know more below.
The Pages Options
The first group of options that is found under the “Insert” tab is labeled “Pages” and is used when you want to insert a “Cover Page” of different types, a “Blank Page” or a “Page Break”. Among these options, the “Cover Page” is the only one that will open even more choices in a box when you click on it as shown on the screenshot below.

The Tables Option
Next, you will see the “Tables” group which contains only one option under it and when it is clicked, a box will appear where you can set the number of columns and rows for the table that you want to insert into the document that you are working on. There are also other links like “Insert Table”, “Draw Table”, “Convert Text to Table”, “Excel Spread Sheet” and “Quick Tables” which you can simply click to whatever you choose.

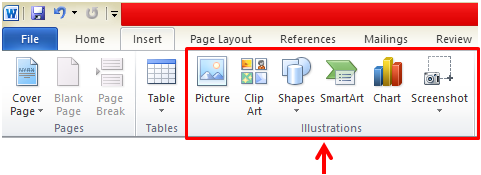
The Illustrations Option
After “Tables”, what follows is the “Illustrations” group of options which will allow you to add some graphic elements into the document that you are creating. The available options are “Picture”, “Clip Art”, “Shapes”, “SmartArt”, “Chart” and “Screenshot” and most of these options are actually user-friendly so you would surely be able to learn how it is used by doing some simple exploring in it.
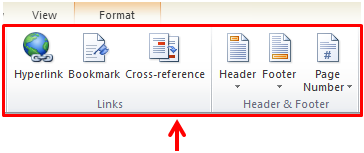
The Links and Header and Footer Options
The “Links” and the “Header and Footer” groups of options are what comes next. Under “Links” you will be able to access three options which are “Hyperlink”, “Bookmark” and “Cross Reference” and all of them basically lets you add webpage links to the document that you are working on. You can even hide a link by linking it to a certain word so you can save space and avoid disrupting the flow of a sentence or a phrase. Just next to “Links” is the “Header and Footer” options which will allow you to add nicely formatted headers on a certain documents especially those formal ones and as well as add footnotes to describe any reference that you want to cite or add a page number to it.
The Text and Symbols Options
The last two groups of options under the “Insert” tab are labeled “Text” and “Symbols”. Under Text, you will be able to access some options for inserting letters and words with more artistic effects such as WordArt and other stuff. If you are trying to add a symbol that does not appear anywhere on your computer’s keyboard then you should check under the “Symbols” group and the one that you’re looking for should be found under the “Symbol” option while if you are looking for an equation to add on to your document then checking under the “Equation” option will surely be of great help.

As you can see, Microsoft Word has almost all that you could wish to insert into a document and it is not only limited to some graphic elements but also includes special format texts. Take even ore time to experiment with each of the options that I have shown here and you’ll surely enjoy everything that this awesome software offers!