Lost Somewhere? Use the Maps App
One of the most powerful features in Windows 8 is the “Maps” app. If you love travelling and you easily get confused with directions then you can use this as a tool in finding your way in a place that is not familiar with you. You can also stay updated with how the traffic looks like in a certain place so you can plan your trip and arrive at your destination on time. The app also works perfectly when you are using a keyboard and a mouse and as well as a touchscreen device.
On touchscreen devices, you can do a pinch gesture to zoom in or zoom out and as well as the familiar swipe upward or from the right-hand side of the screen to view more options and share map information. Step-by-step directions will also be given to you whenever you need it and landmarks can be viewed and zoomed in while you are on Aerial view.
In this tutorial, we will be looking the at the steps involved in using the maps app in Windows 8 and learn some tricks that will help you master everything that has to do with it.
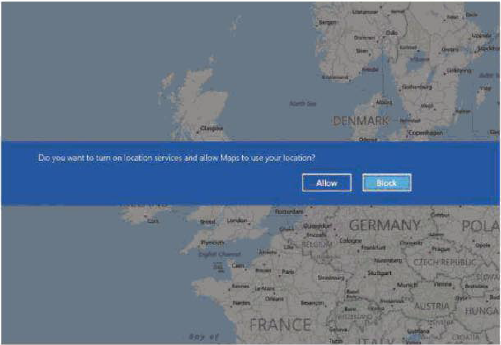
Allow Maps to Use Your Location
After Windows 8 starts up, it checks what type of permission it has. If the system detects that some permissions needed are not enabled such as your location, webcam etc, The “Maps” app will ask for it after it opens. When you are asked by the app to turn on this permission, simply answer “Yes” or “Allow”. If you fail to do this, you will not get directions from your current location.
NOTE:
Turning the permission about your location might compromise aspects of your security. If you don’t want this to happen, you can turn it off right away after using the Maps app. The Location service in Windows 8 allows apps to share your location and display it in social media and other places. Other applications like Internet Explorer 10 may use this permission to cater the right advertisements according to your browsing history, favorite sites and other stuff that you usually do online.
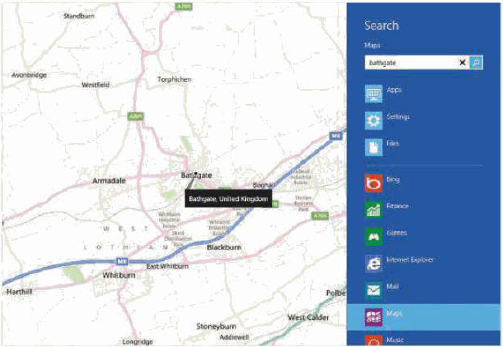
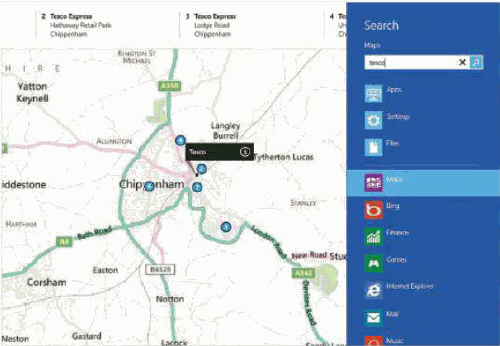
Search for a Place
If you get lost somewhere but you still have a connection to the Internet, you can use the “Maps” app in finding out where you are and getting directions to where you want to go. Simply access the standard search feature by accessing the “Search” charm. You can do this by swiping your finger from the right-hand portion of the screen towards the center and clicking on the icon that is labeled “Search” from the black bar that appears. If you are using a mouse, you can simply point it to the upper or the lower-right corner of the screen and the same black strip overlaid with icons will appear. Simply click the one labeled “Search” and you will get a search input box where you’ll need to input a place (whether the one you are currently in or the one you are heading to) then hit the “Enter” key so that the map will show you your location and give you directions to where you are going to.
Check the Current Traffic Condition
While you are on the “Maps” app screen. Simply right-click anywhere on it and you’ll see the “App bar”. From here, you can see the traffic flow on major roads (those that have green, amber and red colors). Other options will also appear like the “Map style” and other settings for you to do some tweaks on.
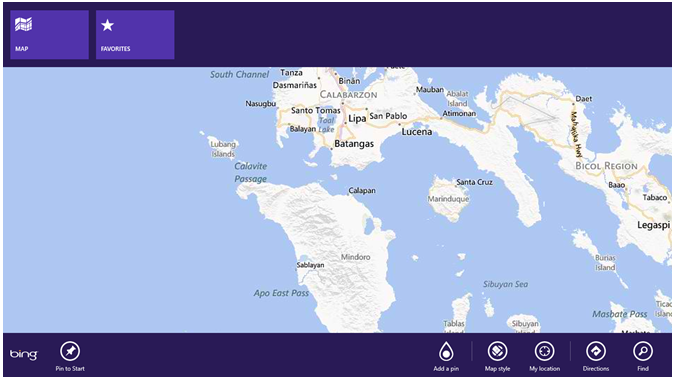
Get Directions
From the “App bar” which appeared earlier after you right-clicked on the screen, you can find an icon that is labeled “Directions”. Simply click on it to open the screen where you can input the “From” and “To” information. Simply type the locations that you want to navigate between. In the “From” input box, your current location will be there by default but you can always change it to whatever location you want. Switching between Road and Aerial views is also possible simply by clicking the “Map style” option.

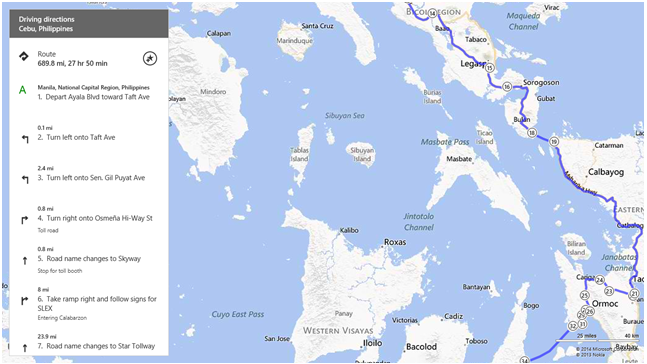
Navigate Through Directions
After typing your location and the place where you are going to, you’ll see the directions on a pop up screen. You can swipe or scroll through these directions to get more details. Each step is numbered and is shown on the map along with the route you are currently taking which is colored blue. Zooming in on the route will show more of the numbered steps.
Share Maps, Directions and Locations
The Maps app can also share your location and as well as some directions in many ways. To do this, simply open the Maps app, navigate to your location or input the location where you are from and to where you are heading to so you can get the directions you need and access the “Share” charm to reveal all the apps which are available for you to share the information. In most cases, these set of apps would include the “Mail” app and other apps which you installed that can share locations, directions and other navigation data.
Get More Information
If you want to get more out of the Maps app, all you need to do is to enter the location which you want to know more about on the Search feature by accessing it using the “Search” charm. Once the app is done displaying all relevant data of the location you entered, you’ll see some blue circles which are numbered and tapping and clicking on them will display a small screen which contains more details like the address, contact information and other important stuff.
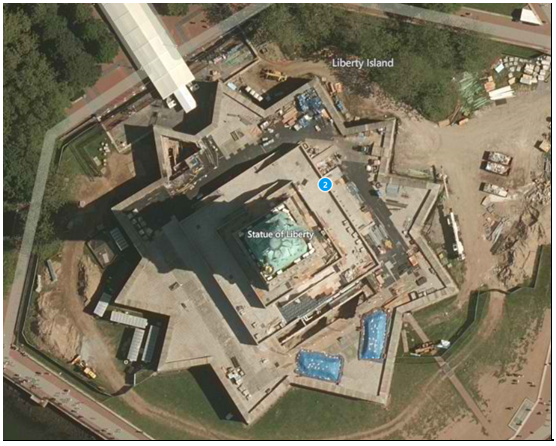
The Stunning Aerial View Feature
Lastly, there’s something that will really get you amazed with the Maps app and it is the Aerial view feature. Using this will allow you to zoom in on certain landmarks (both man-made and natural physical features) anywhere in the world. It’s really great to see all the details captured in an aerial photography and you can zoom in to it to reveal greater detail.
Use the Maps App Like a Boss
As you can see, using the “Maps” app on your Windows 8 machine provides a lot of help especially if you are fond of travelling. This feature also helps you to get access to useful information and share some stuff to other people in just a few simple clicks. Take time to start exploring this app and using it in one of your travels and you will surely love how everything is laid out. With the Windows 8 “Maps” app, you’ll surely get to where you want to go without getting lost. Did you encounter problems or had trouble with one of the steps I have shown above? Please feel free to share it so we can help you. For more tips, tutorials and news about the Windows operating system, stay tuned to windowstechies.loc or subscribe to our email list to get all the latest stuff straight on your inbox.