Making Adjustments and Editing Some Stuff Within the Camera App
In our last three tutorials on the Camera app series, we have discussed much about the options but there were also some which we just talked about in an overview so we have dedicated another article to cover the left out ones in greater detail since they too are important in helping you master the app and maximize its use but first, let’s have a review of how you can access the app and as well as the options that are available in it so get ready to follow the steps that I’ll be showing below.
Accessing the App and its Options
To access any modern style app in Windows 8.1, all you need to do is click on the Start Button or press the Windows Key and the Start Screen will open. From the Start Screen, simply look for the tile that represents the app which you want to open (the Camera app in this instance) and click or tap on it once you find the tile. If in case the tile representing the app does not appear on the Start Screen, just move the mouse pointer and click on the circle button bearing an arrow down icon inside to access the Apps view screen. After doing so, you should be able to find the app shortcut on the App’s list which you just need to simply click to open.
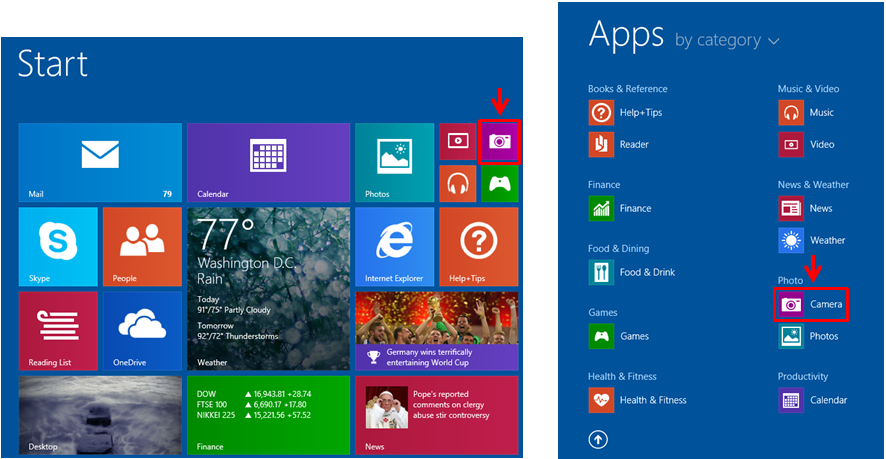
Once the Camera app opens, you will need to right-click anywhere on its screen so you can access the App bar which bears some options and this are what we’re going to talk about first.
Adjusting the Camera Exposure
After you are able to open the Camera app and get to all the options available on the App bar by right-clicking on the screen, you will need to learn how to adjust the exposure level and you can start doing this by clicking on the “Exposure” option located at the extreme-right end of the App bar.

After clicking on it, a white box will appear containing a vertical adjustment knob which you can drag up or down to set the exposure to your desired level. After adjusting the exposure using the knob, you can now start taking photos using the Camera app.
Setting the Timer
The Camera app also has another feature that allows a little delay in the shutter so you can take a perfect pose before the app finally takes the still image. This feature is called “Timer” and you can access it by doing the same steps that you performed when you accessed the Exposure settings which is right-clicking on the Camera app screen and when the app bar appears at the bottom, simply click on the “Timer” option that lies just beside “Exposure”.

After clicking on the option once, the timer will be set to 3 seconds delay and when you click on it for the second time, it will be set to a 10 second delay. A third click on the “Timer” will then turn it off.
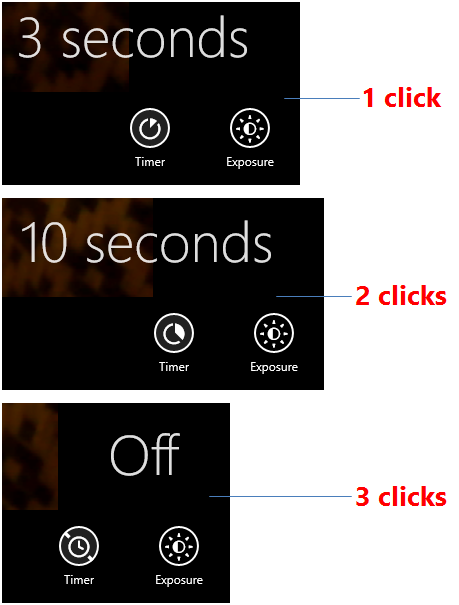
After choosing the time delay duration that you want to use for the Camera app’s timer, you can now click on the button at the right hand portion of the screen that will allow you to take photos and the you will then see that the shutter will be delayed and show a countdown on the center part of the screen according to the time you selected.
Editing a Photo
After going through the options available for the Camera app, we will now learn how to use all of the available settings for editing the photos that you took with it. The editing tools and options that are available in the “Photos” app can also be found in the “Camera” app. To start editing a photo, you will need to look for it by accessing the “Camera roll” and once you find the photo, simply right-click on it and hit the option that says “Edit” which is located on the extreme-right end of the App bar appearing at the bottom of the screen.

After doing so, all available options will appear at the left-hand portion of the screen which are arranged vertically. The option that will automatically be opened is the one that says “Auto fix” and when you check on the right hand side, you will be able to see 6 automatic adjustments to the photo that you have selected for you to choose from.

Basic Fixes
Next editing option in line is the one that says “Basic fixes” and when you click on it, another set of options under it will appear on the right hand portion of the screen which are “Rotate”, “Crop”, “Straighten”, “Red eye”, and “Retouch”. If the photo you took with your Windows 8.1 device is flipped upside down, then you can use the “Rotate” option to correct it. You can also choose to “Crop” a photo so you can focus on just one portion of it or if it is not in line with a certain object such as the horizon or any other image on the background then you can use the “Straighten” option to have in corrected.
There will also be photos of you that are have glowing red eyes but thankfully, there’s a “Red eye” option that will somehow lessen this effect and finally, you can also make a certain portion of a photo look smoother than the original by clicking on the “Retouch” option.

Light
Next to the “Basic fixes” option is another one which is labeled “Light” and when you click on it, a different set of sub-options will appear on the right hand side of the screen which are “Brightness”, “Contrast”, “Highlights” and “Shadows”.
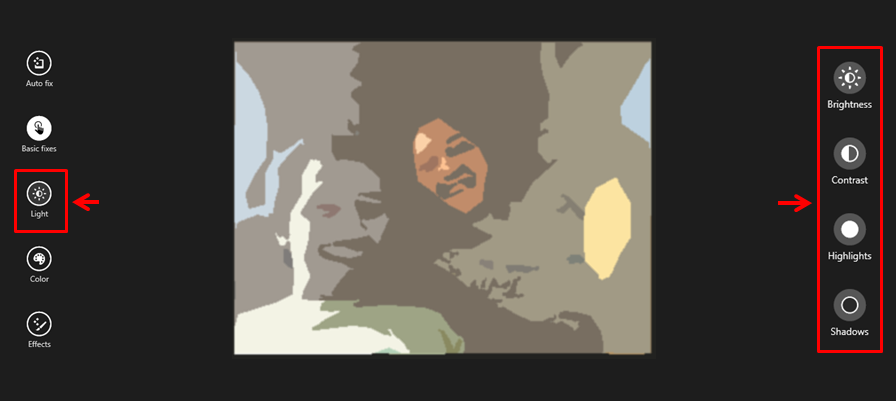
To do some changes on the brightness of a photo that you think is too dark or too bright, all you need to do is click on the “Brightness” button and you will be able to adjust it using a circular adjustment knob. If you drag the knob clockwise, the brightness value will move greater while if you drag it counter-clockwise, the brightness value will be lesser.
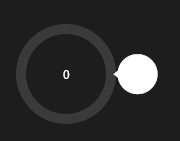
This same circular knob will appear when you click on the options for adjusting the “Contrast”, “Highlights” and “Shadows” so it will surely be easier for you to make changes on these aspect of the photo’s lighting.
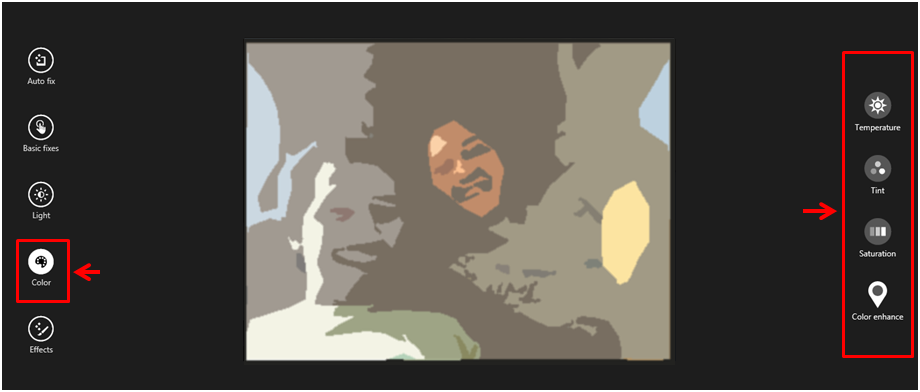
Color
Some aspects of the colors on a specific photo that you selected can also be tweaked. These aspects include “Temperature”, “Tint”, “Saturation” and “Color enhance” and when you click on them, the same circular adjustment knob will appear on the first three options but the fourth one which is “Color enhance” will first provide you with a pin which you can place on the area of the photo that you want the color to be enhanced and after placing the pin, the circular adjustment know will then appear which you can drag clockwise to increase the level or value of the selected color settings or counter-clockwise to decrease it.
Effects
Finally, you can click on the last option from the left hand portion of the screen labeled effects and you will be able to access two other sub-options under it which are “Vignette” and “Selective focus”. When you click on “Vignette”, the circular adjustment knob will again appear and when you drag it clockwise, the four corners will create a triangular black shade which will highlight the center portion of the photo. If you drag it counter-clockwise, all four corners will have triangular white shades which will also tend to highlight the same center portion.

And lastly, the second sub-option which is labeled as “Selective focus” will let you move the clear part (focus) of the photo to different locations. The focus can also be made bigger or smaller by dragging any of the four adjustment knobs towards the direction where you want to move to move the focus on to.
That’s all there is to the Camera app that is built-in with every Windows 8.1 machine and as you can see, it is equipped with some awesome features that will help you take control of your videos and photos. Take time to use it and you’ll surely love every feature that it offers!