Need Microsoft Edge Extensions? Here are the Steps in Adding or Removing Them
It has been a year since Microsoft released Windows 10 and along with its release was a new browser which promised to be faster and better than its competitors but it proved to be very young and still needed some improvements which is why users still preferred Google Chrome or Mozilla Firefox. What Microsoft Edge lacked back then was the support for browser add-ons and plugins that would add some features to it.
This shortcoming has been one of the reasons why developers and other users who really need the power of plugins and add-ons avoided Microsoft Edge for the meantime and still went with the two stronger ones Chrome and Firefox but thankfully in the latest browser version release that is included in the Anniversary Update of Windows 10, Microsoft has already enabled plugin and add-on support in Edge as a fulfillment of their promise!
In this tutorial, we will be learning how to add these plugins and add-ons into Microsoft Edge so if you’re one of those who have been waiting for this to happen then now is the time for you to see even more of Microsoft Edge than ever before!
Accessing Microsoft Edge
Before we get into the details on how plugins and add-ons are added to Microsoft Edge, let us first learn how Windows 10’s built-in browser is launched since it is the very first thing that you will surely do before you can add additional features to the browser itself. There are many ways in accessing Microsoft Edge in your Windows 10 machine and we are going to show each of these methods in this tutorial.
The very first and the easiest method in launching Microsoft Edge is done simply by clicking on its quick launch icon that is pinned on the Taskbar by default as shown on the screenshot below. If you want to move the position of this quick launch icon on the Taskbar for easier access, all you need to do is click-and-hold it then drag it towards the location where you want it to be among the other program or app quick launch icons that are also pinned on your computer’s Taskbar section.

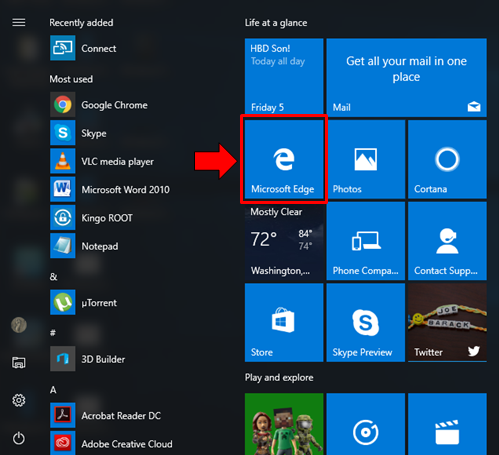
Another method in accessing Microsoft Edge in case its quick launch icon has already been unpinned from the Taskbar is by clicking on its tile from the Start Menu. To do this, just launch the Start Menu first by pressing the Windows key or clicking on the Start Button and once the Start Menu launches, just look for the tile from its right side also called the “Start” section which is labeled “Microsoft Edge” also bearing the Edge logo as highlighted on the screenshot below.
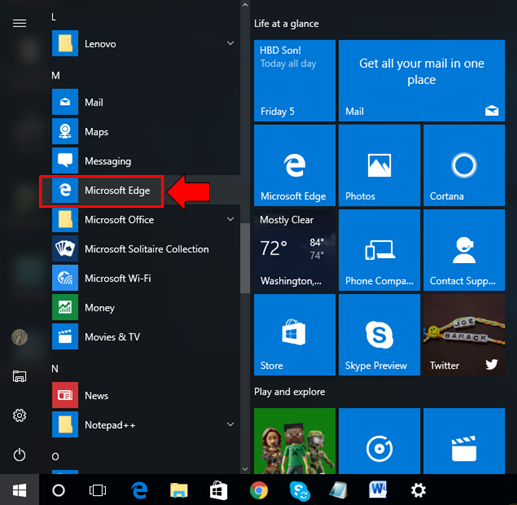
In case both Microsoft Edge’s quick launch icon and its tile has been unpinned from the Taskbar and the Start Menu respectively, there still are two other methods in accessing the browser. First, you will be able to find it in the All apps list and in Windows 10’s Anniversary Update, you no longer need to click on the “All apps” link because all of the installed and as well as built-in Windows 10 Programs and Apps are readily displayed on the left portion of the Start Menu so just scroll towards the “M” apps and programs group in order to find Microsoft Edge’s shortcut which you will simply need to click in order to launch the browser.
Lastly, if you don’t want to do all the scrolling and clicking, you can launch Microsoft Edge in a simpler manner with the use of Windows 10’s Search feature. To do this, you will first need to launch the Search screen by pressing the Windows + S keyboard shortcut.

After pressing these keys, the Search screen will appear on the bottom-left portion and what you need to do is type in “microsoft edge” into its search input box that is found on the bottom. After doing so, the search results will start appearing just above the input box and from here, you should be able to see the Microsoft Edge shortcut as the top result which you will need to click in order to launch Microsoft Edge instantly!
Making Microsoft Edge Your Default Browser
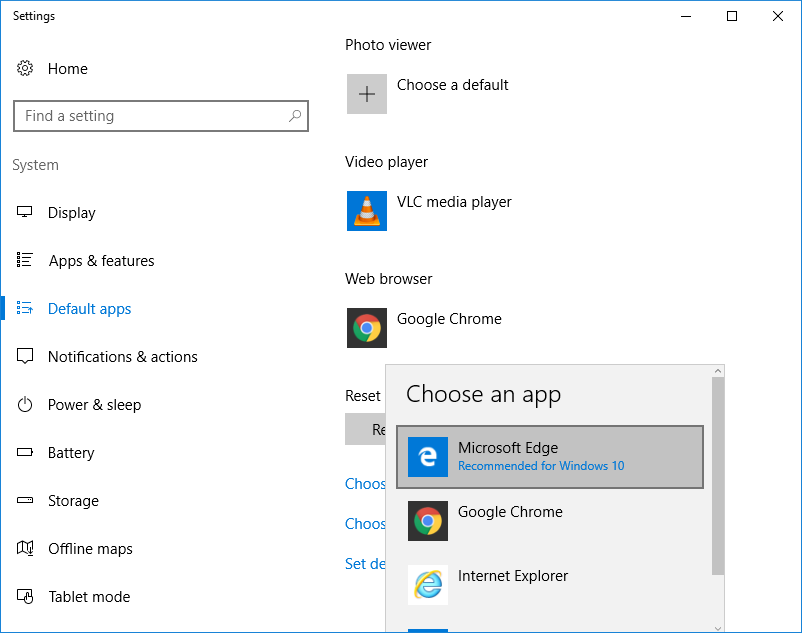
In order to ensure that Microsoft Edge will be working smoothly once you are ready to add some plugins and add-ons to it, you will need to make it the default browser of your Windows 10 machine. Doing this is simple as well, just start by pressing the Windows + S keys in order to launch the Search screen and once it opens, simply type in “default programs” into the search input box on its bottom portion.
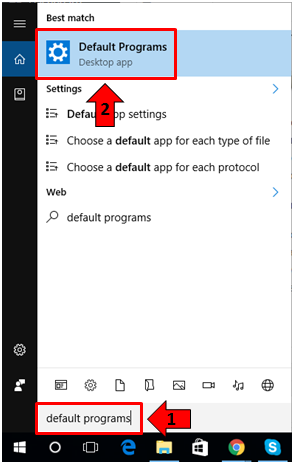
After doing so, the default programs settings shortcut should appear as the top result just above the input box and all you need to do is click on it in order to access the section where you can make Microsoft Edge as your default browser.
Finding Browser Extensions for Microsoft Edge
Now that you already know how to launch Microsoft Edge and it is already set as your computer’s default browser, let us start learning how to add extensions/plugins to it. Just like universal apps to your Windows 10 machine, browser extensions also add features to Microsoft Edge easily and the scope of their uses varies. There are those that will help protect your browsing from malicious attempts to collect your personal and financial information while others are aimed to make you more productive. But how are these extensions accessed? Let us start now by first launching Microsoft Edge on your computer.
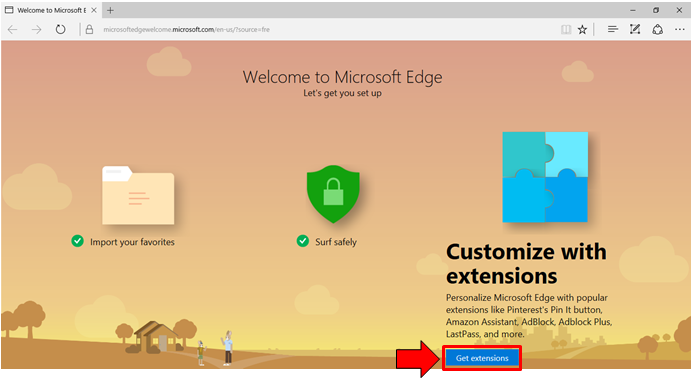
Once it opens, you can choose between two different ways in launching the Store where the extensions are found. First is by clicking on “Get extensions” which is found on Microsoft Edge’s Home screen seen on the screenshot below.
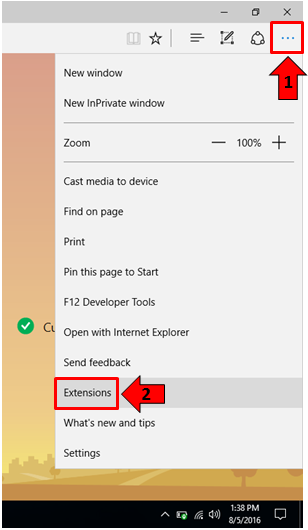
In case you are finding it hard accessing the “Get extensions” button that is shown above, you can just click on the “Settings” icon which is represented by the “…” symbols on the top-right portion of the Microsoft Edge Window and after hitting on it, an menu box will appear where you will need to click on the option that says “Extensions” as you can see below.
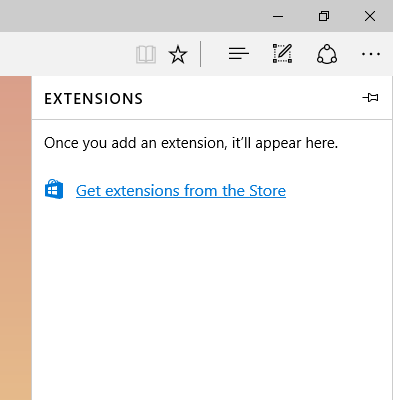
After clicking on “Extentions”, a link will appear on the same screen which says “Get extensions from the Store”. You will need to click on it in order to open the Windows Store section where the newly introduced browser extensions are located.
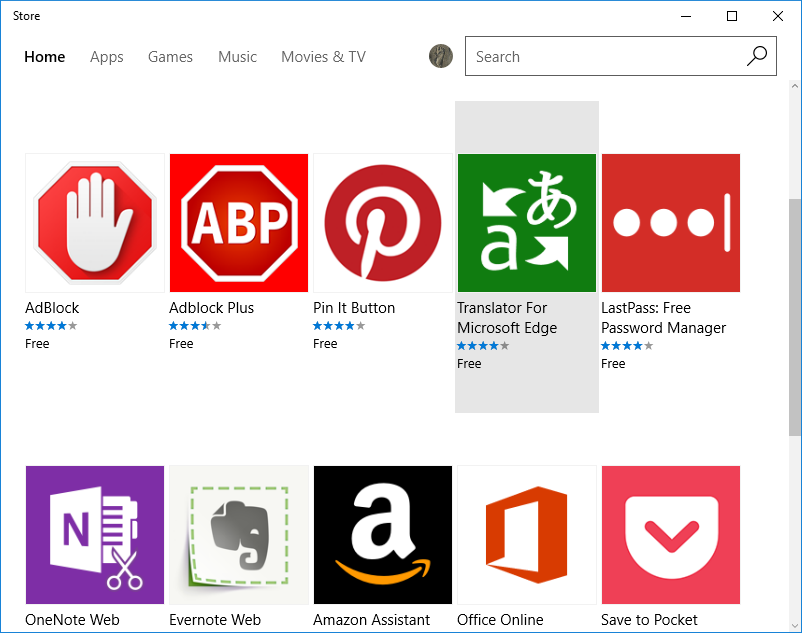
The Windows Store app will then open and display a list of extensions that are available for you to install and use for Microsoft Edge. The list isn’t really that long yet but Microsoft has already declared that they have opened Microsoft Edge for further development to partners who want to create new plugins for the browser. The Extensions page of the Store app looks like the one shown below.
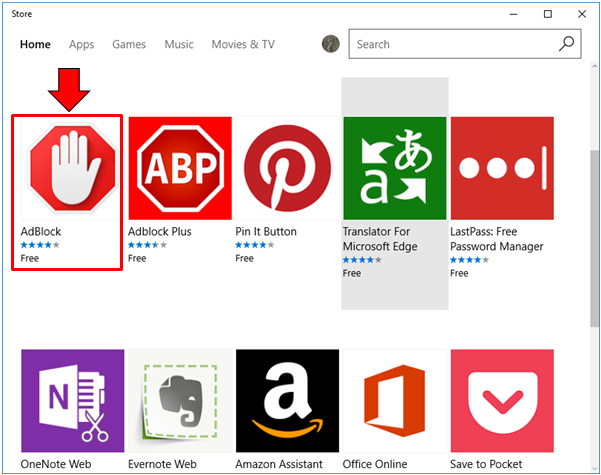
Now that you know how to access the list of all available extensions for Microsoft Edge, let us start learning how you can install it so you can start using it with the Browser. For illustration purposes, we will be installing the browser extension called AdBlock.
Installing an Extension for Microsoft Edge
If you have already opened the Store app and it already displays all the available Microsoft Edge extensions on it then it means that you followed everything correctly and what’s left for us to do now is to learn how to install a certain extension so it can start becoming a part of Microsoft Edge. If you’ve already experienced installing a universal app in Windows 10 before then the feeling and experience of installing a browser extension into Google Chrome shouldn’t be any different.
To start, you will first need to click on the extension icon from the Windows Store Extensions screen and we will be installing AdBlock right now as an example.
After clicking on your extension of choice, you will be able to open its description and details page. You can tarry for a moment on this page and read everything that the extension does before you install it to your browser.
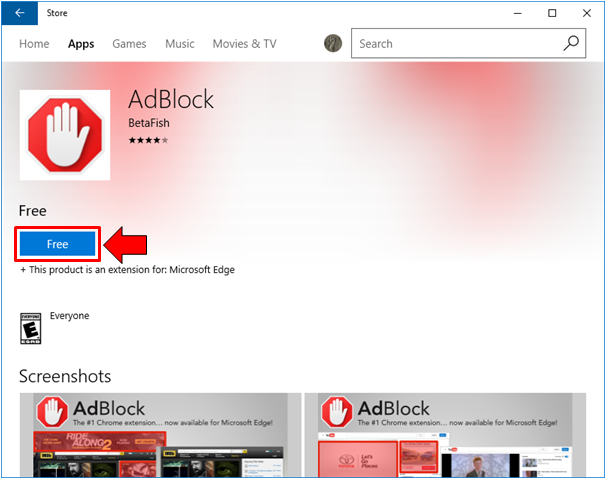
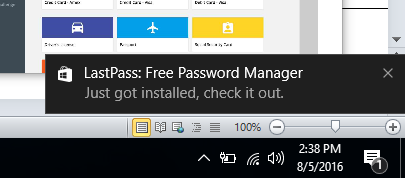
Once you are ready to install the browser extension, you will simply need to click on the button that is labeled “Free” which is found on the description and details page of the extension itself as shown on the screenshot above. After hitting on the said button, the extension will start to be downloaded and all you need to do is wait until it is installed. You will know that it is already installed because a notification will appear and a sound will play along with it as it appears on the bottom-right portion of the screen as shown on the screenshot below when we have installed LastPass.
After the extension gets installed, it will be turned off by default so when you go to Microsoft Edge, you will see a notification from the extension that you have installed containing descriptions on what it does as well as two buttons which are labeled “Turn it on” and “Keep it off”. If you are ready to use the extension, just click on the “Turn it on” button but if you just want it to stay off then just click “Keep it off“.
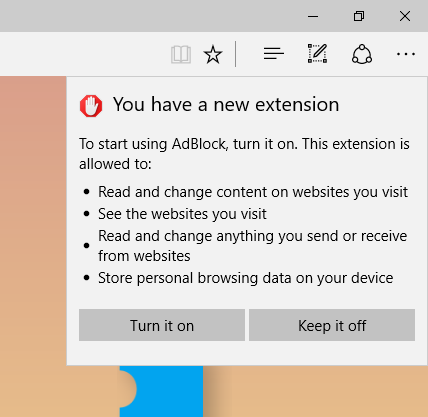
If you choose to “Turn it on”, Microsoft Edge will open a new tab which will now show a message from the developers of the extension plugin. Others such as AdBlock would solicit donations while some will just show a thank you note.
How to View Your Installed Microsoft Edge Extensions
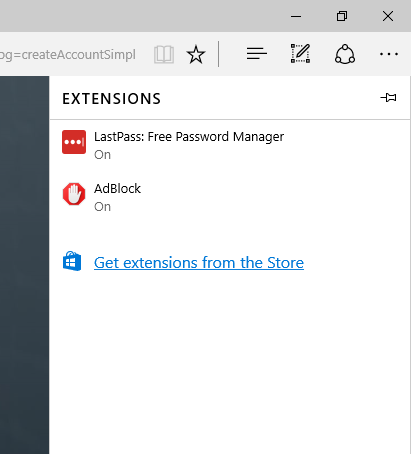
Now that you’ve already installed plugins/extensions to your computer’s Microsoft Edge browser, it is time to learn how to view them so you can avoid installing the same extension the next time you feel like needing the help of something while you are browsing. Viewing your plugins is done simply by first clicking on the settings icon that is found on the top-right portion of the Microsoft Edge Window and a menu will appear where you will need to click on the option that says “Extensions” as you can see on the screenshot below.
After clicking on “Extensions”, the list of installed add-ons will appear and on this list, you can click on any add on of your choice in order to expand its settings and other options that you can tweak to make the add on or extension work as you want it to.
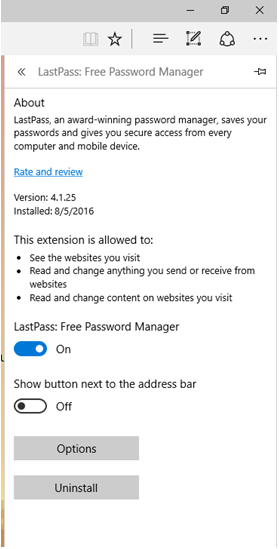
The screenshot below shows the settings screen for the LastPass Microsoft Edge extension and as you can see, there is a section that describes what it does and as well as a few switches and settings at the bottom for making it work according to your preference and usage.
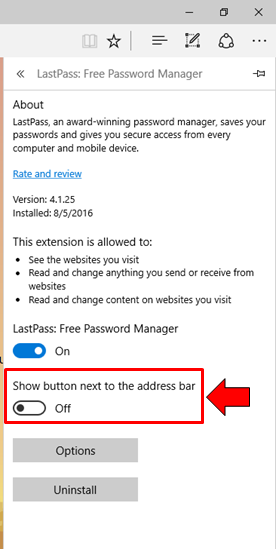
How to Display Extension Icons Beside the Address Bar
If you have tried using add-ons or extensions in Google Chrome, you should already know that the extension icons automatically gets added to the right of the address bar but in Microsoft Edge, this is not the case. It is because browser extension icons are hidden by default. To display the icons of your installed extensions beside the address bar of Microsoft Edge, just click on the switch that is found under the “Show button next to the address bar” which is located on the settings box of the extension as we have accessed earlier.
Just do this turning on of this setting for all of the other Microsoft Edge extensions that you want to display icons for on the right side of the address bar and the result should look like the one that is shown on the screenshot below where two of the extensions that we have installed now shows icons on the address bar.

How to Uninstall Extensions
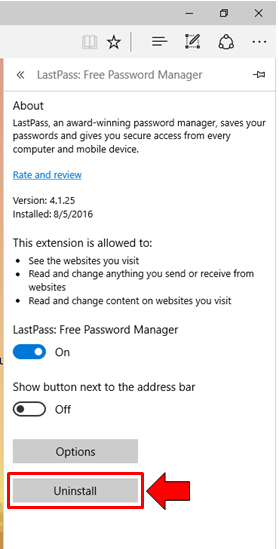
Lastly, we come to the thing that you would surely do in case you no longer need to be using an extension for Microsoft Edge. Uninstalling a browser extension would help you save on system resource and as well as make browsing a lot faster. Doing this is very simple. Just access the Settings section for the extension that you want to uninstall and once you are on it, just scroll towards the bottom and hit the “Uninstall” button. There are actually some other ways that you can use in uninstalling an extension but this one is the easiest so we’ll just reserve the other methods for our future tutorial.
More Browser Extensions to Come!
As you can see, Microsoft has now made Edge a lot better with the newly opened extension support but there are still relatively few of these add ons that are available as of writing this tutorial. However, we all don’t need to worry because this number will surely double or even triple in just a few months just like how Windows Store has grown in terms of the number of apps that it supports and offers. There really is no turning back and all we can expect are better days for our favorite Windows OS. Have you already installed Windows 10’s Anniversary Update? What part of it do you like best? We’d love to hear your opinion. Please feel free to share them on the comments section below.
We also welcome any topic suggestions from our readers so if you have something about Windows that you want us to explain and demonstrate here within a tutorial then please post them as topic suggestions on the comments section as well. See you in our next tutorial only here on WindowsTechies.com!