Pinning Folders to the Taskbar in Windows 10
In our previous tutorials, we have show all the steps involved in pinning programs and apps into the Taskbar in the all-new Windows 10 operating system. From shortcuts that are on the Desktop screen to the ones in that are confined in the new Start Menu, we’ve demonstrated everything and even added bonus by showing how it is done if you want to pin “Settings”.
Pinning the usual stuff into the Taskbar for quicker and easier access is definitely easy. It’s a no-brainer in fact especially to loyal users who have been toying with Windows for a very long time.
What About Pinning Folders?
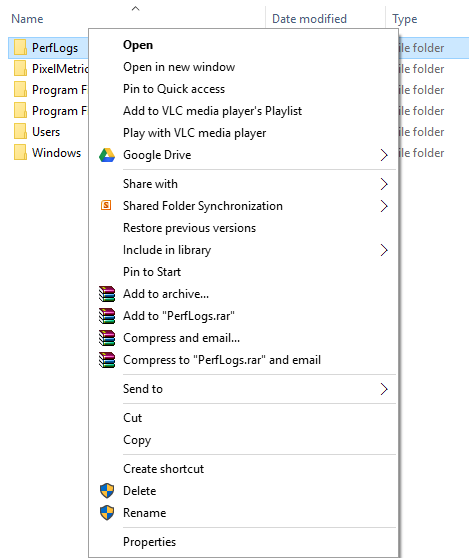
But in the case of folders and libraries, you can’t just right-click on any of them and expect the “Pin to taskbar” option to appear on the right-click menu. As shown on the screenshot below, there is no option whatsoever that will help pin the selected folder to the Taskbar.
So how exactly is pinning a folder to the Taskbar done? Again, it’s not as simple as pinning a program or app but we will demonstrate everything in a way that even beginners can understand and follow. The steps that we will be showing in this tutorial is applicable to Windows 7, Windows 8.1 and as well as Windows 10 but the test computer that we have used has Windows 10 installed. So let’s start and go directly to the first trick!
Pinning a Folder to the Taskbar
Accessing folders that are saved somewhere within your Windows computer is quite a tedious task and if you are like me who want everything to be quick and easy, you’ve surely dreamed of having them pinned to the Taskbar. Well, we will make this dream become a reality right now! To start, you will need to head to the Desktop screen and once you arrive there, just right-click or tap-and-hold on an empty space of the Desktop until a right-click or contextual menu appears as you can see on the screenshot below.
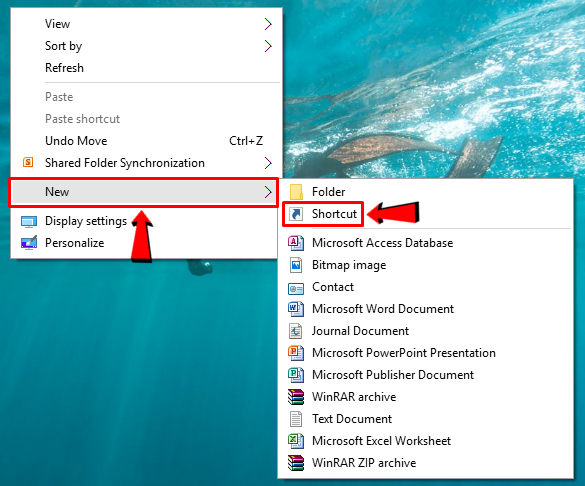
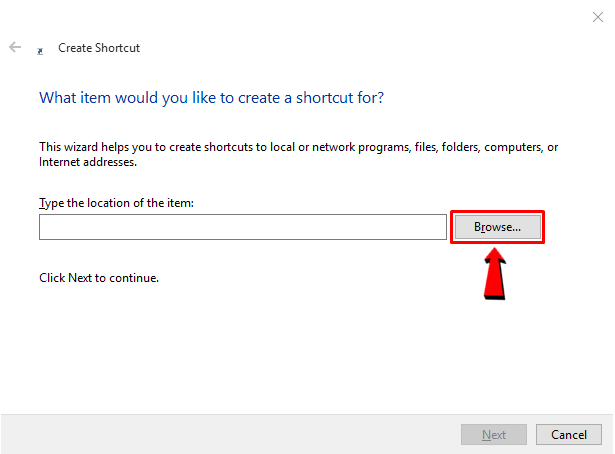
Now, we are going to create a shortcut to the folder that you want to pin to the Taskbar so you just point the mouse or tap on the “New” option then you will see another menu that will appear where you will simply need to click on the option that says “Shortcut” as highlighted on the screenshot above. After doing so, the “Create Shortcut” wizard will open and from here, you will need to click on the “Browse” button.
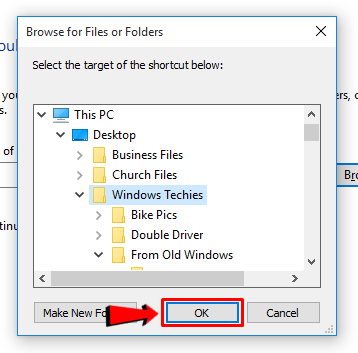
A smaller Window will then appear which is labeled “Browse for Files or Folders” and from here, you will simply need navigate to the folder that you want to pin to the Taskbar. Once you find it, just select it then hit the “OK” button which is located at the bottom-right portion of this small Window as highlighted on the screenshot below.
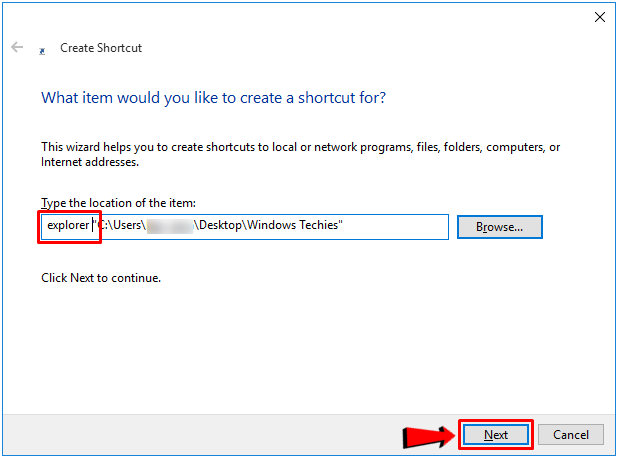
Doing this will now put the folder path into the “Type the location of the item” input box of the “Create Shortcut” wizard as shown below. Once this happens, you will need to type in “explorer” (excluding the quotation marks) then press space. Putting a space is important or else, this procedure will not work as you intend it to. Once you have entered these things before the folder path inside the input box, you can now proceed to the next step by clicking the “Next” button located at the bottom-right portion of the wizard.
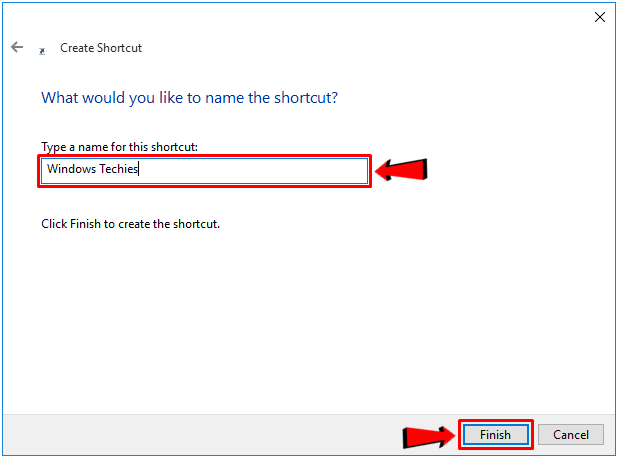
After clicking on the “Next” button, you will now arrive at the very last step of this process which will now ask you the name that you would like to assign for the folder shortcut that you would like to be pinned to the Taskbar of your Windows 10 computer. From here, simply input your desired shortcut name then click on the “Finish” button as highlighted below.
After the “Finish” button is clicked, you should now see the new folder shortcut on your machine’s Desktop screen and it is now ready to be pinned to the Taskbar. Aside from the right-clicking way of pinning items into the Taskbar, there is actually an easier way of doing it and that’s what we will learn about next!
How to Pin the Newly Created Folder Shortcut into the Taskbar
Now, no matter what supported Windows edition you are using, whether it is Windows 7, Windows 8.1 or Windows 10 as what we are using in this tutorial, you can simply pin items from the Desktop screen to the Taskbar just by pointing the mouse on the subject item, press and hold the left-click button then drag the item to an empty space on the Taskbar.

Once the item/shortcut is already on the Taskbar and the “Pin to Taskbar” message already appeared as shown on the screenshot above, all you need to do is drop it by releasing the left-click button of the mouse and voila! The newly created folder shortcut is now pinned on your machine’s Taskbar!
The More Familiar Method
As we have mentioned above, there actually two ways in pinning items from the Desktop screen to the Taskbar and the second one is the more popular which is done by right-clicking on the shortcut and after doing so, a menu will appear with contents that differ depending on the type of program/folder shortcut that was selected and as well as the tools and other software that are installed on your computer which can interact/open it. In short, a “context menu” will appear as shown on the screenshot below.
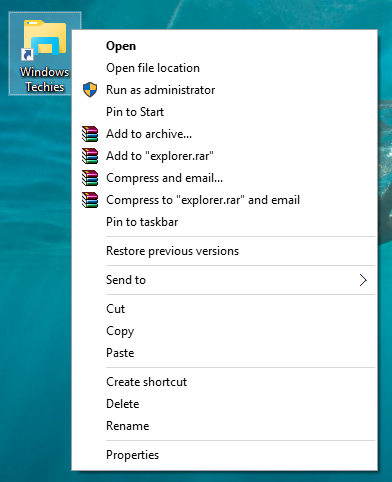
From this menu, all you need to do is click on the option that says “Pin to taskbar” and after doing so, the folder shortcut should now be pinned to the Taskbar of your Windows 10 machine.
How to Change the Icon for Your Newly Pinned Folder
One problem that you would face after a specific folder is pinned to the Taskbar of your Windows 10 machine is that its icon and as well as the icon for the File Explorer tool is just the same as shown on the screenshot below and this can definitely lead to confusion especially to other users who have access to your computer.

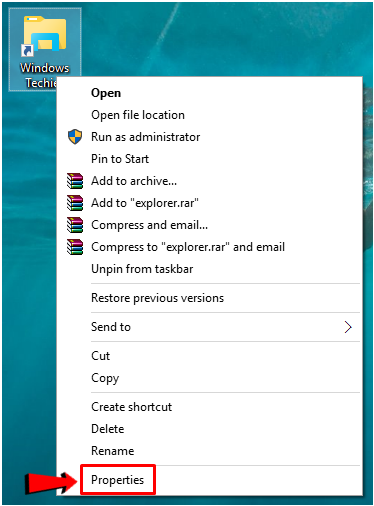
To change the icon for your newly pinned folder in any supported Windows OS (Windows 7, Windows 8.1 and Windows 10), you will simply need to right-click or tap-and-hold on its icon that you have created on the Desktop screen earlier and after doing so, a contextual or right-click menu and from here, simply hit on “Properties”.
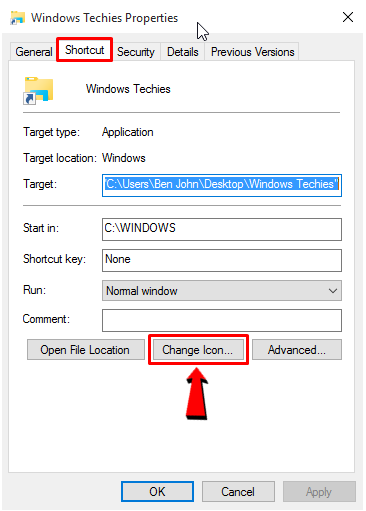
Afterwards, the Folder Properties Window will appear which shows different information about the folder in tabs that are arranged on top. From here, you will need to click on the tab that is labeled “Shortcut” then at the bottom of the information shown in this section, hit the button that says “Change Icon…”.
Now, you will see another Window which is smaller than the Folder Properties Window and this time, it is labeled as “Change Icon”. In this Window, you will see all available icons that are built within the “Change Icon” option. If you see something here that you would like to use for the folder that you have pinned on the Taskbar then just click on that icon of choice then hit the “OK” button.

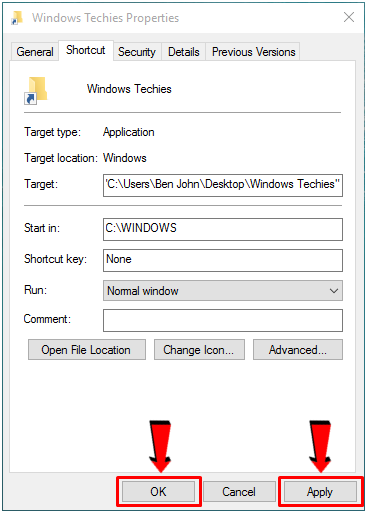
However, if you have downloaded an icon from the Internet and you wish to have it assigned for the newly-pinned folder on the Taskbar then you will need to hit the “Browse…” button as highlighted on the screenshot below, navigate to the location of the downloaded icon that you want to use then select it, hit “Open” then hit the “OK” button on the “Change Icon” Window. On the Folder Properties Window, you will also need to click on the “Apply” then “OK” buttons in order to make the changes final.
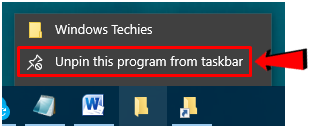
After doing so, the folder shortcut that is on the Desktop screen should now have a new icon but the shortcut that is pinned on the Taskbar is still the same, to change it into the new icon, you will simply need to remove it first by right-clicking on it then hitting the “Unpin this program from taskbar” option from the menu box that would appear as highlighted below.
Once the folder is removed from being pinned on the Taskbar, you can now head back to the folder shortcut that is located on the Desktop screen and you can right-click on it in order to pull-up the contextual/right-click menu then hit the “Pin to taskbar” option in it or you can also click-and-hold on the icon then drag it towards the Taskbar and once it is there, simply drop it by releasing the left-click button.
Pinning Folders from the Start Menu to the Taskbar (Windows 7)
If you have not opted to upgrade to Windows 10 and you’re still using Windows 7 then you can still do this same trick and the awesome thing with older Windows editions like Windows 7 is that you can copy the path of a certain shortcut from the Start Menu which is not available in Windows 10.
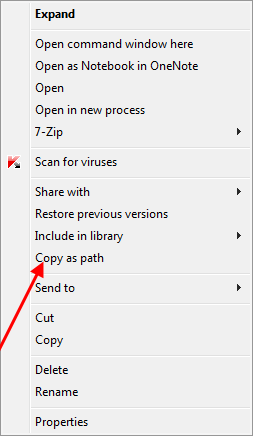
This trick is awesome because it makes the process of pinning folders to the Taskbar a lot easier. To do this, simply open the Start Menu and right-click on the folder that you wish to be pinned to the Taskbar. Again, this will pull-up a contextual menu also known as the right-click menu and from here, just click on the option that says “Copy as path”.
After doing so, you will need to head to the Desktop screen then right-click an empty space on it and hit “Paste” from the right-click menu that would appear, alternatively, you can also press the “CTRL + V” keys and after doing any of the before-mentioned steps, the “Create Shortcut” wizard will appear with the folder path already in its input box. From here, just type in “explorer” (excluding the quotation marks) then press the “Space” bar, hit the “Next” button and on the Window that follows, just enter your desired name for the new folder shortcut then hit “Finish”
After you do so, the new folder shortcut should appear on the Desktop screen of your Windows 7 computer and from here, you can either drag-and-drop it towards the Taskbar or right-click on it then hit the “Pin to taskbar” option from the contextual menu that would appear. Pretty simple right?
Pin Programs to the Taskbar
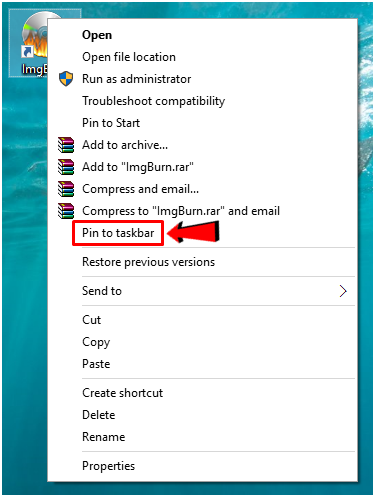
We’ve already demonstrated this in one of our previous tutorials but in order to make this tutorial more detailed, we will show the steps once again. When you install Desktop programs to your computer, an option that will allow you to place a program icon on the Taskbar appears as one of the steps but in case you didn’t choose to do so, you can manually add it simply by right-clicking on its Desktop shortcut then hitting the “Pin to taskbar” option that appears on the right-click menu as highlighted on the screenshot below.
In case you also didn’t allow a Desktop shortcut to be created during the installation process, you can simply look for the program shortcut from the “All apps” list of the Start Menu. To do this, just launch the Start Menu first by clicking on the Start Button or pressing the Windows key and once it opens, you will need to click on the “All apps” link that is located on its bottom-left portion.
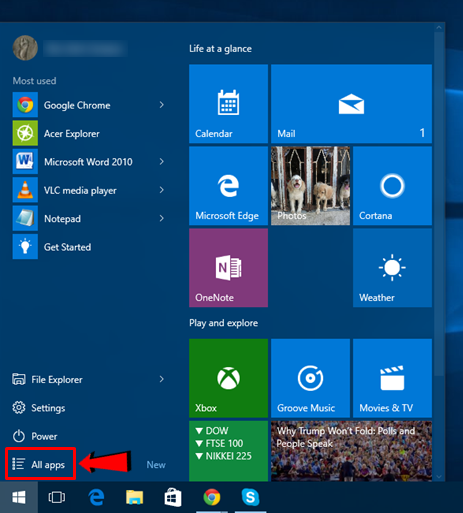
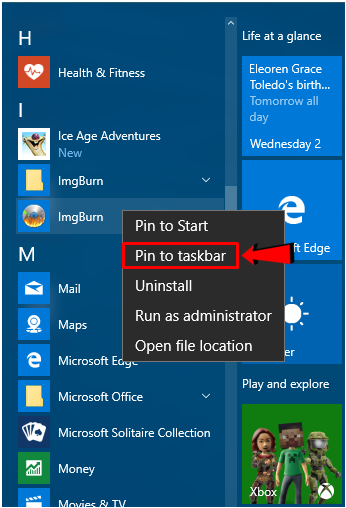
After the “All apps” link is clicked, you will then see the list of all the installed programs and apps in your Windows 10 machine listed in alphabetical order. From here, simply look for the program that you want to pin to the Taskbar and once you find it, you will need to right-click on it in order to pull-up a menu where you will simply need to click on “Pin to taskbar” as highlighted below.
Pinning Modern Apps to the Taskbar
Aside from the traditional Desktop programs, you can also choose to pin modern apps into the Taskbar so you can launch them quickly without having to access the Start Menu. To do this, you will first need to access the Start Menu and once it opens, just look for the app tile that you want to pin to the Taskbar. When you find it, you will again need to do the same trick which is right-click on it then from the menu that would appear, just hit the option that says “Pin to taskbar”.
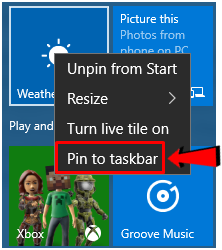
In case the tile for the app that you want to pin doesn’t appear on the right-hand portion of the Start Screen which is also known as the “Start” section, just click on the “All apps” link as what we did earlier when we looked for a program shortcut/icon and once the All apps list opens, it’s time to look for the app tile, right-click on it when it is found then hit the “Pin to taskbar” option from the right-click/contextual menu that would appear. It’s just as easy as that!
How to Unpin Items from the Taskbar
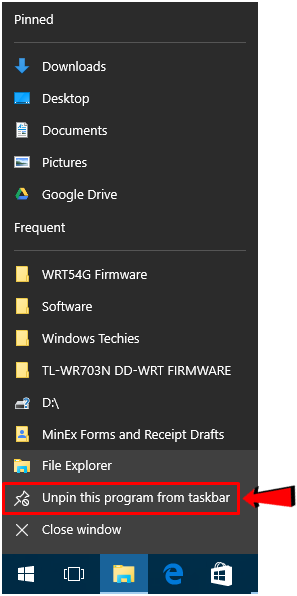
Unlike pinning that involves plenty of steps especially for special stuff like folders, unpinning any pinned item from the Taskbar in Windows 7, Windows 8.1 and Windows 10 is very simple. To do this, simply locate the icon that you want to be unpinned from the Taskbar and once you find it, just right-click on it and from the right-click menu that would appear, simply click on the option that says “Unpin this program from taskbar” as highlighted below.
Pin Items for Quick and Easy Access
Pinning different items to the Taskbar is not that difficult as you have seen in this tutorial but of course, it takes time to really do this for every important stuff that you want to be pinned to your computer’s Taskbar. However, as long as it is not impossible, you will surely be able to do it for as long as you have patience and determination to really have a quick and easy access to your precious stuff without the need of clicking and scrolling through all those system folders and locations that you would normally go through if a shortcut is not pinned on this very important Windows feature. Just follow the steps that we have shown in this tutorial and you should be on your way to having all your important stuff pinned on the ever-steadfast Taskbar feature!