Windows 8: A Quick Guide for Absolute Beginners (Part 1)
Windows is one of the most user-friendly operating system in existence but no matter how easy and intuitive it is, it would still be a hard one to learn especially to the “absolute beginners”. Learning something new really takes time and plenty of adjustments and in the case of Windows 8 and all of its brand new features, one would really think that it is impossible to learn how to use it.
This type of thinking is perfectly normal. No matter how much we know about Windows, it will always be a fact that everything we learned is a product of years and years of exploring and using the system itself and nothing really came to exist right then and there. Most of us would even remember our very first time of using a mouse, a keyboard or the very first experience we had in working on a document. In this tutorial, we will be assuming that our readers are new to Windows and would discuss things in a way that will be understood well even by people who are just starting to know what Windows and the recent release called Windows 8 is all about.
One Basic Rule
Since Windows 8 is a combination of two worlds (PCs and Tablets) merged into one, you’ll also find that most of the tutorials tackling this operating system talks about “tapping” the screen or doing other gestures. To make things sound simple, a “tap” on the screen is the equivalent of the left-click on the mouse and a press and hold gesture would equate to the right-click command that we commonly do in previous Windows versions. However, to make everything simple, we will just be using mouse commands to avoid confusion.
Getting Your Way Through
When you turn on a Windows 8 machine, you will first encounter the “Lock Screen” which has a beautiful background picture and the time and date plus some other icons showing statistics like network and battery are displayed. You can simply click or roll the scroll wheel of the mouse to get to the log in screen.

The log in screen helps protect each user account from being accessed by just anyone so you need to input a password here. If you really want to access a computer then you need to have your own user account and set a password for it. To access the “Users Screen”, you would need to click on the arrow that points to the left, select the user account you created and input your password.

If you want to see what you are typing, simply click on the icon that looks like an eye located at the right side of the password input box.
The Start Screen
After logging in, the very first thing that you’ll meet is the Start Screen. This is a new feature in Windows 8 which combines all the apps and desktop programs shortcuts together. In this section, you will see squares and rectangles each representing apps and shortcuts. Apps are essentially represented by “Tiles” and depending on how it is set, each tile would show real-time information of what it contains. The screenshot below shows the Mail app tile showing one message that has just been received in my email.

When you click on a tile that represents a specific app, you’ll see that it will open in a full screen. You can’t minimize or maximize it since the buttons for these commands are not available on the top-right portion of the screen.
Shortcuts for desktop programs on the other hand will not show real-time information of what it contains but instead just display the appropriate icon that represents it seated inside a box.
More Options and Features Just Around the Corner
Windows 8 also contains other features that can be accessed simply by pointing the mouse on each corner of the screen. For instance, if you point at the top-right corner of the screen and move down smoothly, you’ll be able to access the “Charms”. More about the Charms will be discussed in the second part of this tutorial.

Pointing the mouse at the bottom-right corner of the screen and moving upwards will also open the “Charms” bar.
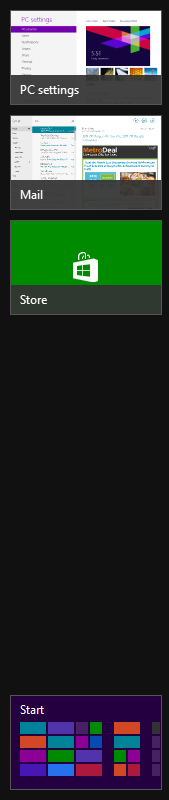
Next, when you point the mouse to the top-left corner of the screen, you’ll be able to see an icon which represents the last app or metro screen you accessed. In my case, I visited the “PC settings” section before working on this tutorial so when I point the mouse to the top-right corner of the screen, I am able to see a small icon that shows me the PC settings section.

Moving the mouse pointer from the top-right corner downwards will open a bar that contains all recently used apps. The one at the top is the most recent one I opened. At the bottom of this bar, you’ll see the “Start” tile and clicking on it will take you directly to the “Start Screen”.
The last corner which is the one at the bottom-left portion is reserved for the “Start” tile. Try pointing the mouse to it and you’ll see the “Start” tile come out.
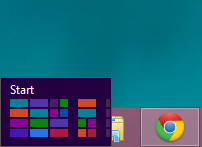
Moving the mouse upwards will again open the bar that shows the recently used apps.
Let’s Talk About the Power Options
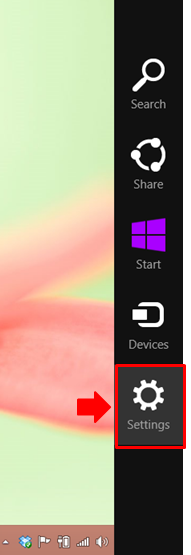
Of course, a computer won’t work without being turned on so we’ll be talking about the “Power Options” first. Since the “Start Button” isn’t around in Windows 8, you’ll need to point the mouse to the upper-right corner of the screen so you can go to the location where you’ll find these options. Once the mouse pointer hit’s the edge, slowly move downwards to make the charms bar become more visible. From here, you’ll need to click on the “Settings” charm.
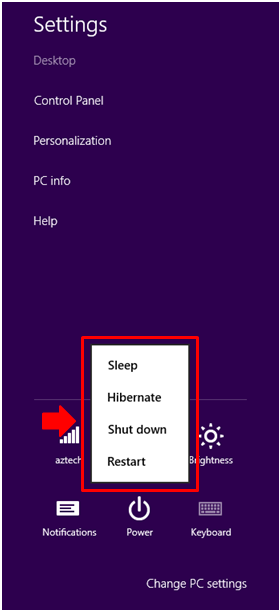
After clicking the “Settings” charm, you’ll see the settings screen and on its bottom part, you’ll see an item that says “Power”. Simply click on it to reveal all the other “Power Options”.
How One Differs From the Other
After seeing the “Power Options”, it’s about time to know what each one does.
- Sleep- This option puts your computer to rest but retains everything that you did in it before you decided to put it to sleep. Putting a computer to “Sleep” and waking it up takes a shorter time compared to the “Hibernate” option but “Sleep” consumes more battery juice compared to “Hibernate”.
- Hibernate- Functions the same as the “Sleep” option but takes a bit longer to wake. As in the “Sleep” option, “Hibernate” also retains anything that you are working on so you can easily get back to it anytime. Hibernate also saves more battery power.
- Shutdown- As the name itself suggests, “Shutdown” turns off the computer and everything else that you are working is removed or closed.
- Restart- A very useful option that helps you reboot your system easily when needed. The “Restart” option helps turn off your machine then turn it back on automatically without the need of pressing the power button.
More to Learn in Part 2
As you can see, making your way through Windows 8 is not that hard but this is just the first part of a two series tutorial for absolute beginners. On the next part, we’ll be seeing some more options and features and learn how to use them so you can start using your Windows 8 machine for the most basic tasks that you need to do. Did you find this tutorial useful? What other sections of Windows 8 are you having a hard time with. We would like to hear from you. If you have questions regarding the Windows 8 operating system please feel free to post them as comments below.