How to Save Files into the OneDrive Folder
Aside from being able to hold settings and sync them into your other Windows 8 or Windows 8.1-based devices, OneDrive also allows saving of files directly to it while you are working on the desktop. This means that you don’t need to access the OneDrive website just to upload files to it or create a new file using the Online Office apps. Windows 8.1 already has the OneDrive folder as one of the libraries in File Explorer and if this is your first time to hear about this then you need to learn the steps in how you can move your important files into a safer place so it can be protected against any serious software or hardware problems that can happen to your computer without prior notice. Doing all these things are actually easy and that’s what we’re going to discuss in this tutorial so get yourself buckled up and follow the steps that I’ll be showing below.
What is OneDrive Anyway?
When mobile devices started to flood the market, a way to sync files from PCs to these portable devices also came and started to become a need. Transferring files manually from computers to mobile devices is really a tedious task and you surely can relate to this statement if you’ve tried it before. Even the wireless methods like Bluetooth and its older counterpart called Infrared are also quite confusing to use especially to novice users and these together with the increased need of larger storage space which are not vulnerable to being lost due to software or hardware failures has given software companies a good reason to develop what is now called as “Cloud Storage”.

Google has created Google Drive and other third-party software developers made the likes of “Dropbox” and “Box” but Microsoft will not be outraced by any of these companies and released its own cloud storage service to improve productivity of Windows users and called it SkyDrive which was later changed its name to that which we already know at present as “OneDrive”. This awesome online storage service offers free 7GB of storage when you choose to use it and if you sign up for other Microsoft online service, you will get even more bonus storage space as a reward. As of writing this tutorial, I already have 18GB of storage space in my OneDrive account because I signed up for other Microsoft service such as Family Safety and others.

Accessing the OneDrive Library
In newer Windows 8.1 computers, accessing the Libraries section through File Explorer is very simple because the File Explorer thumbnail itself which used to be called Windows Explorer in older Windows versions is now found on the taskbar. It should be one of the items that is pinned on this section by default together with thumbnails for Internet Explorer, Windows Store and the Start Button itself sitting on the left-most portion.
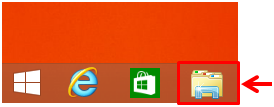
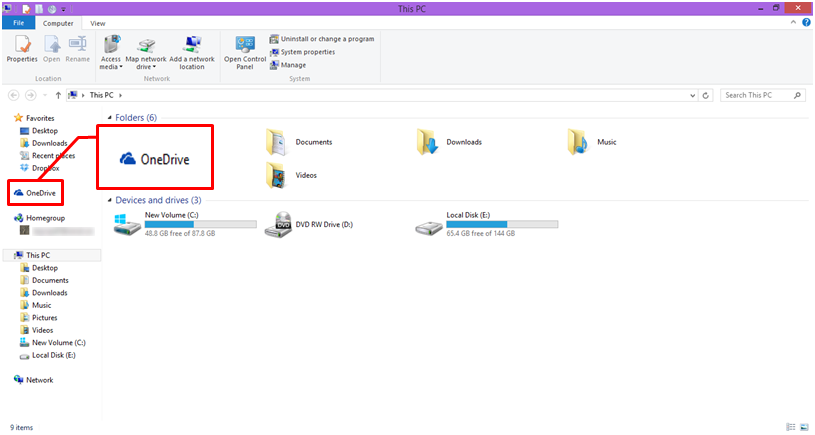
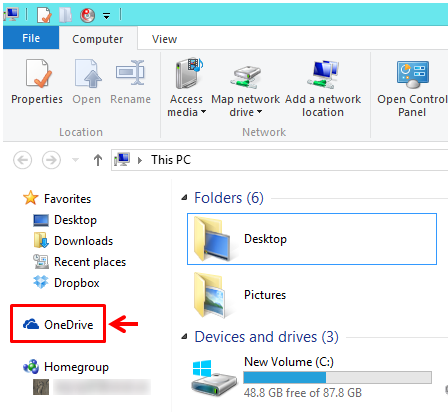
You an easily open File Explorer simply by clicking or tapping on its thumbnail that is pinned on the taskbar and after doing so, its Window should open and you will see all available libraries and folders and system locations on the navigation pane which is located at the left edge of the screen. From these libraries, you should be able to see one that is called “OneDrive” with an icon that looks like a dark blue cloud instead of a folder. This represents the OneDrive library which you can easily copy things into anytime when a file or document needs quick safe-keeping.
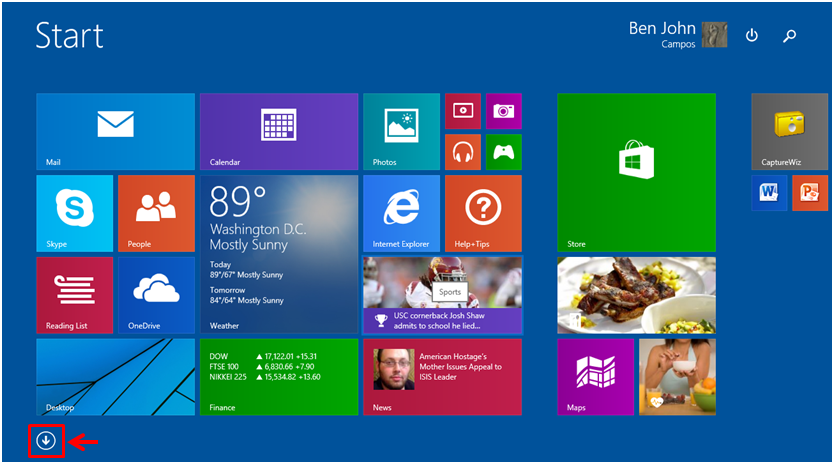
In case you don’t see the File Explorer thumbnail on the taskbar maybe because it has been removed from there intentionally to clear up more space for other items, you might be confused in how you can access File Explorer because of the absence of the Start Menu but it doesn’t have to be so. You can easily access the File Explorer shortcut from the Apps view screen and you can even add it to the taskbar or the Start Screen for easier access. Doing this is simple, just access the Start Screen first by pressing the Windows key and after doing so, you will need to move the mouse over the screen until you see a round button containing an arrow down icon in it that is located at the bottom-left portion of the Start Screen as shown on the screenshot below.
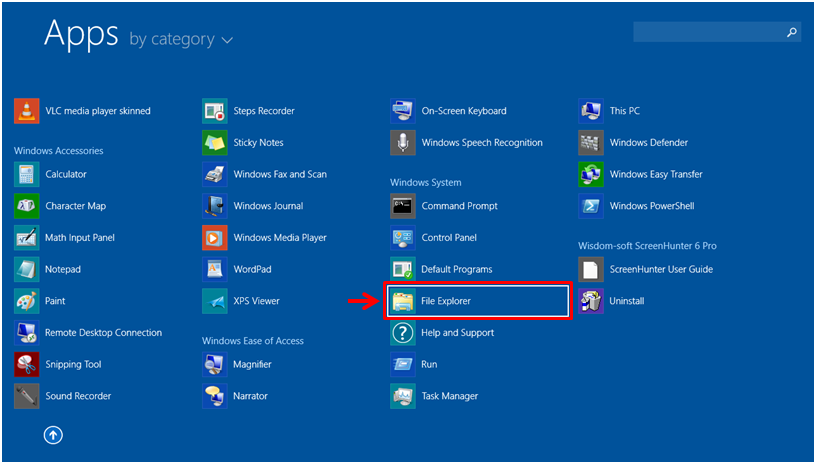
After clicking on the button, you will be taken right away to the Apps view screen which is considered as the modern Start Menu of the Windows 8.1 operating system and from here, all you need to do is scroll towards the right and you will see the File Explorer shortcut under the “Windows System” category. Once you find this shortcut, simply click on it and the File Explorer Window should open.
Viewing OneDrive’s Contents from the Desktop
As I have mentioned earlier, you can already find “OneDrive” as one of the prominent libraries that you will see from the left hand portion of the screen when you open File Explorer. This means that you can directly store files into this library without the need of getting to the OneDrive website and uploading the files which will otherwise need an Internet connection. To do this, just click on the item that is labeled “OneDrive” from the navigation pane located at the left hand portion of the File Explorer Window.
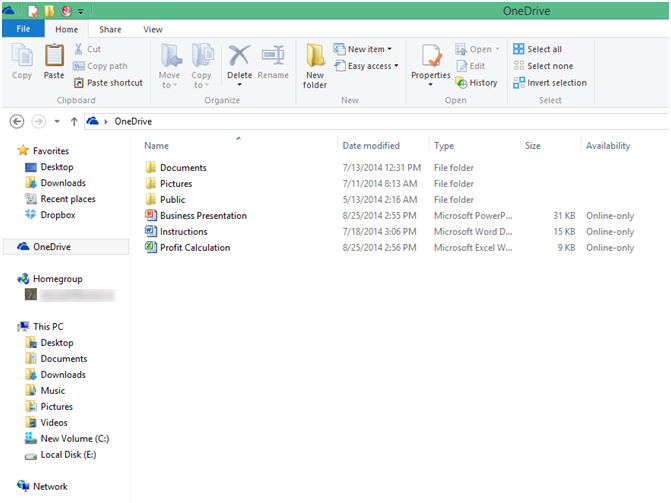
After doing so, OneDrive’s default contents which are folders that are labeled “Documents”, “Pictures”, “Public” will appear and in case you’ve already uploaded some files to your OneDrive account using a web browser and forgot to place the files in folders, you should find them as additional items on the contents pane as you can see on the screenshot of my OneDrive contents in my Windows 8.1 machine.
If you want to view a document that you have uploaded to your account, you can simply click on its shortcut from your OneDrive library and it will be downloaded automatically into your computer so you can view it.
Adding Files into OneDrive
Now that you learned how to view your OneDrive folder contents, the next step is to learn how you can add your important files into this same section for safe-keeping. Doing this crucial task is the same as copying files from one location to another which is done either by moving the file itself or by using the famous “Copy and Paste” feature. You can also drag and drop a file into your OneDrive library. You surely are familiar with at least one of these methods but for the benefit of those who don’t know any yet, let me show one method here. First, just go to the file that you want to store into OneDrive and once you find it, simply select the file then hit the “Copy” option from the ribbon that is located on top.

Now, when the file gets copied, just go back the the OneDrive library and once you are on it, go to the ribbon options on top again then hit the “Paste” option which is located beside “Copy” and the file which or folder will automatically be copied into your OneDrive library contents.

Once all the files that you want to save in OneDrive gets copied, all of them will be synced into your online cloud storage so you can still access them on all your other Windows 8 or Windows 8.1-based devices. Now, you can always go anywhere with any Windows device with you because OneDrive will take care of all of your important contents every time you need them.