Setting a Homegroup Sharing From Windows 8’s PC Settings
The Homegroup is one of the most useful networking feature on any Windows machine. It helps you share some stuff like files, folders and other devices that are on your computer to other users whom you added to the group. This process takes just a few clicks and the good thing is you don’t have to be an expert to learn how to do it. In this tutorial, we will discuss the steps of how you can access the Homegroup on Windows 8 and we will teach you how to manage it. Just read on and discover some useful steps in managing this awesome feature found on Windows 7 and Windows 8 and learn how to manage it by yourself.
Note:
the Homegroup feature only works if the computers on a network have Windows 7 or Windows 8 installed. It will not work for XP or Vista even if the network on it is set to “Home”. Also, you need to remember that the computers which you want to add to the Homegroup should set the network as a “Home” network and not “Public” or “Work” networks.
Creating a Homegroup from Your Computer’s PC Settings
To create a a Homegroup from Windows 8’s PC settings, you need to access it first. Here’s how you can do it:
- On the desktop screen move the mouse pointer or your finger to the bottom or top right corner of the screen. After that, move the mouse pointer upwards if you used the bottom corner or downward if you used the top corner. A black strip of background will then appear on the screen which contains the charms on it.

Click on the “Settings” charm and on the Window that opens. click on “Change PC settings” located at the bottom.

On the “PC settings” Window, scroll down and select the “Homegroup” item by clicking or tapping on it.

On the “PC Settings” Window, look at the right portion and you will see something that says “Create a homegroup” having some explanations beneath and a button labelled “Create” at the bottom.

Next, you need to click/ tap on the “Create” button. It may take a little while for Windows 8 to create a Homegroup since it still needs to create a password for it and as well as make a default settings.

After the process of creating it, the Homegroup will finally be displayed complete with a new set of options asking you what you want to share with other computers as well as the devices that belong to the Homegroup you created.
Connecting to a Homegroup from Your Machine’s PC Settings
A message that says “A homegroup is available” will be displayed on a Windows 8 computer once a new Homegroup is created by another computer that is joined to a network. You will then be asked to enter the password to it. Just type the password to the text box provided then click/tap on the “Join” button.

Just like creating a Homegroup, it may also take a while for Windows 8 to apply all the default settings and connect to it.

Once the connecting process is done, you can now start sharing some files, folders libraries, devices and other stuff with other computers that are joined to the Homegroup.
Setting the Stuff That You Want to Share with the Homegroup
After setting up the Homegroup or joining one, you can now set the stuff that you want to share.
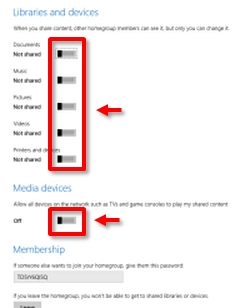
You can do this by going to the PC settings then on the section for the Homegroup, look at the right portion and look at the settings. On the top section you will see the devices and Libraries section where several switches are available which is labelled “Shared or Not Shared”.

You can set these switches to whatever settings that you want (Shared or Not Shared) so you only share those that you want shared and keep those that you do not want to share. All stuff that you shared only has the “Read only” accessibility. All the other users that can access it cannot do any changes or delete anything on it.
Once you scroll lower, you will see the section labelled “Media devices”. This is where you can set any device on a network like consoles, TVs and other media devices to play any content that you enabled for sharing.

Once the media devices is set “ON”. All the media contents on your computer like pictures, music and videos will be viewed by the other computers and devices via streaming. This includes your Playstation and Xbox Consoles.
Viewing the Password of Your Homegroup from the PC Settings on Windows 8
In case you forgot the password of your Homegroup and you badly need it to enable another device to join it then you can always find it out from your machine’s PC settings. To know your password again. Just go to the tab labelled “Homegroup”, click/tap on it and look for the section labelled “Membership” on the right portion of the screen.

Leaving a Homegroup from the PC Settings on Windows 8
If in case you decide to leave the Homegroup, you can simply do it by clicking or tapping on the “Leave” button just below the password text box of the membership section as shown above. After that, just wait a few seconds for the process to complete.

Things that You Can’t Do to the Homegroup on Windows 8’s PC Settings
Accessing the Homegroup section from Windows 8’s PC Settings section is not the same as getting to it from the Control Panel because there are other things that you cannot do on the Homegroup if you accessed it from PC Settings.
For instance, you cannot do any change on your Homegroup’s password but you can do it from the Control Panel. Another is you can only make tweaks (Share or Not Share) on the libraries that are set by default like the Music, Pictures, Documents and Videos library. You can only enable sharing for other stuff that are saved on your computer from the “File Explorer” (the Windows 8 version of the Windows Explorer).
The last one but definitely not the least is that you are not able to set permissions or change it on any item contained in the libraries that you shared. The permission set as default is “Read only”.
What’s the Advantage of Using the Homegroup Feature
The simple answer is “it saves time”. If you enable a Homegroup on your existing network then you will not be needing external drives and flashdrives just to transfer documents and other files from one computer or device to another. This also allows other users to share other files and other stuff to you without the hassle of doing the same and on Windows 8, you can access this valuable feature with the use of a mouse or your finger in many different ways. Now that you learned the things that we discussed above, you should be able to share it to others and make them use the Homegroup feature which readily and and freely available on any Windows 7 or Windows 8 computer.