Staying Safe with Windows 8
One of the things that users really take good care about in any operating system version or platform is the security of its contents. In the advent of Windows 8, the list of possible instances where users can become a victim of certain security and privacy problems has increased but Microsoft has designed it to counteract even the slightest breach that may appear anytime.
For instance, you can restrict the apps that are installed on your computer from sharing your account picture, location and other account details that can be used by other people in doing certain illegal activities online. Microsoft also makes sure that you are installing only the apps which are safe and approves the ones that are coming from the Windows Store. There are even more than these and we’ll be learning about the safety features that Windows 8 has in this tutorial.
Choose the Information Shared by Apps
Mobile apps, the same as those that you install on your Windows 8 tablet or Windows phone are also available in your Windows 8 PC. If it is your first time using the operating system, you will notice that there are two different environments which are available, the desktop and the Start Screen and the latter bears all the mobile apps that you get from the Windows Store.
Windows 8 apps are all set to share your name, account picture, location and other personal information whenever you are using them but you can put restrictions to each one that is installed on your computer. To do this, simply follow the steps below
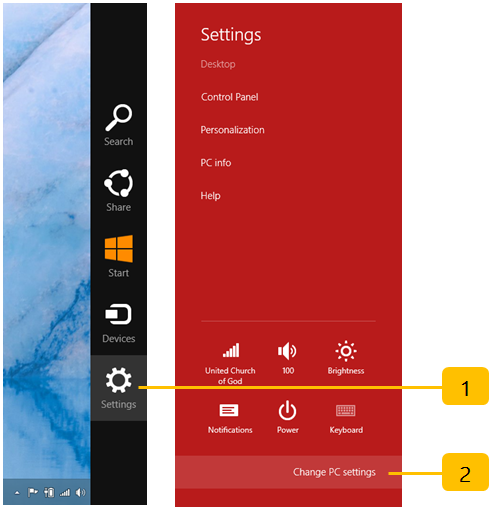
1. Access the Charms bar by pointing the mouse to the upper or lower- left corner of the screen. After doing so, you’ll see five icons appear, simply move the mouse upward or downward depending on where you pointed it and the black Charms bar will appear to highlight all the icons. From these icons, simply click on the one that is labeled “Settings”.
2. After clicking on the “Settings” Charm, the Settings screen will appear and at the bottom of it, look for a link that “Change PC settings”. Once you find it, simply click or tap on it to access the PC settings screen.
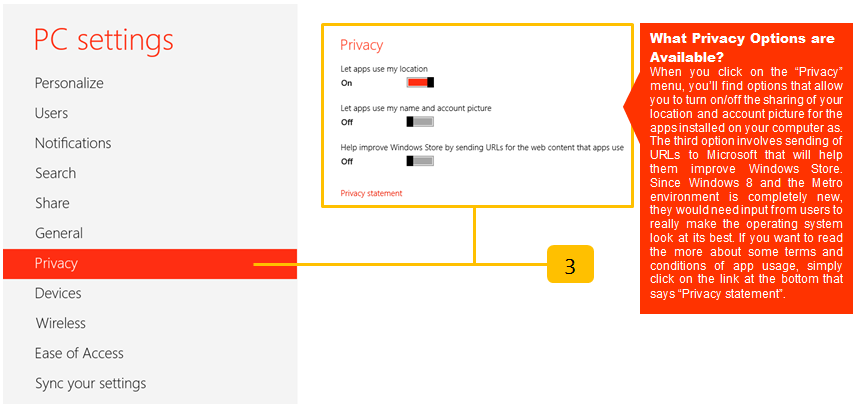
3. When the “PC settings” screen opens, take time to go through the menu listed on the left hand side and look for the one that says “Privacy”. Once you find it, simply click or tap on it to open all available privacy options.
Install Apps Only From Verified Sources
If you are using Windows 8, the best and safest source of apps is the “Windows Store”. Mobile platforms really does that by default but most of us want to try even more and install some stuff that we found outside of what Windows 8 recommends but of course, you’ll be doing this at your own risk.
1. To do this trick, you’ll need to tell Windows that it’s OK for such apps to be installed. This process involves tweaking the “SmartScreen” settings but if you are logged in as an “administrator”, you can simply right-click on the app and select “Run as administrator”.

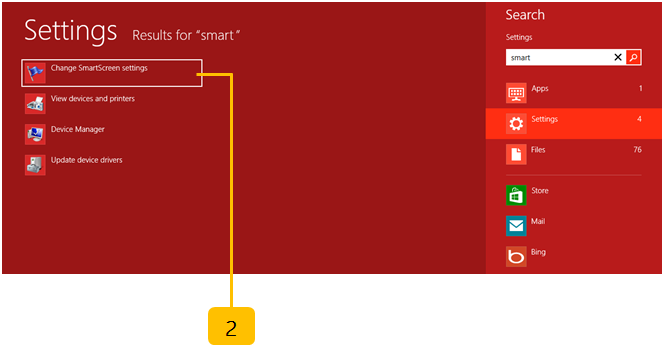
2. Another method is by pressing the “Windows + W” keyboard shortcut combination. After pressing these keys, the “Search” screen will appear and on the input box, simply type the word “smart”. The search results will then appear on the left hand side of the screen. From here, simply select the option that says “Change SmartScreen settings”.
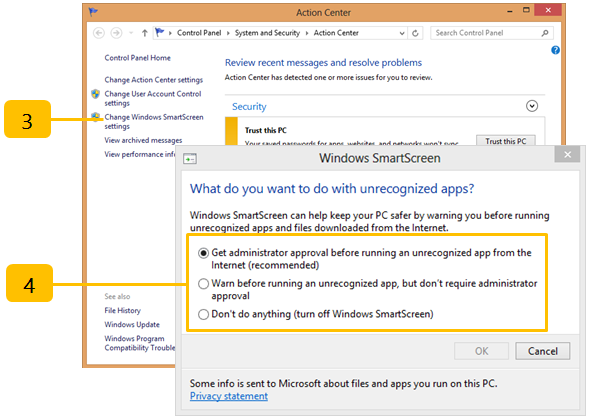
3. After clicking on “Change SmartScreen settings”, the Action Center Window will appear, from here, all you need to do is click on the “Change Windows SmartScreen settings” option located at the left navigation pane.
4. The “SmartScreen” Window will then appear where you can find three settings for dealing with apps that you would like to install on your computer. These three options come with some pretty clear explanations so you should be able to choose the one that would fit your taste. If you want to install apps that are not from the Windows Store, simply select the second option or if you really want total freedom, you simply need to choose the third option. After selecting your the option that you want, simply click on the “OK” button at the bottom to save the changes.
Add More Security with Windows Firewall
The Windows Firewall has become even better with some advanced options and settings and it also asks you whether an app should be allowed access through it or not. But of course, you can always make changes to these settings if you have “administrator” rights. Here’s how.
1. Access the “Search” Charm from the charms bar or by clicking on the “Windows + W” keyboard shortcut combination. Once the Search screen appears, simply type “windows firewall” then click again on the “Settings” search result just below the search input box.
2. After clicking on the “Settings” search result category, its contents will be displayed on the left hand portion of the screen. From here, simply select the one that says “Allow an app through Windows Firewall”.

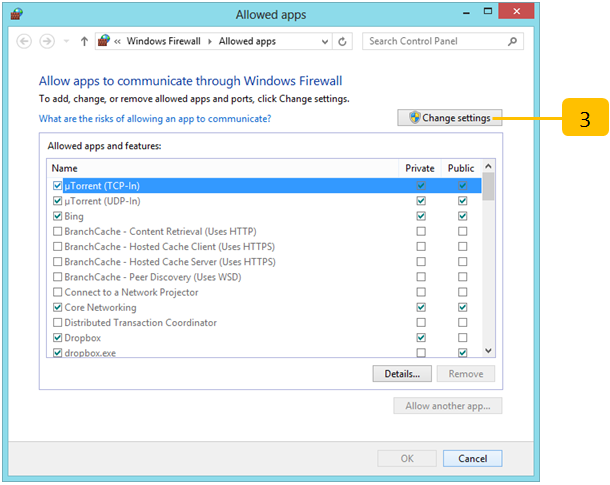
3. The “Allowed apps” Window will then appear where you can see some checkboxes for the apps that can be allowed for public or private access. To start making some changes, simply click on the “Change settings” button. This section of the Control Panel also allows you to make some changes on some settings that are related to the firewall on your machine like the import and export of different security settings and policies. When you’re done doing some changes, simply click on the “OK” button.
Organize the Stuff that are Being Synced
Another very useful security feature in Windows 8 is its ability to sync files and settings to other Windows 8 devices that you might own for as long as you are logged in using you Microsoft account. For instance, if you set up your PC and your tablet using your Microsoft account, you will notice that it synchronizes your account details, emails, contacts and many more. This is a big advantage for people owning more than one Windows 8 device but it can also be a bad idea in other cases especially when there are other people who are using one or more of your devices. To take control of what Windows syncs and what it should not sync on a particular device, simply follow these steps.
1. Click or tap on the “Settings” charm then “Change PC settings” then on the “PC Settings” screen, simply click or tap on the menu that says “Sync your settings”.

2. All options under “Sync your settings” will then appear at the right hand side of the screen, simply select and turn the ones that you would like to sync and turn off those that you don’t want to be synced. Simply do this same process on your other devices which is used by other people in your household to avoid having your stuff exposed to other users who has nothing to do with any of them.

That’s it! You now accomplished another tweak that will make your Windows 8 machine more secure against any breaches. Remember, the key is always prevention rather than having troubles dealing with the cure. Take time to do the steps I have shown above and you will surely have peace of mind and confidence on whichever Windows 8 device you are using. Want to learn some cool stuff about Windows 8? Be sure to catch our “Tip of the Week” and learn some tricks that will surely help you make the most of your Windows 8 machine.