The Basics of Windows 10’s App Marketplace (Windows Store)
One of the wonderful things that users like about the latest Windows editions starting Windows 8 down to the latest one called Windows 10 is that it’s capable of getting new features and capabilities just like smartphones. If you don’t know yet about this then you might have just been focused with the traditional Desktop environment in Windows 10 which means that you are not really getting the most out of your computer! Microsoft’s latest Windows edition has far better stuff in it that would surely make you become more productive in many ways on many different aspects! For instance, if you want to add a calculator to your computer that works quite better than what’s built within the operating system (Windows 10) then you can simply head to the Windows Store and look for a new calculator app that would satisfy your need. Not just that, you can also look for some other stuff that will keep you entertained on your leisure time such as games, books, movies and many other stuff and everything works just like how you download and add new features, capabilities and other stuff to your smartphone! But how is it done? Well, you should be very familiar with it if you’ve already been doing it on your smartphone but for the benefit of those who are switching to Windows 10 for the first time then we’ve created a tutorial that will guide everyone through the basics in using Microsoft’s app marketplace called the Windows Store or simple the “Store”!
How to Access Windows Store
If you’ve just got your computer upgraded to Windows 10 then you will have the Store icon pinned on the Taskbar by default and you can access it simply by clicking on the icon itself as you can see highlighted on the screenshot below.  However, if the Store icon has been removed or unpinned from the Taskbar in order to give way to the icons of other more useful apps, programs and applications that you are using most of the time then accessing the Store will be quite different but still easy! To do this, you can simply click on the Start Button then from the right-hand portion of the Start Menu, all you need to do is scroll down and you should be able to see the “Store” tile which you can simply click in order to launch it!
  Now, if the Store tile has also been removed or unpinned from the Start Menu, the last method that you can use in order to access it is through the “All apps” section. To get into this section, you will again need to open the Start Menu by clicking on the Start Button then at the bottom-left portion of the Start Menu just above the Start Button, you will need to click on the link that says “All apps” as shown below.
 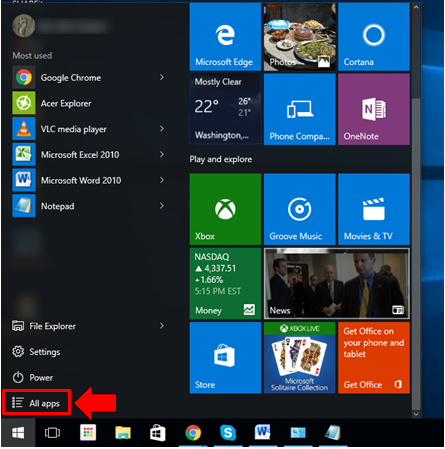 After clicking on the “All apps” link, you will then be able to open the list of all the apps that are installed on your computer and as well as those that came built-in with Windows 10. The programs and apps are arranged in alphabetical order so in order to find the “Store”, you will need to scroll down to the “S” section.
 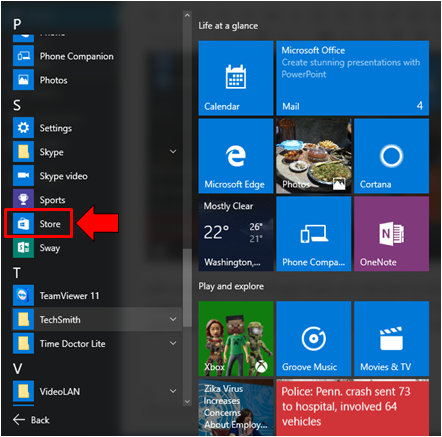 Once you found the apps that starts with letter “S”, just look for the “Store” shortcut in it and simply click on it in order to launch Windows Store. It’s actually that simple and if you really want to get quick and easy access to this feature in your Windows 10 computer, all you need to do is right-click on the “Store” task that already appears on the Taskbar after you’ve opened it then from the right-menu that would appear, simply click the “Pin to taskbar” option.
 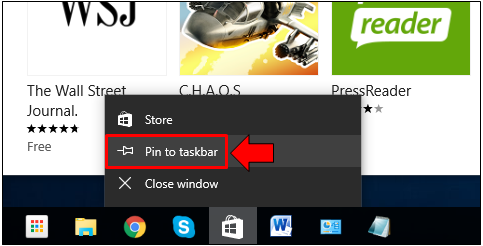 After doing so, the “Store” icon will again be pinned on the Taskbar so the next time you need to get access to it in order to install a new mobile app, all you need to do is click on the icon that has been pinned on your computer’s Taskbar and Windows Store will open instantly!
Getting Familiar with the Main Interface
Once Windows Store opens, the very first thing that you will notice is that it does not open in a regular Window the same as the desktop apps and programs that are installed in your computer which you surely got used to working with. This is because the Store itself is part of the modern environment in every Windows 10 operating system. Your computer looks and feels more like a mobile device when you are in this environment but nevertheless, the minimize, maximize and as well as the close or exit buttons are still sitting at the top-right portion of the screen for easier navigation. 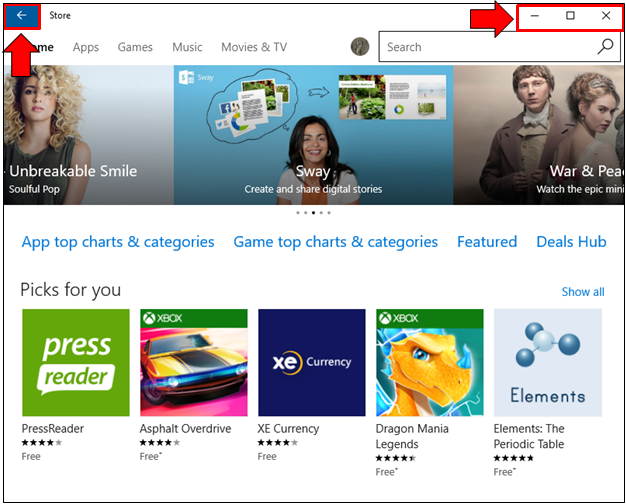 You will also find a “Back” button that is found at the top-left portion of the screen which you can use to quickly go back to a previous page in the Store that you have opened. This button is also highlighted on the screenshot above so you can easily locate it on your computer’s Windows Store.
Searching for Specific Apps in the Store
Now that you were able to open the Home screen of Windows 10’s Store, the next step that you will need to go through is looking for the exact app that you need. You can search for apps in the Store in two ways. One is by simply entering the name of the app into the search input box located at the top-right portion of the Store Window or manually looking for it in case you don’t know the exact name of the app. Let’s learn how these two are done.
Searching for an App by Name
The easiest and quickest way in looking for an app in the Store is by entering its name into the search input box that is found at the top-right portion of the screen as you can see on the screenshot below. 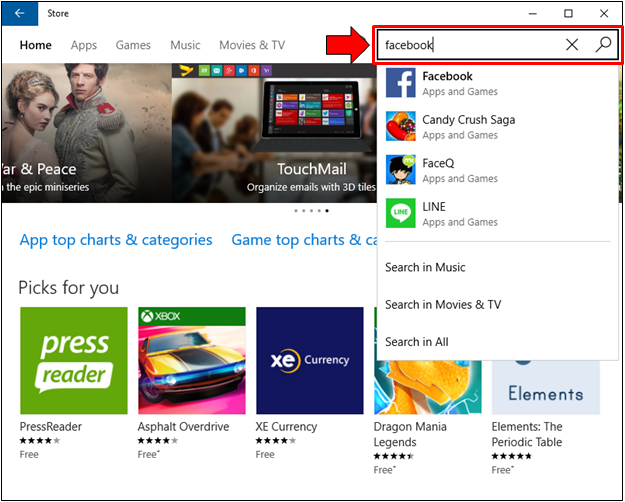 Right after the name of the app is typed into the box, you will see suggestions instantly that will open in a white box as shown on the screenshot above. From here, you can either click on the app itself in case it is displayed in the suggestions box or you can also click on the “magnifying lens” icon at the right of the input box in order to open the search results.
 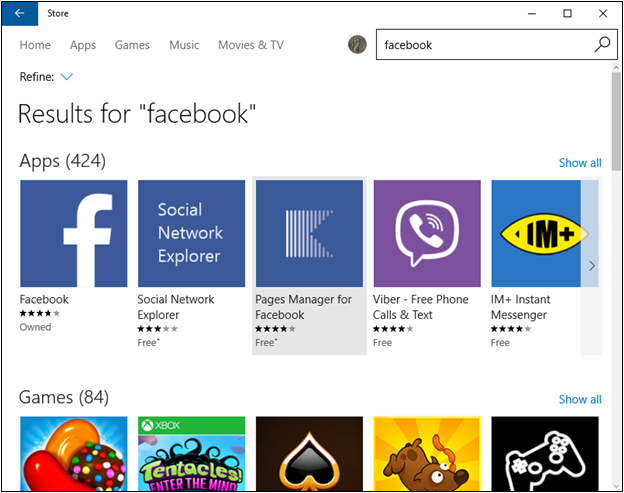 From the search results, all you need to do is click on the app itself then just follow all the other steps that will come up next. We will be discussing this in a separate tutorial so for now, let’s proceed to the second method in looking for apps from the Store.
Manually Looking for Apps in the Windows Store
Finally, we come to the last item that we will be discussing in this tutorial and it is looking for apps manually. This would be helpful if you don’t really know the name of the app. To find apps easily, you can simply use the categories that are found on top of the Store Window as highlighted on the screenshot below. 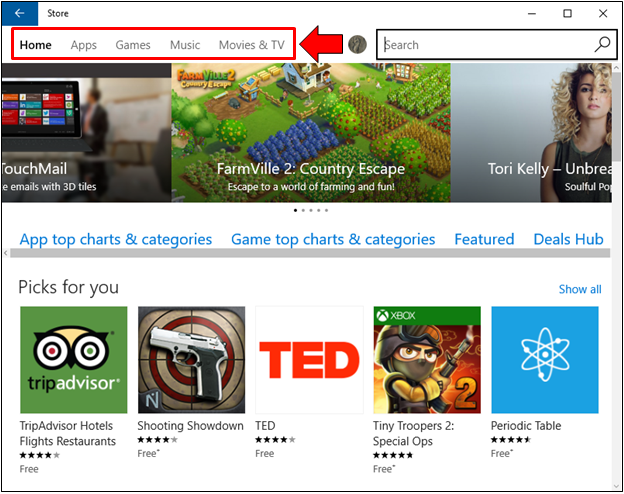 In case you are in a hurry to find the app, you can just use key phrases like “photo editing app” or “calculator app” or “best simulation games” in order to reveal results that are related to the keywords you typed into the Search input box. Once the results appear, just look for the app that you want to install by scrolling through the results or you can also “Refine” your search according to the available categories that are found at the left-hand side of the Windows Store screen as highlighted on the screenshot below.
 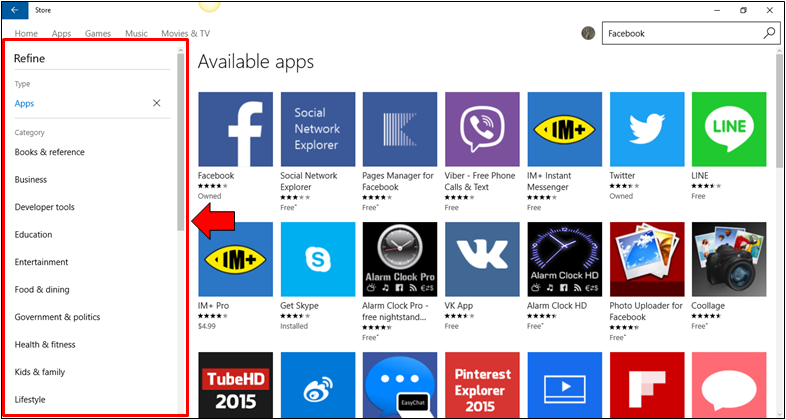 Once you find the app that you need, simply click on it and follow the instructions that will be displayed next on your computer screen. If you’re not yet confident in doing this then you need to watch out for our next tutorial that will discuss the details in how this is done on Windows 10. Do you have favorite Windows Store apps that you’d like to share with us? Please feel free to make it known by using the comments section below!