How to Tweak Windows Defender Settings in Windows 10
Windows has always been a popular operating system for PCs and laptops even before mobile versions of it was released. It has become even better when Microsoft decided to make it capable of running in both PCs and mobile devices adding even more features to it which gave the operating system an unbeatable edge among its competition.
One of the things that Microsoft has added to it is its built-in antivirus and antispyware program called Windows Defender also known as Microsoft Security Essentials back in the days of Windows Vista, Windows 7 and even in the early days of Windows 8 before the company decided to include the software as one of the security tools in Windows 10.
If you’ve been using Windows 10 for quite a while now then you must already be aware that Windows Defender just works silently on the background and it really works smoothly with the operating system itself because it doesn’t show annoying prompts and play sounds that often surprises you but we’ve been receiving questions from our readers asking about the way in launching it.
If you’ve been wanting to launch this tool in your Windows 10 machine and access its settings so you can tweak the way it works then you’ll need to join us in this tutorial as we show you the steps in how tweaking the settings are done in this built-in antivirus/antispyware software is done in your Windows 10 computer.
NOTE:
The screenshots taken in this article are from a Windows 10 machine that already has the Anniversary Update installed on it. If you are using an older Windows 10 version then there might be slight differences in the appearance of menus but everything else works basically the same so just follow the steps that are going to be shown below and you should get through the Windows Defender settings smoothly.
Accessing Windows Defender in Windows 10
In older Windows 10 builds, the Windows Defender tool is totally just hidden in the background. It does its job pretty silently but efficiently since it does not show even just a single icon in the System Tray or in any other locations within the Windows 10 operating system. We don’t really know if this is a bug which has found its fix in Windows 10’s Anniversary Update because right now, there’s already an icon found in the hidden items section of the System Tray which is intended for Windows Defender as you can see being highlighted on the screenshot below.
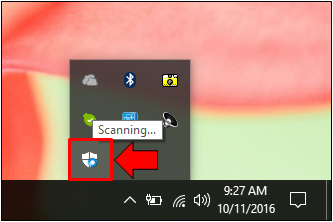
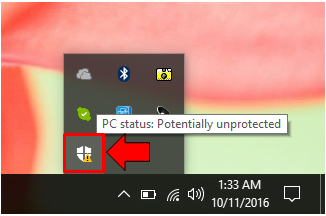
The icon also features different overlays like the circle loading icon that you see above which indicates that Windows Defender is currently doing a scan process. In case it detects a malicious item or it wants to inform you that the virus definitions are outdated as well as if it detects that you need to do a scan on your system it will have a yellow exclamation point overlay on it as shown below.
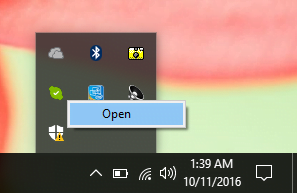
In order to launch the Windows Defender screen, all you need to do is click or right-click on the icon itself and a sole option which says “Open” should then appear. Just click on this option as you can see on the screenshot below and the Windows Defender Home Screen should launch instantly!
From here, you won’t really see much of Windows Defender’s settings and the reason for this is that its settings are found under the universal Settings app.Windows Defender is treated as part of the Windows 10 operating system that’s why is settings are found in this section and it is also done intentionally in order to make the tool lighter and smaller in terms of system resource usage and file size.
Accessing Windows Defender’s Settings
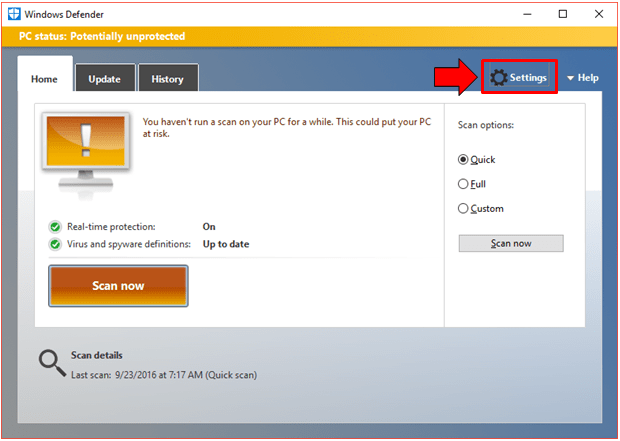
Now that you are already on the Windows Defender home screen, you will need to get acquainted with the options, items and features that can be found on it. We’ve discussed the steps in how you can use and work with all of these items found in the Windows Defender user interface in this previous tutorial and we recommend that you read it first so you will have a better understanding in how the tool works. In order to access the settings section for Windows Defender from the universal Settings app, all you need to do is click on the button that is found on the top-right portion which says “Settings” as highlighted on the screenshot below.
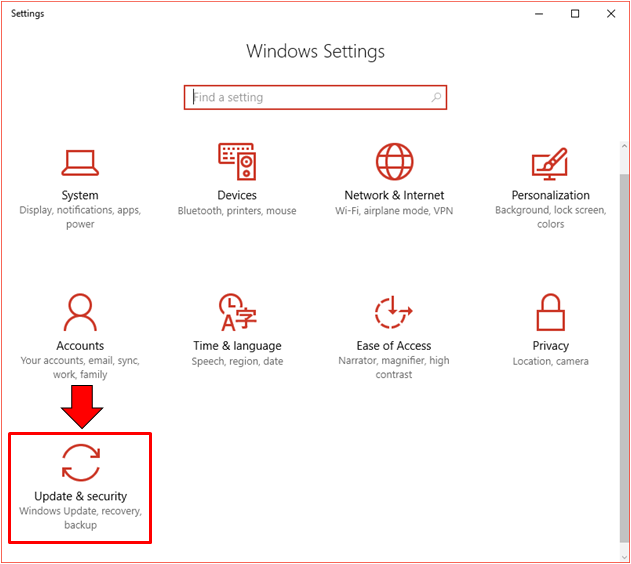
After clicking the button, the universal Settings app should launch in an instant and it should take you directly to the Windows Defender settings Window. If you want to do things the hard way, you can also launch Windows Defender’s settings section by first launching the universal Settings app. To do this, just press the Windows + I keys and the Settings app Window should instantly open on your screen showing its home page section. From here, just click on the settings category that says “Update & Security” as you can see on the screenshot below.
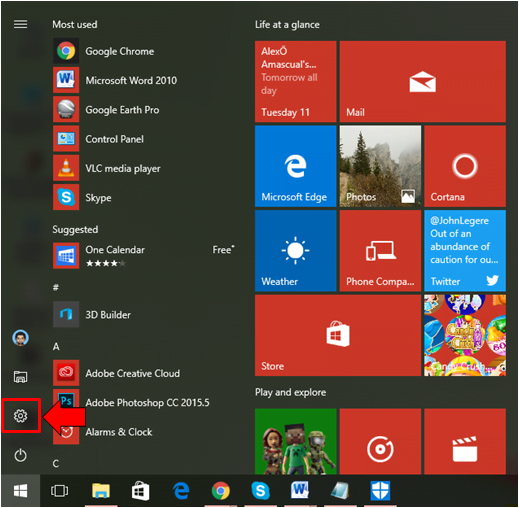
You can also launch the universal Settings app by clicking on its icon that is found on the Start Menu as highlighted on the screenshot below.
Now that you are already on the settings section of the Windows Defender tool, it is time to learn what tweaks can you do in order to change how the tool itself works. Just remember though that all of the default settings and values that are found in this section are already designed for your best protection and system performance. If you don’t really know what a setting is intended for, it would be best to just leave it as is but if you know what you are doing, you can go ahead and tweak each of the options that you would like to change.
Opening Windows Defender from its Settings Screen
On the settings section for Windows Defender that is accessed by clicking on “Windows Defender” on the navigation pane at the left of the “Update & Security” section of the universal Settings app, you should be able to see a button that is on the top just under the description of what Windows Defender does on your computer which is labeled “Open Windows Defender” as shown on the screenshot below.
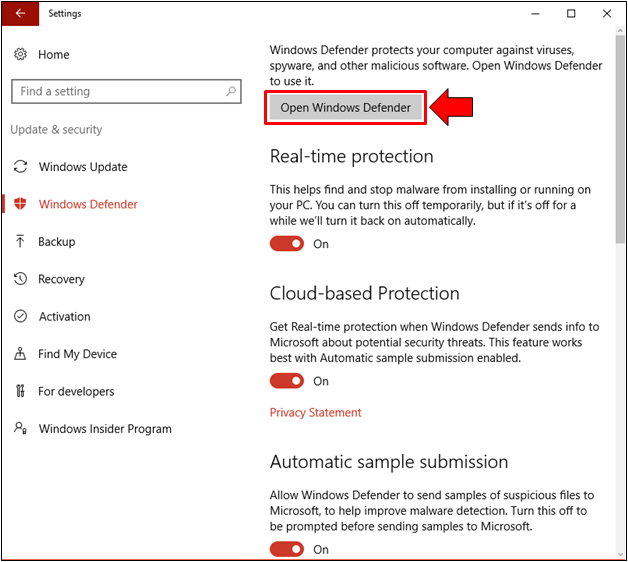
When you click on it, you’ll be able to launch the Windows Defender home screen where you will be able to see the different aspects and options available in it.
Turning Real-Time Protection On or Off
This is one of the most important components of Windows Defender since it protects you from malware that tries to install or run on your computer. This feature can be turned off simply by clicking on the switch under it but we strongly recommend that you would only do so when needed such as situations where a software requires that any antivirus program be turned off or disabled for it to be installed.
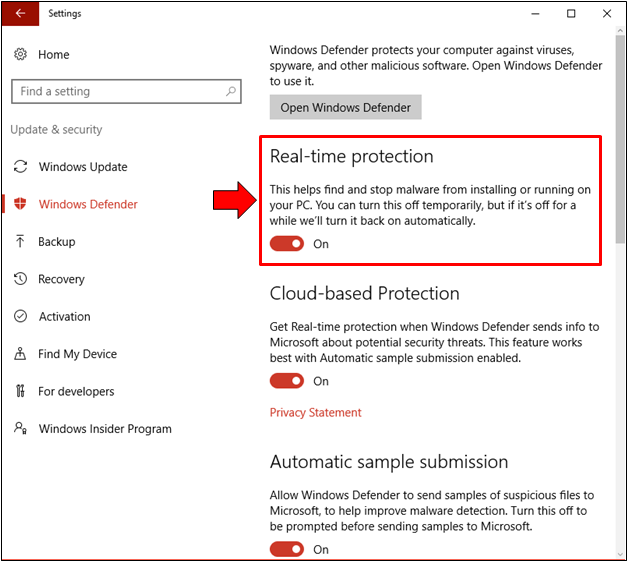
When Windows 10 detects that Real-time protection has been turned off for a long time, it will automatically turn the feature on without the need of any user intervention in order to make sure that are you protected against any threat that can come from different sources while you are using your computer.
Enabling or Disabling Cloud-Based Protection
Another awesome feature that is found in Windows Defender is the one that is called “Cloud-based Protection” and it basically provides real-time protection for you and your computer directly from Microsoft security servers whenever it detects anything that can pose potential threat or become a vulnerability if left unaddressed.

If you have this feature turned on, you will also need to make sure that the next option is also turned on since Cloud-based protection requires Automatic sample submission in order to work effectively and efficiently every time.
Turning Automatic Sample Submission On or Off
The next option works in conjunction with the “Cloud-based Protection” feature and it basically allows Windows Defender to send samples to Microsoft of any suspicious file or any other stuff that it detects in order to help malware detection a lot more improved.

If you turn this settings off, Windows Defender will automatically ask you whether or not you would like to send certain samples of detected files to Microsoft instead of having them sent automatically which is what actually happens if you choose to leave it on its default settings which is turned on.
Exclusions
The Exclusion section has a link below its description that says “Add an exclusion” and this setting basically allows you to choose certain files, folders or system location as well as drives that you don’t want Windows Defender to scan whenever you do a scan process with it. It is best to leave no exclusions so as to make sure that your computer is totally protected.
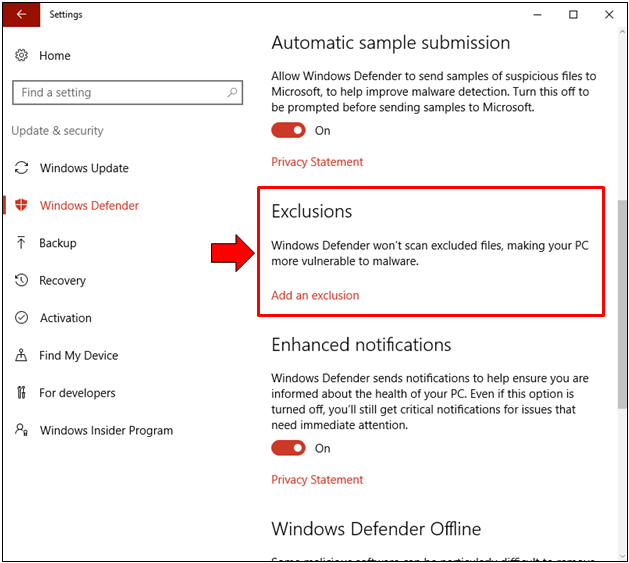
However, if you are pretty sure that you want to exclude something from being scanned for any reason then you can simply click on the “Add an exclusion” link, browse towards the location of the file, folder, drive or system location that you want to be excluded from being scanned, select it then add it to the exclusions list. It’s actually an easy and straightforward process that doesn’t need any advanced knowledge on anything related to antivirus software.
Enhanced Notifications
For less important things, Windows Defender just displays notifications in the Action Center screen but for more urgent concerns that need your immediate attention, it displays a prompt at the bottom-right portion of your computer screen. If you want to turn this off then all you need to do is click on the switch that is found just below it.
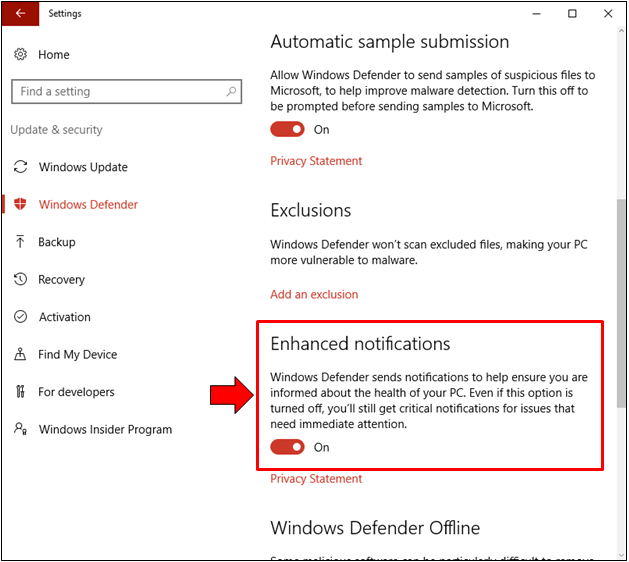
Just remember though that even if “Enhanced notifications” is turned off, Windows Defender will still continue to display prompts on the bottom-right portion of your computer screen for very urgent concerns that need your attention such as detected malware or when a scheduled scan needs to be started. These are all aimed towards making the tool perform its intended purpose-protect you from threats coming from different sources.
Windows Defender Offline
What if your computer gets infected by a very strong virus and it already blocks Windows Defender from doing a scan on your computer? How can you perform a scan and remove any threat that is causing the problem? This has been a big concern about Windows 10 and Windows Defender and thankfully, Microsoft has made a way for users to boot up directly to a Windows Defender scan and you can do this simply by clicking on the “Scan Offline” button that is found under the “Windows Defender Offline” description text as you can see below.
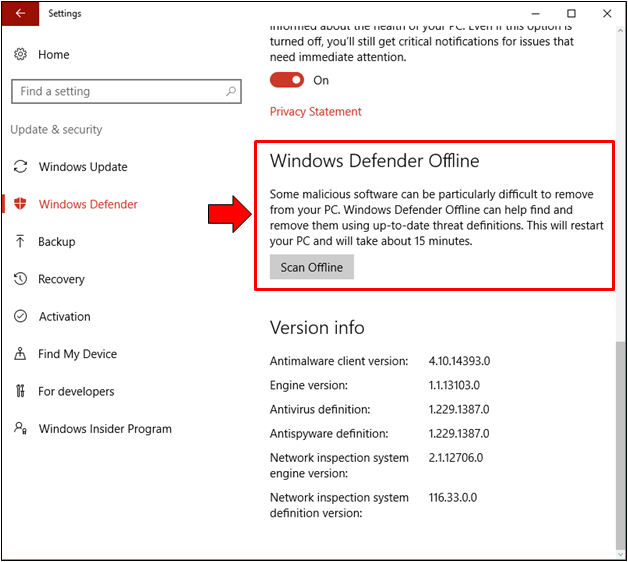
After the button is clicked, Windows 10 will ask you to save any work that you are doing because a restart process is going to be done on your machine. You can choose to do this at a later time though and just continue with what you are currently doing on your computer.
Version Info
Lastly on the bottom-most portion of the Windows Defender settings screen, you should be able to see a comprehensive list of information pertaining to the Windows Defender tool which includes “Antimalware client version”, “Engine version”, “Antivirus definition”, “Antispyware definition”, “Network inspection system engine version” and “Network inspection system definition version”.
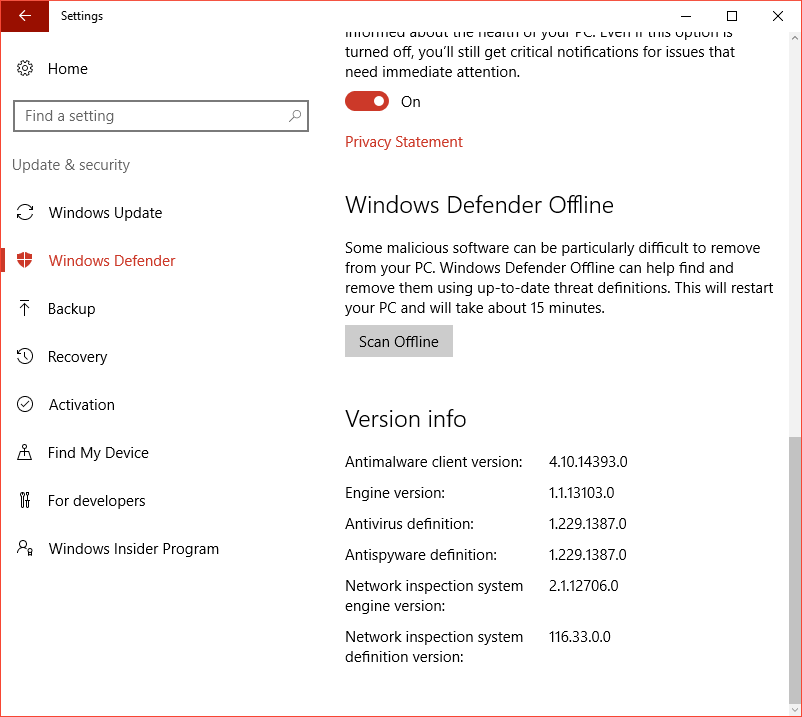
From these items alone, you can already have an idea on what Windows Defender really is all about and a you can see, it is a powerful tool that can protect your computer from different threats can can be lurking around the dark corners of the Internet or even the ones that are in the network that you are currently connected to. These version numbers change from time to time especially when Microsoft updates them so don’t panic if you check the next time and something has changed in them. It’s just the way it is.
Keep Yourself and Your Computer Protected with Windows Defender
Of all the antivirus software that is available for free or as premium software that requires to be purchased, we have not found anything that works as smoothly and quietly as Windows Defender, Microsoft has really done a great job in creating the perfect antivirus/antispyware/antimalware program for Windows 10 and we can only expect the best to come as the company improves everything as time passes.
Did you even have experience using Windows Defender in deleting a virus that has found its way to your Windows 10 machine? Did it work efficiently in detecting and deleting it? We want to hear your story. Just post them on the comments section below and if this tutorial has been of great help to you, please share it with your friends so they as well can learn about Windows Defender– Windows 10’s awesome antivirus software.