Learning the Basics in Working with the Family Safety Website
Making Windows 8.1 child-friendly should be one of the priority that parents should have in their home PCs and other gadgets that their child are getting access to. The Internet is no doubt a good tool in helping our child learn and discover endless sources of knowledge and facts but it can also easily turn into an enemy that can influence your child in the negative way if not used with control and discretion. It is therefore important for parents to have a way in controlling certain aspects in their child’s PC usage such as time and even website access as well as app and game restrictions. There are plenty of third-party software that allows you to do these things but before exploring for options that are available from outside the Windows 8.1 operating system, it would be good if you first learn about a built-in tool that does a better job and is perfectly integrated with all the other features that your machine has.

Windows 8.1’s Family Safety feature gives you good grips with your child’s PC usage and other statistics that will let you stay in control with certain aspects in your kids leisure or research time with your home PC or laptop. These options were once part of the operating system but since this is less secure and anyone who knows the password of your computer’s administrator account can change the settings, Microsoft moved everything online and created a “Family Safety” website which you can access using your Microsoft account login details. In this tutorial, we will be learning how to access the Family Safety website and get acquainted with some of the basic options and buttons as well as know all the tools that are available in it so get your Windows 8.1 machine ready to follow the steps below.
Getting to the Family Safety Section in Control Panel
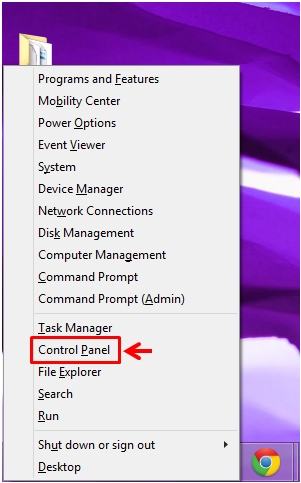
Before you can set up the Family Safety feature for an account, you’ll need to make sure that there’s an existing Child’s account in your Windows 8.1 machine. Once there’s already one that exists, you can access the Family Safety section from the Control Panel by first pressing the Windows+X keys. If you used to access Control Panel from the Start Menu back in the previous Windows versions, accessing this same system location in Windows 8.1 isn’t the same as its predecessors.
The Start Menu has permanently been taken out from this brand new operating system and the Windows+X keys will show a hidden menu which contains links leading towards different system locations, tools and other important stuff and this includes the “Control Panel”. Just click on the link that says “Control Panel” from this hidden and you should be able to open the Control Panel Window instantly.
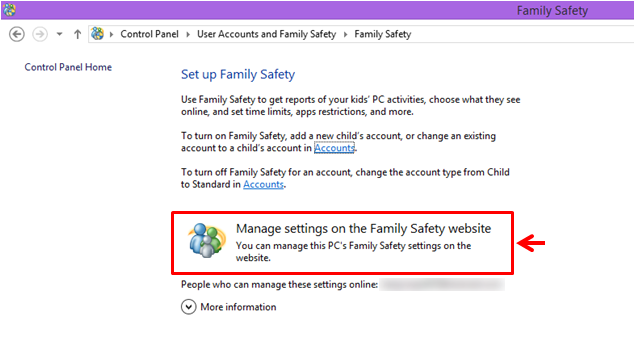
When the main Control Panel Window opens, you will need to click on the link that says “User Accounts and Family Safety” then on the Window that follows, just click on “Family Safety” or the sublink under it which says “Set up Family Safety for any user”. These links will open the same section so it doesn’t really matter which one you’ll click.

Now, on the Window that will follow after you click on the “Family Safety” or “Set up Family for any user” links, you will see instructions for setting up the Family Safety feature for an existing account or turning it off. There are also links that says “Accounts” on each of these instructions and both will take you to the PC settings screen where you can change the type of an existing user account or remove one. To access the “Family Safety” website, just click or tap on the link that says “Manage settings on the Family Safety website”.
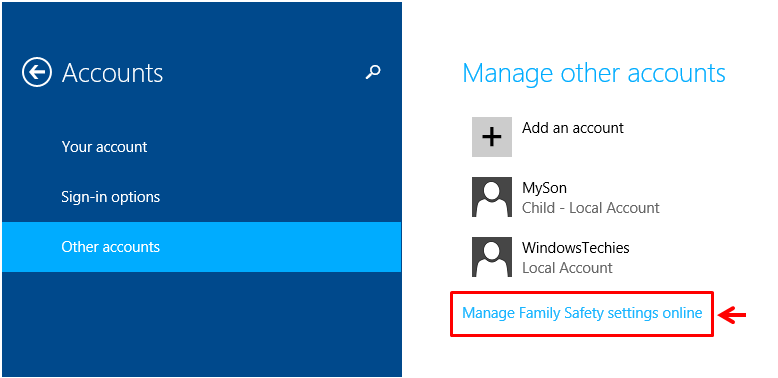
Another way in accessing the website is by clicking on any of the links from this same Window which says “Accounts” and after doing so, you will be taken to the “Accounts” section of the “PC settings” metro screen and from here, all you need to do is click on the link that is found at the bottom which says “Manage Family Safety settings online”.
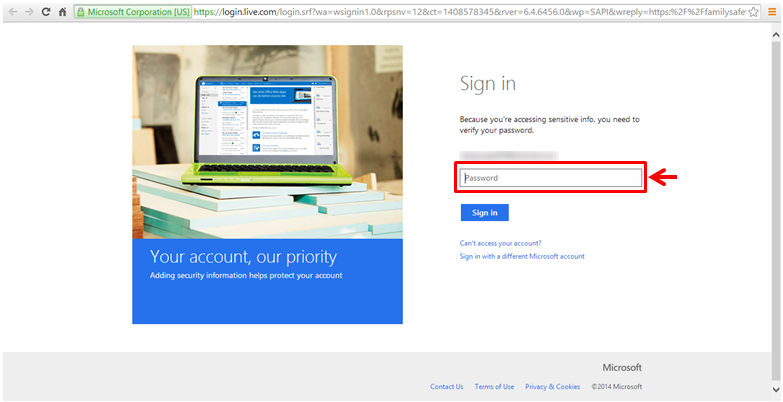
After clicking on the “Manage settings on the Family Safety website” link which is found on the Control Panel Window or the “Manage Family Safety settings online” link from the PC settings metro screen, the Family Safety website will open in your machine’s default browser and from here, you will be asked to enter your Microsoft account password so you an have access to all available “Family Safety” options.
Getting Familiar with the Family Safety Website
After entering the password for your Microsoft Account, you will be redirected to the main page of the Family Safety website. From here, you will see all Child’s account that are registered in your computer or any other Windows 8.1 device where you use your Microsoft account on. These accounts are listed under the “Kids” column as show on the screenshot below. From here, simply click on the account that you want to make Family Setting changes on.
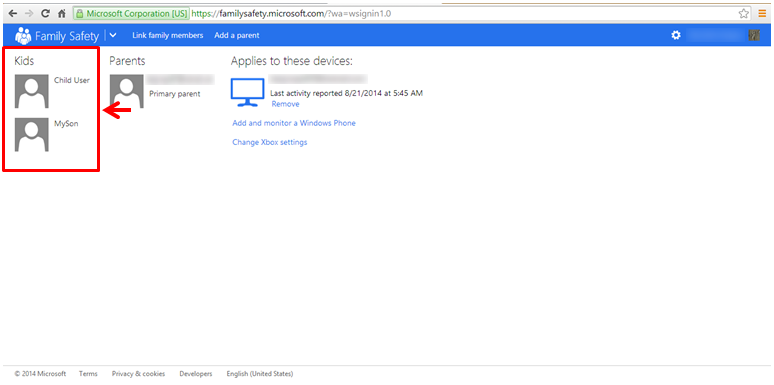
After clicking on your desired account, you will be redirected to the page that contains all Family Safety features and tools which you can make changes on.
What Tools are Available
Once the desired Child’s account gets selected, you’ll be taken to the page of the Family Safety website which shows the “Overview” section. From here, you will see some links that will allow you to get access to certain aspects of the Family Safety feature such as “Activity reporting”, “Web filtering”, “Time limits”, “App restrictions”, “Windows Store and game restrictions” and “Requests”. You will also see some descriptions on each of these aspects so you can have an idea of what they are used for and when you can use them.

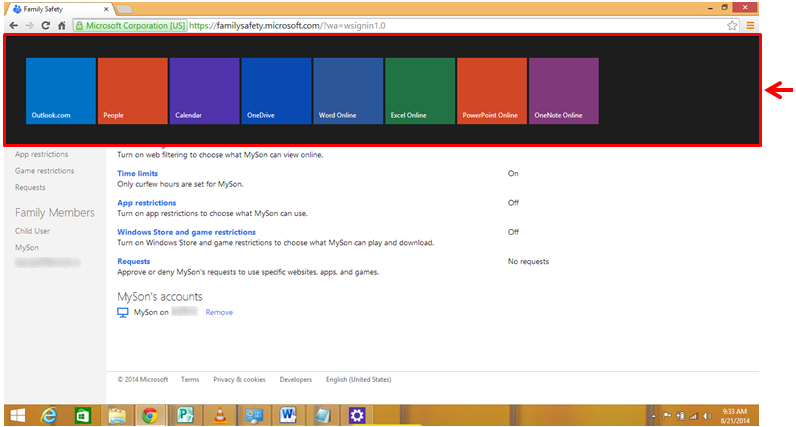
At the left hand portion of this page, you will find the same links for all aspects of the Family Safety feature and at the top just beside the “Family Safety” label, you will see an arrow down icon. Try clicking on it and you will be able to access a bar that will appear from the top which contains some online versions of desktop programs like OneNote, Microsoft Word, Microsoft Excel etc.
Next, just beside this arrow down icon is a link that says “Remove family member”. When you click on it, you’ll be able to access a prompt that will ask you to confirm the account removal action as you can see on the screenshot below. From this prompt, all you need to do is click on the button that says “Remove” if you really want to delete the Kid’s account which you opened.
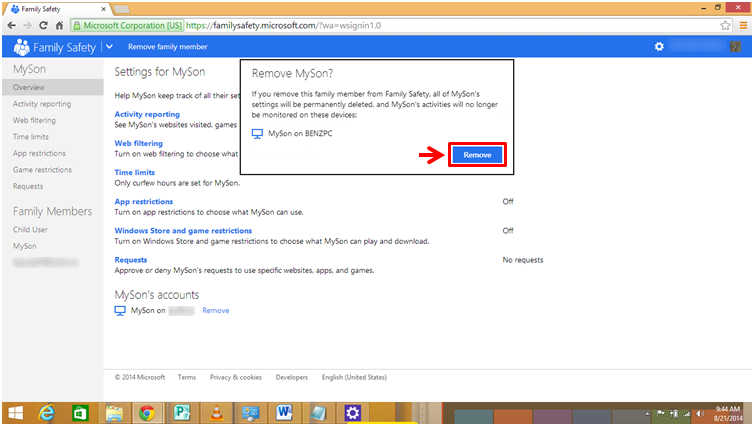
Another way in removing the selected Kid’s account is by clicking on the “Remove” link that is found at the bottom of the same page as highlighted on the screenshot below. On our next tutorial, we will be showing you all the needed steps in setting up certain aspects of the Family Safety feature such as “Web filtering”, “Time limits”, “App restrictions” etc so be sure to watch out for it and we’ll help you get on your way to mastering this important security feature which can turn every Windows 8.1 computer into a child-friendly machine.