Tweaking the Date and Time Format on Windows 7
Your Windows machine does a lot of wonderful things and one very useful function that it has which most of us use on a daily basis is time keeping. Windows is equipped with a calendar and a clock feature that is capable of being adjusted to any time zone or update itself to follow any public time server which you specify. Learning how to do these things may seem irrelevant at times but as you will see later, you will realize that having a knowledge in doing these tweaks is very useful especially if you want to keep track of different time zones for any reason.
This tutorial will cover the basic things which you need to learn regarding the time and date features on your Windows 7 machine and the rest of the advanced features and tweaks will be covered on a tutorial that I will make as a follow up for this series.
How to Open the Date and Time Section on Windows 7
Tweaking some aspects of your machine’s date and time settings is done in one Window and as always the case, there are many ways of accessing it on your Windows computer but for this tutorial, I will show you two easy ways of getting into this section. Just follow the steps below to learn how to do it.
1. Clicking the Date and Time Section on the Taskbar
- One very easy way of accessing the “Date and Time” settings Window is by clicking in the area of the taskbar where the date and time is located (extreme-right corner of the taskbar at the bottom of the screen).

- After clicking on the time and date area on the taskbar, a Window will appear which looks like the screenshot below. From this Window, just click on the link at the bottom that says “Change date and time settings…”.
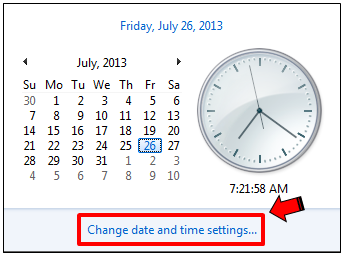
- After clicking on the link, you will be directed to the “Date and Time” Window where we will do most of the tweaks later as we move on.

2. Using the Start Menu Search Feature
Another way of accessing this section on your Windows 7 machine is by using the search box on the Start Menu. Here’s how you can do it:
- First, you need to open the “Start Menu” by clicking on the “Start” button or simply pressing the “Windows Key” on your computer’s keyboard then type the words “date and time” on the search box (excluding the quotation marks).
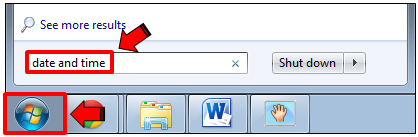
- Once the search results appears, just click on the “Date and Time” link located under the “Control Panel” search results category. The “Set the time and date” link will also lead you to the same Window.

You can also access this section through the “Control Panel” but I have already shown you enough ways of doing it so I’ll just leave it for you to try.
Changing the Time and Date Format
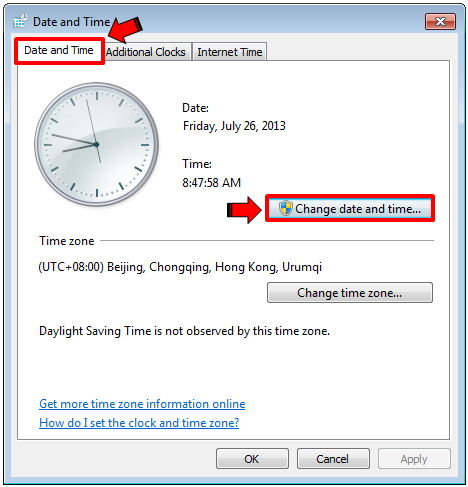
It is now time to do some tweaks on the date and time of your machine but first, you need to access the “Date and Time” Window and you should be there now if you followed the steps I described above in accessing it. Now,on the “Date and Time” settings Window, just click on the “Date and Time” tab on top then click the button that says “Change date and time” as shown on the screenshot below.
After clicking this button, the “Date and Time” settings Window will then appear. You will see a box looking like a calendar and if you click on the Month name located at the top of the box, it will zoom and show the month (one click). Doing another click on the same area will show the year (two clicks) and a third click will show year brackets in decades.
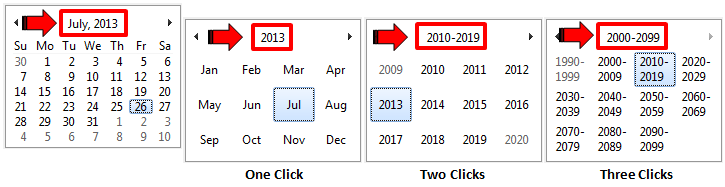
You can scroll back to the current date, time and year simply by selecting it from the calendar or by using the left and right arrows to select the right decade, year, month and date.
On this same Window, you will also see a link that says “Change calendar settings” located at the bottom-left area. You can click on this link if you want to change the format of the date and time on your machine. After clicking on it, you will see “Customize Format” Window. From here, you can now do the tweaks that you desire.
There are two date formats which you can choose and make some tweaks on. One is the “Long date” which is seldom tweaked and another is the “Short date” format that is common in most Windows computer. You can see the “Long date” format on a pop-up Window if you point your mouse on the time and date display located at the extreme-right side of the taskbar while the “Short date” is what you see just below the time display. You can change how the information is arranged on the date display by choosing from the available options on the drop-down list.
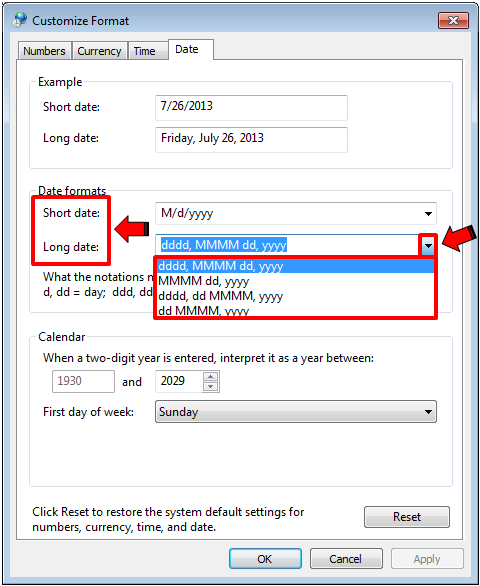
You can also change the date format by typing the settings that you want using the codes located at the bottom of the Short date and Long date boxes instead of choosing from the drop-down list. For instance, you can set the date format like this “dddd, d /MMM – yyyy” then click on “Apply” and “OK” after doing so.

After doing the adjustments, the Date and Time display on the taskbar will now look like the screenshot below.
![]()
The remaining items at the bottom of the “Date” tab the “Customize Format” Window gives you the option of changing the year intervals so that the feature will properly interpret a two-digit year that will be entered. The first day of the week can also be selected and it would depend your country if this setting needs to be changed.
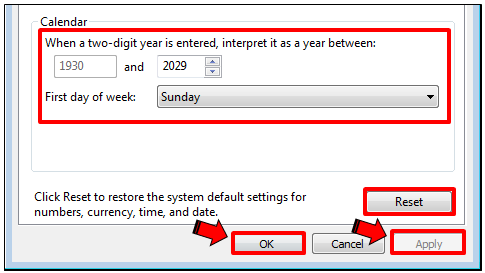
After doing the changes that you want on this Window, just click on the “Apply” then “OK” so that the changes can take effect.
If you don’t like any of the changes, just click the “Reset” button but you would need to adjust the time and date format settings again after clicking on it because Windows will reset it to a different time and date which can cause other system components and programs to stop working.
Changing How the Time Display Appears
On the same “Customize Format” Window, you will see another tab on the left of the “Date” tab which is labeled “Time” and this is where you can change some settings on your computer’s time display.

Just like tweaking the Date display format, you can also see a “Short time” and a “Long time” box on this section which you can tweak according to your liking. You can also change AM and PM to “Morning” and “Evening” or “Night” and “Day”. After changing some aspects from this section, just click on “OK” on all of the Windows that are open to save and finalize all the changes made.
Changing the Time Zone
Another thing that you can change and make adjustments on with your computer’s “Date and Time” display is the time zone. To do this, just click on the “Change time zone…” button from the “Date and Time” Window as shown on the screenshot below.

After doing so, the “Time Zone Settings” Window will then appear. From here, you need to select your country’s time zone from the drop-down list. You might also be asked to set the “Daylight saving time” but it all depends on what time zone does your country belong.
More to Learn on the Next Tutorial
As you can see, doing some tweaks on your machine’s date and time isn’t that hard and it is also useful especially if you are the type of person who travels a lot. On the next tutorial for this series, I will be showing the steps in adding clocks to show different time zones and as well as setting the time to a different server. If you have questions regarding the topic covered on this tutorial please feel free to share then as comments below.