How to Use the Disk Defragment Tool in Windows 10
In time as you use your Windows machine for different tasks, the hard drive would accumulate some bad sectors in it which if not fixed would make your machine become slower than usual and worst is it would cause disk errors that can lead to data loss.
A problem with slow computer is often manageable and you can just go on using it. However, when the worst thing happens, things can become unbearable! Just imagine all your precious stuff being lost in? And most of them become inaccessible even with a data recovery software?
That’s exactly what the Disk Defragment which is now known as the “Optimize Disk” tool in your Windows machine is all about. It prevents the worst from happening and fixes any problem that can potentially cause data loss. In this tutorial, we will be showing you what the tool looks like in Windows 10 an demonstrate the steps that are involved in using it so if you’ve noticed that your computer has been slow these past days, it might already need a disk defragmenting fix and if you need help in doing it, just follow the steps that are going to be shown below.
Accessing the Optimize Drives Tool in Windows 10
In older Windows editions, the Optimize Drives tool used to be called the Disk Defragment tool as we’ve already mentioned earlier. This tool has undergone some changes since it’s been introduced into the Windows operating system so if you already know how to use it in Windows 7, Windows 8 or Windows 8.1, you will still need to be familiar with the steps in how it is used in Windows 10 because there are some aspects that have changed along with the name of course. So let’s first learn the different ways in accessing this tool. Let’s start with the easiest.
Accessing Optimize Drives Using Search
One of the simplest and easiest method in launching the Optimize Drives tool is done using the new and improved Search feature that is available in all Windows 10 machine. Search has been around for quite some time now but it is only in Windows 10 that the tool has been placed almost anywhere within the Windows operating system environment. To launch this tool, all you need to do is press the Windows + S keyboard shortcut combination.

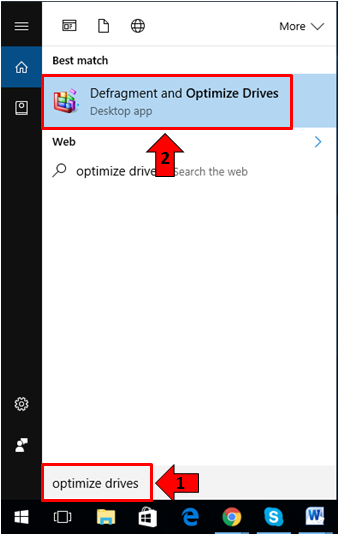
After pressing these keys, the Search box should slide-up from the bottom-left portion of your computer screen and on this box, just enter the words “optimize drives” into the text input box that is found at the bottom then once the search results appear above it, simply click on the shortcut that says “Defragment and Optimize Drives” as you can see being highlighted on the screenshot below.
After clicking on the shortcut from the search results, the Optimize Drives tool should launch instantly and you can now use it if you are already aware of the process.
Launching the Optimize Drives Tool from the File Explorer Window
Did you know that you can also access the Optimize Drives tool from the File Explorer Window? Yes! It is possible and the process in doing it is very easy. First, you will need to launch the File Explorer Window and you can easily do so by pressing the Windows + E keyboard shortcut combination.

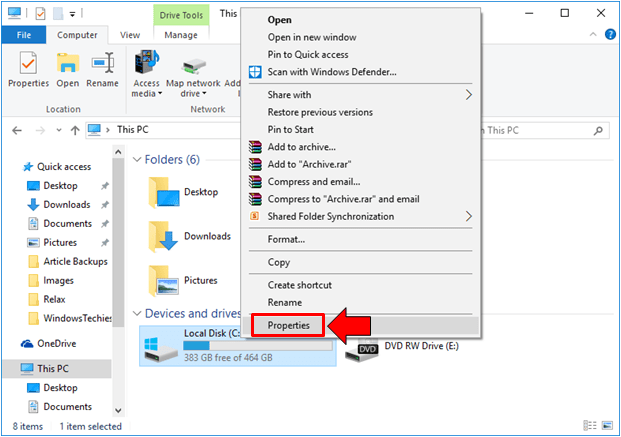
Once the File Explorer Window launches, you will need to click on the “This PC” link that is found on the navigation pane at the left of the Window. This will then give you access to the “Devices and Drives” section where you can view all available hard drive partitions on your Windows 10 machine. From here, just right-click on the drive partition that you want to defragment and after doing so, a right-click menu should appear where you will need to click on the option that says “Properties” as you can see below.
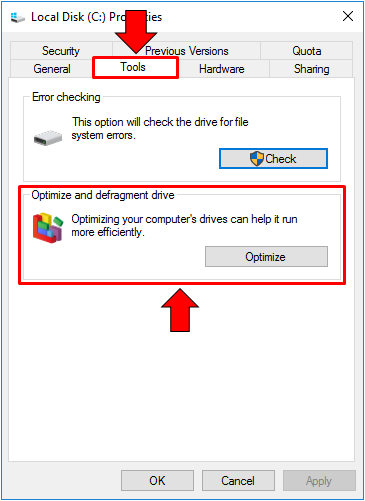
After clicking on the “Properties” option, you should be able to access a small Window which shows the different settings and options that are available for the drive that you have selected to defragment. From here, you will need to click on the tab that is found on top which says “Tools” as shown below and voila! The Optimize Drives tool should be visible and ready to use.
Those are the two easiest ways in launching the Optimize Drives tool on your Windows 10 machine. There are still other methods in doing it but we’ll limit everything to these two to save space and as well as save you the time in reading. Now, let’s go to the steps in how you can use this tool to defragment your drive.
How to use the Optimize Drives Tool Manually
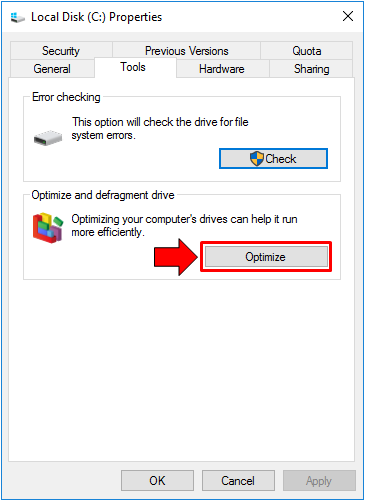
If you have used the first method that we’ve shown in launching the Optimize Drives tool, you should now be able to see it already opened on your computer screen. However, if you used the second method, you will first need to click on the button that says “Optimize” as highlighted on the screenshot below in order to launch the tool.
On the Optimize Drives tool Window, you should be able to see a list of all available drive partitions that you can defragment for optimum performance. Take note that even if there is only one available hard disk partition on your computer, there will still be other items that will appear instead of just drive “(C:)” because the Window operating system automatically gets small chunks of your hard drive space so it can store some necessary system files and other stuff in order to run Windows 10 on your machine.
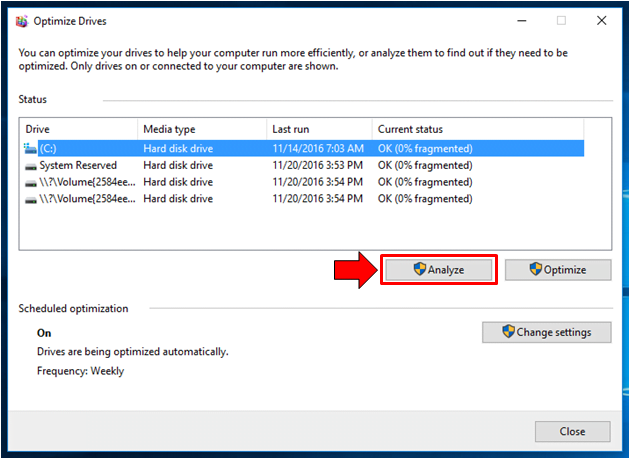
In this example, we will be defragmenting drive (C:) and in order to know how much percentage of the disk is fragmented, we’ll first need to click on the button that is found on the bottom-left portion of the box where the drive partitions are listed which says “Analyze” as you can see being highlighted on the screenshot below.
After clicking on the “Analyze” button, the tool will initiate the process of looking into the selected disk to identify how much it really is defragmented. After the process, it should then tell you the percent of fragmentation on your drive under the “Current status” column as shown below.
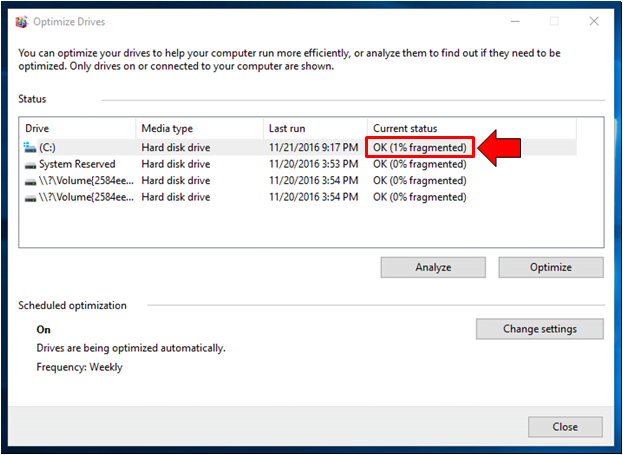
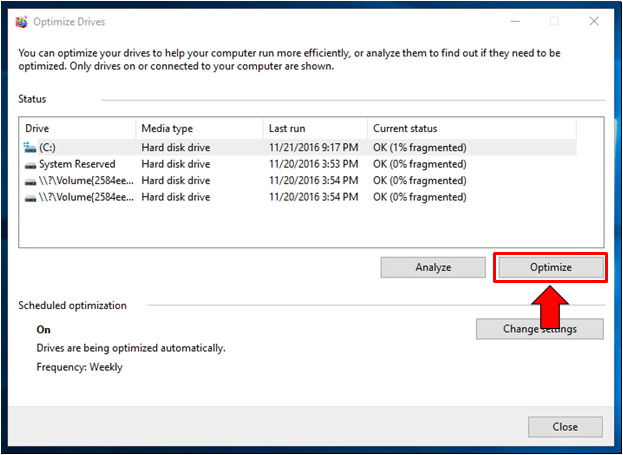
As you can see, the drive on our test computer is only 1% fragmented and it is such a small percentage of problem that won’t really have a significant effect on the machine’s performance. Your computer’s hard disk fragmentation might not be the same as our test computer (which is only 1%). It might be higher especially if you’ve already been using your computer for a long time doing plenty of tasks in it. since we are trying to demonstrate how the disk defragmenting and optimization process is done in Windows 10, we’ll go ahead with the process. To proceed, all that you need to do is click on the “Optimize” button as highlighted on the screenshot below.
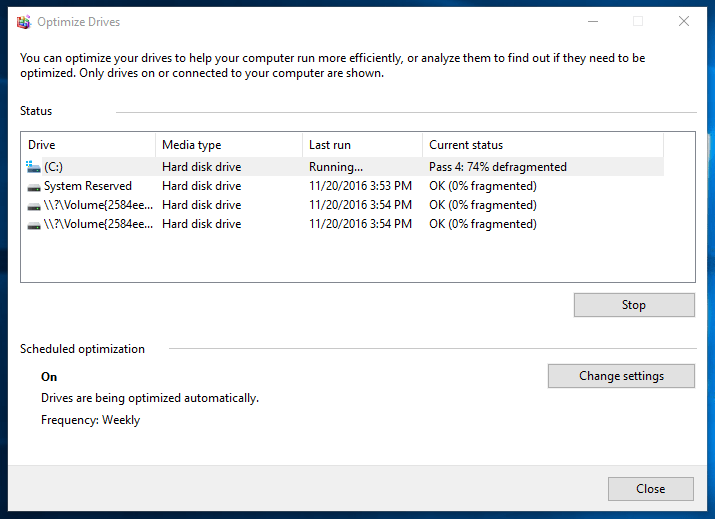
The tool will then re-analyze the disk and after it does, it will start relocating the fragmented sectors and arrange them so that problems with bad sectors would be fixed. The next step is consolidating then defragmenting. You will see each of these steps being done each from 0-100%.
So that’s exactly how you optimize a hard drive partition manually on your Windows 10 machine and if the process itself looks quite a hassle to you and your busy schedule each day, you can choose to do the defragment and optimization task automatically on a repeating schedule. If this sounds good to you then just read on to discover how.
How to Set the Optimize Drives Tool to Work Automatically
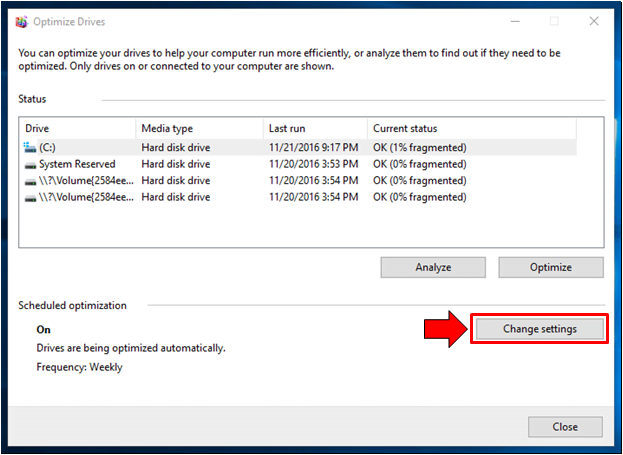
As we’ve already mentioned earlier, defragmenting and optimizing your drive doesn’t really have to be a manual thing. You can set the tool to work automatically on your chosen schedule and in order to do this, you should start by clicking on the “Change settings” button that is found on the right-hand portion of the “Optimize Drives” Window under the “Scheduled optimization” section as shown below.
After clicking on the “Change settings” button, the “Optimization schedule” Window will appear and from here, you can adjust certain aspects such as the “Frequency” or how often the drive optimization is done. The default setting is “Weekly” and if you want to change it, you will simply need to click on the box that is on the right of the “Frequency” label and a drop-down options box should appear as you can see on the screenshot below.
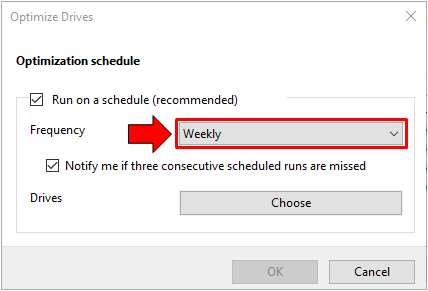
The other available options are “Daily” and “Monthly” but again, since Windows has set it to the default schedule which is “Weekly”, it is better to leave it at that setting of you aren’t really doing so much of a task in your Windows 10 machine.
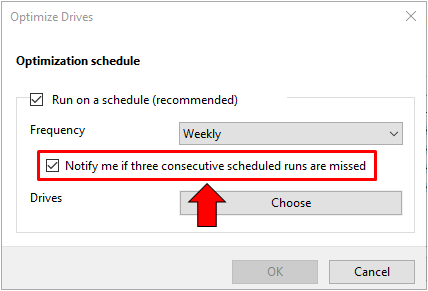
Now, there is also an option just below the “Frequency” settings section which says “Notify me if three consecutive scheduled runs are missed” and from the name itself, this setting needs to be enabled so you will know if the tool has not been able to do the optimization task maybe because your computer has been turned off for a long time. This option is also enabled by default so we would recommend that you leave it that way to ensure that your machine is not missing any defragment schedules at any given time.
Finally, you can also choose which drive/s to defragment in every optimization schedule. In order to do so, you will simply need to click on the “Choose” button that is found at the right portion of the settings Window as you can see being highlighted on the screenshot below.
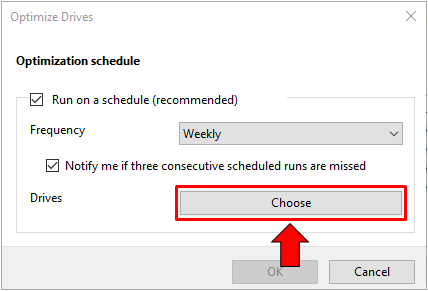
After the button is clicked, you should be able to view all available drives that the tool can defragment sitting inside a box with checkboxes on their left portion as you can see on the screenshot below. To specify the drives that you want to be optimized in every scheduled deframentation schedule, all you need to do is put a check mark on them by clicking on their corresponding box and remove the check from those drives that you don’t want to defragment.

Once you are done choosing the drives to be optimized from this Window, all you need to do is click on the “OK” button which should become clickable after you do some changes on the default settings. All of the drives in your computer are selected by default. After clicking on the “OK” button, you will be taken back to the previous Window and from here, simply click on the “OK” button once again in order to exit from the settings section.
Optimize Drives for Better Windows 10 Performance
As you can see, Windows 10’s Optimize Drives tool is pretty straightforward to use and in fact, Windows already has it set with the recommended settings to make sure that your machine runs smoothly every time. However as we have shown in this tutorial, you can also choose to do a manual optimization process in your computer if you want to. With the tweaks that we’ve shown here, you can further control how the tool works so you can be sure that your machine really works at its best while you are doing the usual tasks that you accomplish with it.
Have you ever tried using the Optimize Drives tool in your Windows 10 computer? How did it affect your computer’s performance? We’d like to hear your story and if you have one to tell then please feel free to share it with us on the comments section below. We also welcome topic suggestions and you can post them as comments below so we can discuss it on our future tutorial.