How to Use the Windows Memory Diagnostic Tool
One of the problem in Windows computers that is commonly mistaken to be caused by something else involves the RAM or memory modules. You will only know it when you already exhausted all possible solutions to the problem but still, nothing happens. This could be very frustrating and outward irritating but Windows has a diagnostic tool that will help you pinpoint problems in your machine’s RAM and save you from unnecessary expenses in repairs and other fees. This useful tool is called Windows Memory Diagnostic which works basically the same in Windows 7 and Windows 8. In this tutorial, you will know how this tool is accessed in both operating system versions and as well as learn the steps in using it.
How to Access the Tool in Windows 7
If your Windows 7 machine is still functional, you can access Windows Memory Diagnostics simply by using the “Search” feature of the Start Menu. Here’s how you can do it:
- Click on the Start button then type “memory” on the search box.

The search results will then appear on top of the search box. From these results, simply search for the one that says “Windows Memory Diagnostics” which is located under the “Programs” category of the search results then click it as shown on the screenshot above.
Another way of accessing the Windows Memory Diagnostic tool is through the Control Panel. To learn how it is done, simply follow the steps below:
First, you would need to open the Control Panel and once you’re on its main Window, click on the “System and Security” link.

On the “System and Security” Window, look for the link that says “Administrative Tools” then click on it and once it opens, you’ll find the shortcut link to “Windows Memory Diagnostics” tool.

Once you double-click on it, Windows Memory Diagnostics will open asking you if you want to do the check now or just do it the next time your computer reboots.

Accessing the Tool in Windows 8
If your machine is running on Windows 8, the method of accessing the tool is different. Since the Start Menu is not existing in Windows 8, you would need to go to the Start Screen either by pressing the Windows Key or clicking on the Start Charm. Once you are on the screen, simply type “memory” then filter the results by “Settings”. The contents under the Settings search results will then show up at the left portion of the screen. From this list, simply look for the one that says “Diagnose your computer’s memory problems”.

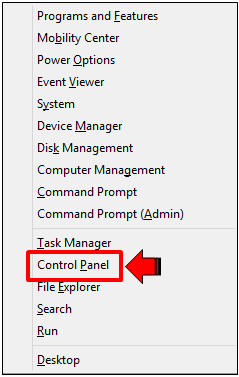
Another way is by accessing the Control Panel but since the Start Button is not around to summon the Start Menu like in Windows 7, you would need to access a hidden system menu by pressing the “Windows + X” keys then clicking on the “Control Panel” option from the menu that would appear.
On the main Control Panel Window, simply click the “System and Security” link and once it opens, click “Administrative Tools” and look for the “Windows Memory Diagnostic” shortcut link then double-click it just like doing it in Windows 7.

How to Start the Tool When Windows Refuses to Boot Up
If your computer fails and Windows refuses to boot, you can still access the Windows Memory Diagnostic Tool simply by using the installation disk or a system repair disk you created earlier. If you still don’t have one, feel free to read our article on “Creating a System Repair Disk (Windows 7 and 8)” to learn how you can create your own using a different computer running the same Windows version as yours and use it in repairing your computer.
Another method is using a recovery drive saved on a USB memory stick. To learn how to create a recovery drive and save it in a USB memory stick, be sure to read our tutorial on “Creating a Recovery Drive Using a USB Memory Stick (Windows 8)”
If your machine is running on Windows 7 and you don’t know how to use the system recovery options from the installation disk or a system repair drive, you can follow the steps illustrated in our tutorial on “How to Use the System Recovery Options in Windows 7”.
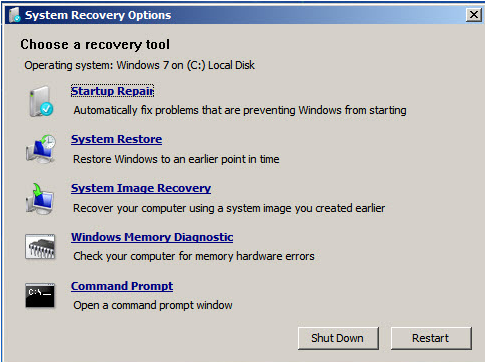
If you are using Windows 8 or the recent one which is Windows 8.1, you’ll see that there’s no shortcut available for the Windows Memory Diagnostic Tool when you use the System Repair Disk or the Recovery Drive but it can still be launched using the “Command Prompt”. Simply choose the “Troubleshoot” option then click “Advanced” and start the Command Prompt. On the Command Prompt Window, type mdsched.exe then hit “Enter”.

Simply select the option that you want from the Windows Memory Diagnostic Window; either “Restart now and check for problems (recommended)” if you want to do the memory check right away or “Check for problems the next time I start my computer” if you want to do the check the next time your machine starts.
How to Use the Tool
Before proceeding with the process, be sure that everything you’ve been working on is saved and closed. After clicking the option that says “Restart now and check for problems (recommended)”, you computer will restart and the screen will look like the image below.

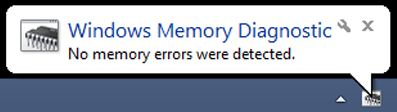
You will then see a bar indicating the overall progress of the memory diagnostics process and once it is done, your computer will reboot and a small balloon message will appear on the system tray which tells you the result of the test performed.
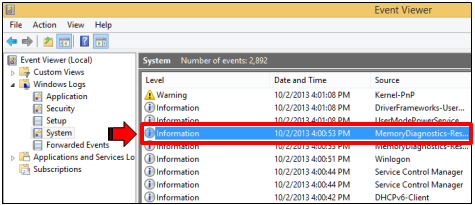
If you want to see the detailed results of the test, simply open the Event Viewer then expand the “Windows Logs” folder located at the left then click on “System”. The results of the memory diagnostic test is located under the event labeled as “MemoryDiagnostics-Results”.
Learning to Use the Advance Options
When you look at the bottom part of the Windows Memory Diagnostic Tool, you’ll see a label that says “F1=Options”; by pressing the F1 key, you can access more options of the Windows Memory Diagnostics tool.

Ordinary users won’t have anything to do with the other options available but if you are an advance user wanting to do some tweaks on how this tool works, you can press F1 when this tool starts. The available options are as follows:
- Test Mix- under this option, you can choose either “Basic”, “Standard” or “Extended”. The “Basic” test mix takes a relatively shorter time to complete compared to “Standard” and “Extended”. Windows Memory Diagnostic is set on “Standard” test mix but if you want to perform an extensive diagnostic process on your RAM, you can select “Extended” however, the time that it would take for the process to complete is really longer compared to the other two.
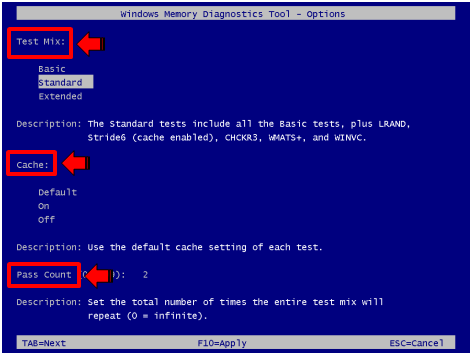
- Cache- The Cache is set on “Default” but it can also be turned On or Off.
- Pass Count- This is the number of time that the test would be repeated and the default setting is two (2) which is already perfect for most tests.
Windows Memory Diagnostic works best when problems seem to be impossible to solve no matter what solution you employ. Since problems in the RAM looks like it is caused by something else, using the Windows Memory Diagnostic tool would be the best thing to do so you can pinpoint the real cause and solve them right away.