What’s in the App Bar for the Mail App
Back in the days that we’ve been using just desktop programs in Windows, accessing its settings meant that you had to get to the Control Panel Window while other settings were available in the program Window itself when you do a right-click action using the mouse. Although these things are still possible for desktop programs on Windows 8.1, it does not apply to the modern style apps so you will need to learn how to make some tweaks to some of the built-in apps so it can work exactly as you want it to. The tweaks and options for modern style apps are found on the “App bar” and in this tutorial, we’ll be going through all the options available on the “App bar” for the “Mail” app.
What’s with the Mail App?
You might be wondering why Microsoft still had to include a Mail app in the brand new Windows 8.1 operating system when there are already browsers that can do the task of accessing emails but the answer lies in what the Mail app is capable of doing which browsers can never do in a quick and convenient way and it is providing a one-stop location for accessing all your email accounts. Yes! the Mail app is capable of doing this by letting you link all your existing email accounts to it and in case you don’t know yet how it is done, you can read our tutorial that describes the steps in linking your email accounts to the Mail app on your Windows 8.1 machine.
Accessing the App Bar
As I have mentioned earlier, tweaking any modern style app requires you to access the “App bar”. The App bar is the section where you can find some tweaks and settings for a certain app that is open on your computer screen and you can get access to it simply by right-clicking an empty space on the app’s main screen. In the case of the Mail app, all you need to do is open it by clicking on its tile which is pinned on the Start Screen.
Managing Your Email Folders
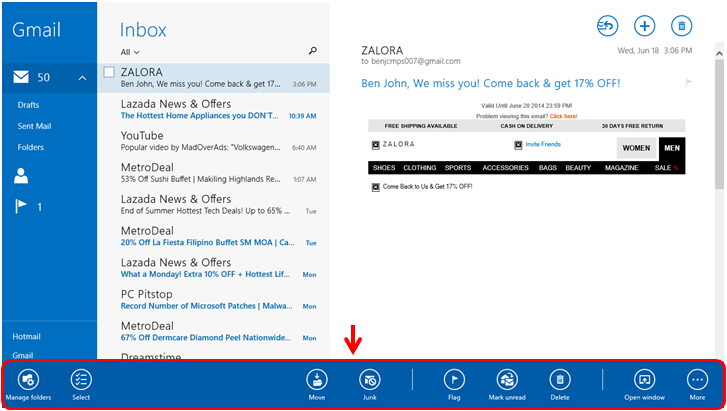
At the extreme-left end of the app bar is an option that says “Manage folders”. When you click on it, you’ll be able to access even more options which are geared towards getting all your folders like the “Inbox”, “Drafts”, “Sent Mail” and others organized, cleaned and set in order.
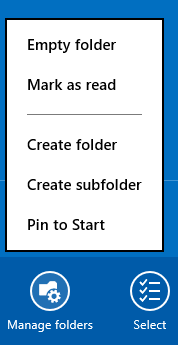
The “Empty folder” option will help you clear a selected folder in just a few clicks. Try clicking or tapping on it and a prompt will appear which will ask you if you really want to clear the folder you selected. From this prompt, you can click on either “Yes” or “No” according to what you really want to do. The next option says “Mark as read” and as its name itself suggests, it allows you to mark unread emails as read. This would be very helpful if you really want to avoid being confused of an unread email as something important or urgent.
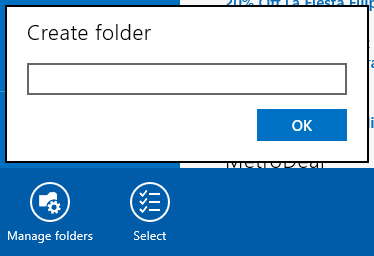
The second set of options focuses more on folders. First, you’ll see a “Create a folder” option and when you click on it, a small screen will appear which has an input box where you can input the name of the folder that you want to create. After inputting the name, all you need to do is click on the “OK” button and the new folder will appear on the pane at the left together with the already existing folders in your email account.
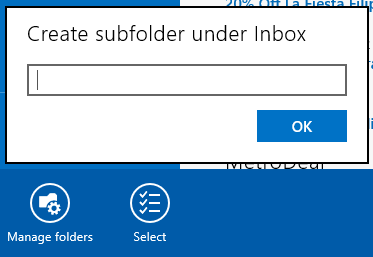
The other options are “Create a subfolder” and “Pin to Start”. The “Create a subfolder” option allows you to make a new folder under and existing one. For instance, you can create subfolder and label it as “Important” under the “Inbox” folder of your email. When you click on the “Create a subfolder” option. A small screen will also appear which contains a box for inputting the name of the subfolder which you want to create and after you input this required information, simply hit the “OK” button.
Finally, the last option that appears on the small screen is the one that says “Pin to Start” and when you click on it, you will be able to pin any folder in your email to Windows 8.1’s Start Screen for easier access.
Select Multiple Items
The next option which is located beside (right) of “Manage folders” is labeled “Select” and when you click on it, a small tick box will appear at the left of every email message in the folder you selected and these tick boxes are there so you can tick inside them and select a certain item. After selecting some emails, you can do a single action to all of the selected ones in one single click like deleting, moving or marking them as read or unread. The “Manage folders” and “Select” options are the only two options found at the left-end of the app bar but there are still even more options which can be found at the right-end so just continue reading to learn what each one of them are for.

Moving Your Emails
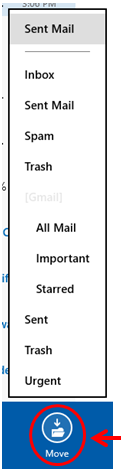
The next option going to the right of the first two options that we’ve talked about is the one that says “Move” and when you click on it, the locations where you can move the emails you selected will appear in a long list. To initiate the moving process, all you need to do is select the emails that you want to move and click or tap on the location where you want it to be moved from the locations that appears.
What is a Junk Email?
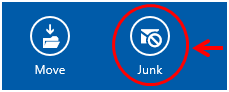
There are emails which are not worthy to be in your inbox folder. In this case, you can move them to the “Junks” folder and that’s what the option next to “Move” is for. When you click on the this option, the email will automatically be removed from the inbox folder and be moved to the Junks folder of the Mail app. Junk emails aren’t deleted ones so you can always access them anytime you want by simply going to the Junk emails.
Other Options
Moving towards the right end of the App bar are even more options which will help you work with emails and organize them more effectively. First, you will see the “Flag” option which marks every email as important. This classification appears on the left pane of the Mail app together with the links for the “Inbox”, “Drafts”, “Sent Mails” and other folders. Next, the “Mark unread” option will let you turn read emails into unread ones. Just select an email that is already read which you want to change status of and click on the “Mark unread” option.

The last three options which are “Delete”, “Open window” and “More” will let you do even more with the emails that are in your inbox or in any other folder. I’m sure that you already know what the “Delete” button is for so we will move to the next which says “Open window”. To use this option, just select an email from any folder and click on the “Open window” option. After doing so, the email will open on a Window that comes out of the right edge of the screen and finally, when you click on the “More” option, there will be two more stuff in it which will appear in a small white box which says “Sync” and “Print”. Both of these options are surely familiar to you so I won’t need to explain what each one of them are for.