Windows 8: Getting Used to Touchscreen Gestures
Windows 8’s uniqueness doesn’t just end with the Start Screen, Lock Screen, Apps, Charms and its fast boot up process. These things makes Microsoft’s newest operating system a lot better than the older ones but there’s another feature that makes a big difference and set’s it apart from Windows XP, Vista and Windows 7 and it is Windows 8’s ability to adopt and be used even on touch screen devices. Just like the previous Windows versions, Windows 8 has different editions which works on tablets, phones and other mobile devices but the one that works on laptops and PC’s also possesses features that are also found on the versions for touchscreen devices.
Yes! Windows 8 Pro and all the other versions also recognizes touchscreen gestures and if you bought a computer having a touch-enabled screen then you need to learn some gestures that will help you maximize the features of the machine you just bought. Most of us would just prefer to use the keyboard and the mouse in getting through the different parts, aspects and sections of Windows 8 but as you’ll see later, there are some other features (especially the brand new ones introduced in Windows 8) which can only be activated and used using your fingers. If you already bought a new computer that has a touch-enabled screen and is running on Windows 8 but you’re not yet sure what gestures are and how each one of them works then you’ll surely find this guide very handy.
Common Touchscreen Gestures and Their Mouse/Keyboard Equivalents
1. Selecting an Item on the Screen and Performing Certain Actions

Tapping on a program, an app tile, a menu, an option or any executable file on the screen will start or launch it. Remember that this is a quick tap and not a press and hold gesture. If you are on the Start Screen, you can easily tap on a tile, a shortcut or any other thing that is pinned on it and you’ll see that the app or the item you touched will launch.
MOUSE EQUIVALENT: If done on using a mouse, this would be the very common left-click command.
KEYBOARD EQUIVALENT: Select an item using the arrow keys then hit the “Enter” key once the right item is highlighted.
2. Press and Hold on a Certain Item on the Screen to Get More Details Options
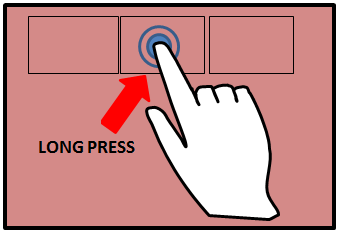
Press and hold on an item found on the desktop and you’ll see more options that will pop up. This group of options are collectively called a “contextual menu”. On the Start Screen, pressing and holding a tile will reveal more details of an app or shortcut. What this gesture does depends on your location within the Windows 8 environment. If you are working on the desktop then this would pull up additional options but if you are on the metro/app environment, it will reveal more details and descriptions
MOUSE EQUIVALENT: Hovering the mouse pointer on a certain item without pressing the left or the right click button will reveal more options while pointing an object on the screen and right-clicking on it will reveal the “contextual menu”
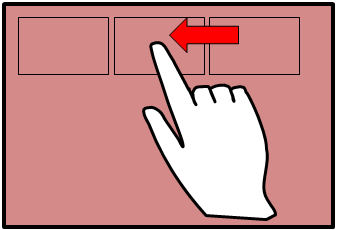
3. Commands Specific for Each App

While an app is open, simply swipe your finger upwards and you’ll see all options available for the open application that will appear on a bar at the bottom of the screen. If you are on the Start Screen, you can also do the same and you’ll see the “All apps” button at the bottom-right corner of the screen.
MOUSE EQUIVALENT: Just right-click on an empty space while you are on the Start Screen or right-click a certain app or shortcut pinned to it and you’ll see the options available for the specific app.
4. Move Tiles and Shortcuts by Dragging Them
Press and hold a tile or a shortcut on the Start Screen and drag it to wherever you want it to be. Once you find the perfect location for it, simply release it and the item will now be dropped or moved to the new location you selected. This also applies to desktop shortcuts and other stuff.
MOUSE EQUIVALENT: Click and hold on a certain object then drag it to your desired location and drop or release it so it will be moved.
5. Access Some Recently Used Apps

Swiping your finger from the left portion of the screen towards the center will pull up the recently used apps all sitting on a black bar while swiping from the center of the screen towards the left will hide the bar containing the apps. From this bar, you’ll also see the “Start Tile” located at the bottom and clicking or tapping on it will take you to the Start Screen.
MOUSE EQUIVALENT: Using the mouse, simply point it to the top-left corner of the screen then move downwards to open the bar containing the recently used apps. Pointing on the bottom-left corner and moving upwards also works.
6. Summon the Charms
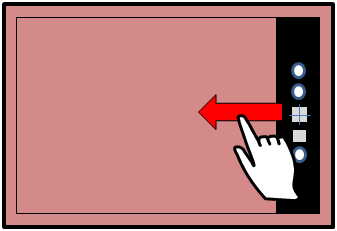
Swiping your finger from the right portion of the screen towards the center will open a black bar containing the Charms. From here, you can perform a search, share something, open the Start Screen, see some available devices or open the settings by simply selecting the Charm that corresponds to the task that you want to do.
MOUSE EQUIVALENT: Point the mouse to the top-right corner of the screen and move downwards so that the Charms bar would appear. Pointing at the bottom-right corner and moving upwards also works.
7. Zooming in and Zooming Out
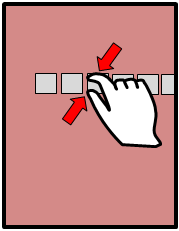
Pinching on the screen will zoom out and make everything look smaller like a picture or even the Start Screen tiles while starting on pinch position and spreading your index finger and your thumb away from each other will zoom everything back to the normal size.
MOUSE EQUIVALENT: This gesture can be done on computers having no touch-enabled screen simply by pressing and holding the “CTRL” key and using the scroll wheel of the mouse to zoom in and zoom out.
8. Closing an App Quickly
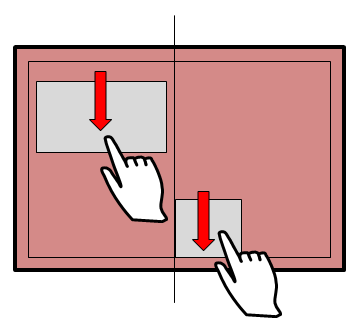
Active apps does not affect Windows 8’s performance in any way but if in case you want to close it quickly, simply point on top of it and drag it towards the bottom of the screen until it gets smaller and once it fades, you need to release it.
MOUSE EQUIVALENT: Just put the mouse pointer on the top portion of the app then click it and drag it towards the bottom of the screen and release it.
9. Rotate, Turn and Pivot Items on the Screen

Simply put your index finger and your thumb opposite each other on top of an object found on the screen and rotate it to the left or to the right.
MOUSE EQUIVALENT: Rotating objects and items using the mouse depends on the app but in most cases, rotation won’t work when you use the mouse. However, if you use Microsoft Word, you can do this with any pasted shape, pictures and other stuff.
Try it On Your Own Device
Of course, simply reading and looking at the illustrations I have shown above won’t make you an expert in doing touchscreen gestures so you need to try it on your own as well and if you discovered another type of gesture which is not shown above then feel free to describe it using the comments section below.