Windows 8: Master Everything on the Desktop Screen
I assume that most of us know and are very familiar with the Windows desktop. It is set as the very first screen that you will land into after Windows starts especially in older Windows versions like XP, Vista and Windows 7. This feature has been around for almost 18 years but nothing really significant was changed in it except for some minor improvements which were added as new versions of Windows were released. In Windows 8, you’ll never notice big changes on how the desktop screen appears and how everything works in it but if you are completely new to using a computer and you’re not yet sure what to do while you are on the desktop screen then this tutorial will be a very handy guide that will help you master every aspect of it. So get your computer ready and follow these simple tips that will help you have full control over your desktop.
1. Work With the Taskbar First
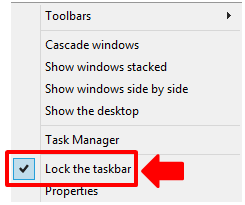
The taskbar is the bottom most portion of the Desktop screen where you can find icons of the programs that are currently running and as well as some other icons at the right side which tells you some relevant information like time and date, battery level and network connection status and is called the system tray. To start customizing the taskbar, simply right-click an empty space on it and uncheck the “Lock the taskbar” option from the options that will pop out.
2. Making the Taskbar Space Wider
Now that the taskbar is unlocked, you can start customizing it or even make it wider to give more space for all the active apps and programs to be accommodated without scrolling through them. Simply put the mouse pointer on the topmost edge of the taskbar until it turns into an arrow that points upward and downward then drag it upwards to widen and downwards to make it narrower.

3. Move the Taskbar to the Edges of Your Screen
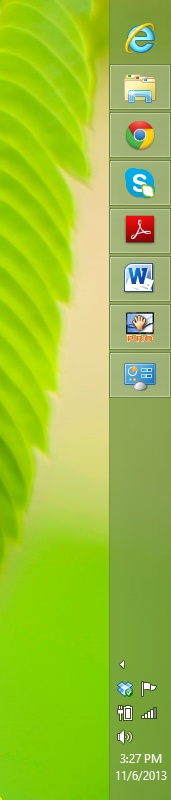
The taskbar can also be relocated to the top, left or right edge of your screen and the process is very simple. Just click and hold an empty space on it and drag it to the place where you want to relocate it. On the screenshot below, I moved the taskbar to the right edge of my computer screen.
4. Customize How Taskbar Icons Appear
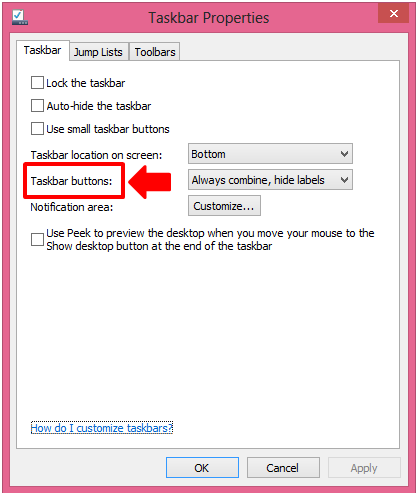
Right-click on the taskbar again and click “Properties” from the options that would appear then look for a setting that says “Taskbar buttons”. This setting helps organize how icons are arranged on the taskbar. Simply choose the arrangement that you want and click “Apply” then “OK”.
5. Access Some Hidden Stuff
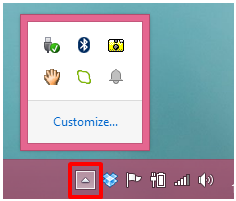
At the right portion if the taskbar which is also called the “System tray”, you’ll find an arrow that points upwards. Clicking on this arrow will show all the hidden programs which are running on the background. Clicking the customize link will take you to the section where settings for the notifications of the running programs are found.
6. Set Open Windows to Arrange in Cascades
Put your mouse on an empty space of the taskbar again then right-click on it and choose the “Cascade windows” option to make all the open Windows arrange one on top of another with a little space to click on to view each of them.

7. Stack Windows or Put Them Side-by-Side
If you are working on plenty of apps and programs all at the same time then you can stack them by choosing “Show windows stacked” or “Show windows side by side”. You can also hold and drag 2 open Windows to each side of the screen so they can be snapped in place.

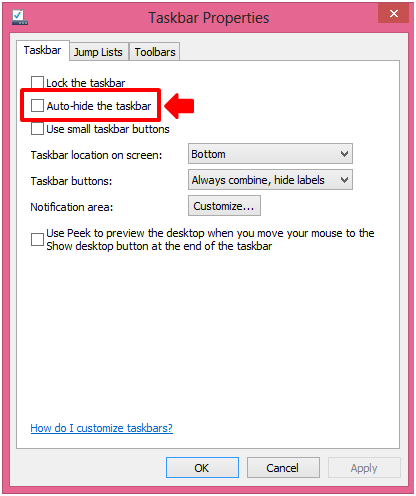
8. Auto-hide the Taskbar
Right-click on an empty space of the taskbar again then hit “Properties”. On the taskbar properties Window, you should see an option that says “Auto-hide the taskbar”. Checking it will make the taskbar disappear from where it is sitting. This will give you more screen space. The taskbar will only appear again once you point or touch the edge where it is located.
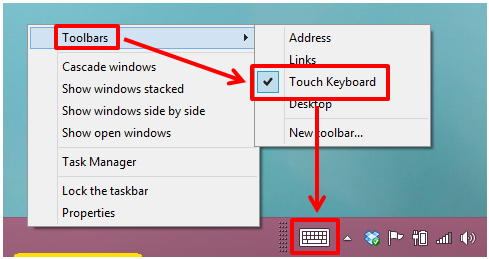
9. Add More Toolbars
If you need to get hold of the touch keyboard quickly or the Internet Explorer address box then you can easily add a toolbar for them on the system tray. Simply right click on the taskbar again then point the mouse on the toolbar option and you’ll see another options box at the right where the options for additional toolbars are found. Just check the one that you need and it will be added to the system tray.
10. Take a Peek at What’s on Your Desktop
Right-click on the taskbar again then click on the “Properties” option. After doing so, a Windows will appear labeled “Taskbar Properties” and on the options, check the one that says “Use peek to preview the desktop when you move your mouse to the Show desktop button at the end of the taskbar” and hit “Apply” then “OK”. After this option gets enabled, you will be able to see what’s happening on your desktop whenever you put the mouse pointer at the extreme-right end of the taskbar.
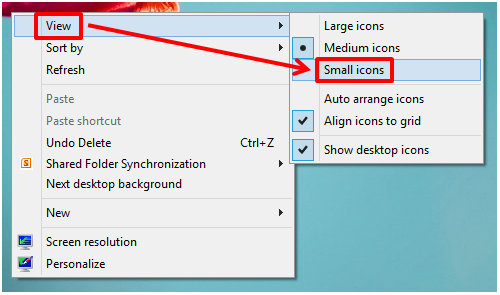
11. Make Desktop Icons Shrink
Your computer’s Desktop is a place where all temporary files, shortcuts and other stuff gets stored or pinned and because of this, it can easily become cluttered. To free up more space on it, simply right-click on an empty space of the desktop then select “View” the “Small icons” so everything gets smaller.
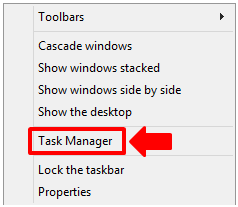
12. Quickly Launch the Task Manager
The Task Manager is a tool that helps you keep track on a specific program or a set of programs installed on your computer. While “CTRL” + “Shift” + “Esc” launches this tool, you can also right-click on the taskbar again and select the “Task Manager” option to open it.
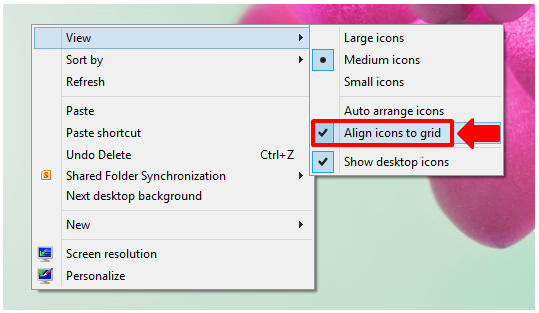
13. Put Desktop Icons in Precise Locations
The Desktop icons are arranged in a way that follows a grid so that everything are arranged in-line with each other. If you want to arrange the desktop icons in precise locations without following an arrangement or grids then simply right-click an empty space on the Desktop screen then point your mouse on the “View” option and on the options box that would appear, you need to uncheck that option that says “Align icons to grid”.
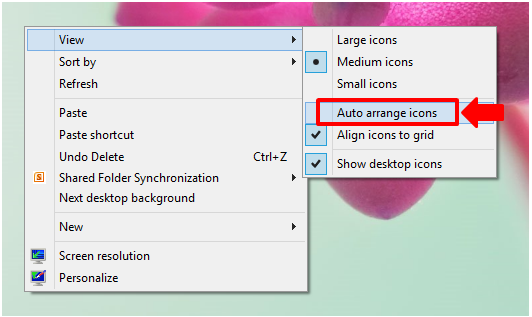
14. Let Windows Arrange Icons for You
If you don’t want doing a precise arrangement of the Desktop icons and would just prefer to let Windows arrange everything for you then all you need to do is right-click on the Desktop screen, point the mouse to the “View” option then check the “Auto arrange icons” item on the pop-up menu box that would appear.
15. Hide Everything
Do you want to take all icons away from the desktop screen? You can actually do it without uninstalling or deleting the programs and files represented by each icon or shortcut. Simply right-click on the Desktop, point to the “View” option and on the pop-up menu that appears, simply uncheck the one that says “Show desktop icons” and you’ll see that everything will disappear from the Desktop. To view all these icons again, simply open a File Explorer Window and click on the “Desktop” folder to access all these hidden Desktop icons.

16. Sort Your Desktop Icons
Right-click on the Desktop screen again then hover your mouse over to the “Sort by” option then choose a sorting option from the pop-up menu box that will appear and observe all your Desktop icons arrange according to the option you selected.

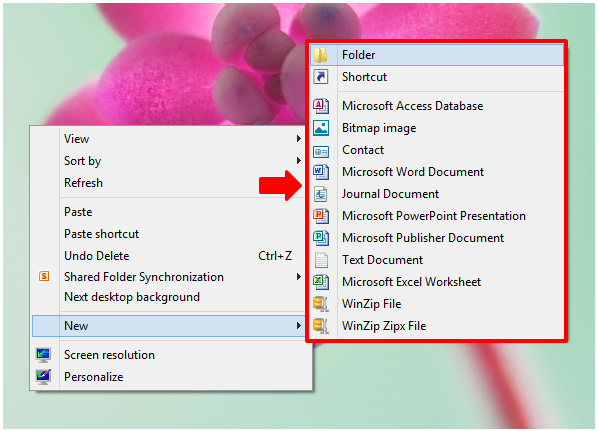
17. Add Some New Stuff to the Desktop
As in any other folder or library, you can also create a new folder and other stuff on the Desktop. To do this, simply right-click on it then hover your mouse over the “New” option and on the pop-up menu that appears, simply select the option of your choice. You can add a new folder, document, shortcut and other stuff which are available on the list.
As you can see, mastering the Desktop section is not that hard a task. If you know of any other tip which can be added to the list which I have included on this tutorial please feel free to share them on the comments section below.