Windows Tiles: What Do They Do and How Can You Tweak Them in Windows 10
The modern version of Microsoft’s flagship product we all know as the Windows operating system has gone through many changes in the past years. There have been several reasons for thee changes and improvements but all are designed to make the current version become the best that it can be in terms of providing smooth performance and usability to all users!
One of the features that was included in the modern editions starting in Windows 8 down to Windows 8.1 and now in Windows 10 are the mainstays of the Metro environment which are called “Tiles”.
If you’ve tried the modern versions starting from Windows 8 until Windows 10 then you should be well aware of the changes that have been done to this feature but in case you don’t know much about these features yet because you’ve just been lodging on the traditional Desktop environment whenever you are using your Windows 10 computer, you’ll need to learn how these features work and how you can tweak them and that’s exactly what we’re going to show in this tutorial.
Where are Windows 10 Tiles Found?
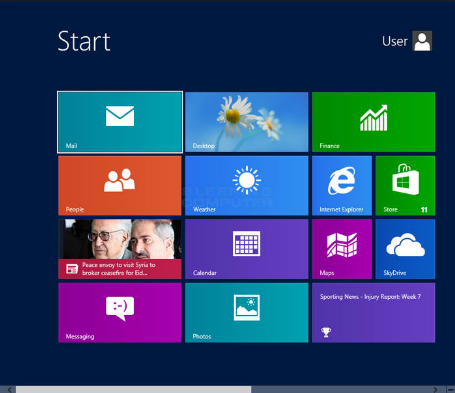
As we’ve mentioned earlier, Windows tiles have gone through changes starting when it was introduced in Windows 8 until it was carried over to Windows 10. One of these changes is the location where these tiles are found. Back in Windows 8, tiles were found on the Start Screen as you can see on the screenshot below.
However, because of the thousands if not millions of users who complained about the Start Screen being a feature that adds confusion and demanded the putting back of the Start Menu, this feature has slowly transitioned towards what we are seeing in the latest versions of Windows 10. Instead of having a Start Screen that takes the whole of your machines screen whenever you access it, Microsoft has made things easier for everyone by making the tiles appear on a Start Menu that has many improvements to accommodate the Metro environment without sacrificing the older Desktop interface which long-time users have got accustomed to. The new Start Menu and the tiles that are pinned to it looks like the one that is shown below.
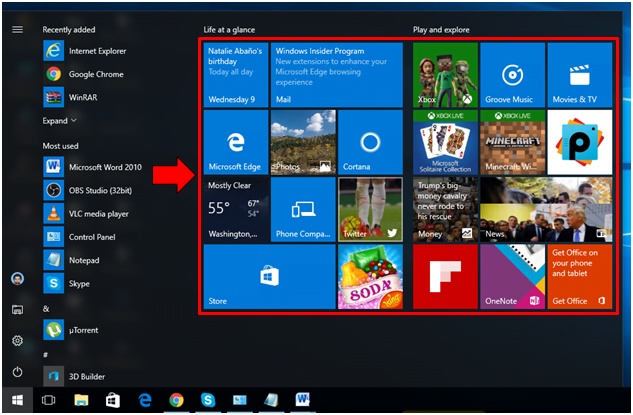
As you can see, the tiles are now located on a smaller screen which does not take the whole monitor whenever the Start Menu is launched. This new design of the Start Menu can also be resized as we will show later on in this tutorial. The Start Button which has been a mainstay in the Windows operating systems that were released in the past has also been restored to its rightful place after it went missing in Windows 8 and earlier versions of Windows 8.1.
How do Tiles Differ from Ordinary Program Shortcuts
Now, if you are wondering why tiles are needed when program shortcuts are already available on the Desktop screen then you will need to know what’s the difference between these two types of shortcuts found in the modern versions of the Windows operating system including Windows 10. To better understand how tiles differ from your ordinary program shortcuts that automatically gets pinned on the Desktop screen after installing a certain program, here’s a quick list of how these new features differ from the old ones.
- Tiles only represent modern applications also known as universal apps in Windows 10. The portion of the Start Menu where they are pinned is called the “Start” section. Shortcuts can actually be pinned into this section but they will not work the same as Tiles do. We’ll discuss what tiles can do in a separate section on this tutorial so just read on to find out what they are.
- Tiles actually show the contents of the app that it represents. For instance, the screenshot below shows the Photos application tile and as you can see, it displays some of the pictures that I took with my smartphone and even displays them in a slideshow. This capability is not found in ordinary program shortcuts that are pinned on the Desktop screen.

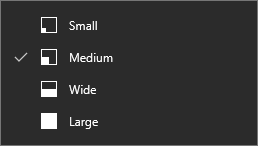
- App Tiles can be resized individually according to 4 available sizes (Small, Medium, Wide and Large). You will see how these sizes for a certain tile looks like as we progress in this tutorial. Program shortcuts can be resized but not individually as tiles do. You can only resize ordinary shortcuts on your Desktop screen altogether.
- There are many other options and tweaks that you can do to the Tiles that are found on the Start section of the Start Menu aside from just resizing it. For instance, you can make it a live tile which means that it will display the current content or activity being done by an app or you can turn this feature off so it only shows the logo or name of the app. We’ll discuss more about these things next.
What Can Tiles Do?
Tiles are unique shortcuts representing the universal apps that you have installed as well as those that are built within your Windows machine. Aside from being shortcuts, tiles have other capabilities which are not found in ordinary Desktop program shortcuts and here’s a list of these features.
- Tiles come in rectangles and squares in different sizes and they can change color depending on the theme that is set on your computer. While this does not matter that much to most users, it sure means something to those who want to put a personal touch on their devices.
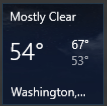
- Tiles can give you an idea on what is happening within a certain app. It also shows some quick information so you won’t need to be launching the app that it represents. The screenshot below shows the weather app tile showing some real-time information about the weather condition.
- Tiles can easily be arranged on the Start section of the Start Menu. To do this, you will simply need to click-and-hold then drag a certain application tile then drop it to your desired new location for it. The other tiles on the new location will automatically clear a space for the new tile that you want to be moved.
- Tiles can change sizes easily. This is a very useful feature especially for the apps that are very important to you such as the News app. Setting the size of the app to become bigger will make the real-time information that it displays easier to see.
What Tiles Cannot Do
The Tiles themselves have their own set of advantages and as well as disadvantages. The disadvantages that they have over the traditional Desktop program shortcuts are as follows:
- Tiles can never be pinned into any other place within Windows 10 except on the Start section of the Start Menu. This is quite a hassle since accessing an app or even just viewing a quick information that it displays through the “live tile” feature would mean that you first need to launch the Start Menu then close it back when you’re done accessing an app or viewing certain information from a tile.
- Tiles cannot be deleted. You can only remove them from being pinned on the Start section of the Start Menu. Unlike program shortcuts that are found on the Desktop screen, tiles can also be hard to find especially if you have plenty of universal apps already installed on your Windows machine because they all look similar except of course for those tiles that have the “live tile” feature turned on.
- Tiles cannot be tweaked from their properties section because they don’t have properties either. Unlike program shortcuts, there’s a limited set of tweaks that you can do to universal app tiles but most of these tweaks are not found in the properties section of Desktop program shortcuts so it’s like a break-even between these two features when it comes to this aspect.
How to Resize a Tile
As we have mentioned earlier, there are four sizes that are available for the application Tiles that are found on the Start section of the Start Menu in Windows 10. These sizes are Small, Medium, Wide and Large as you can see on the screenshot below.
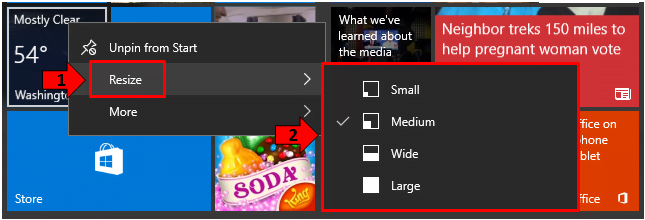
To access this set of tile size settings, all you need to do is right-click on a certain tile that you want to resize then an options box will appear. From this options box, just click on the item that says “Resize” and after you do so, the available sizes for you to choose from will appear as shown below.
The actual size of a tile when set to “Small”, “Medium”, “Wide” and “Large” is shown on the screenshot below.
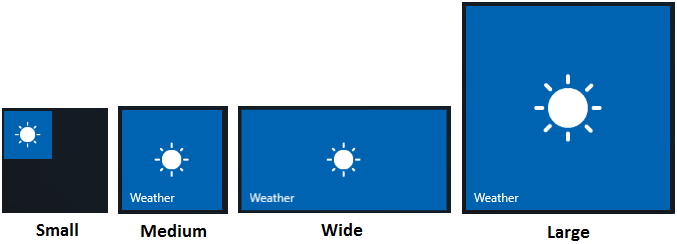
As you can see, there’s a big difference between the Small and the Large tile size and Microsoft intentionally did this so that those who are having a hard time viewing small letters and stuff being displayed by a live tile.
How to Turn Live Tile Feature On or Off
The good thing about the tiles that represent universal apps in Windows 10 is that they can display real-time information on what’s actually going on within a certain app. This feature can be turned on or off depending on your preference. To do this, you will again need to right-click on the tile that you want to turn the live tile feature on or off then on the right-click options box that would appear, simply click on the item that says “More” as shown on the screenshot below.
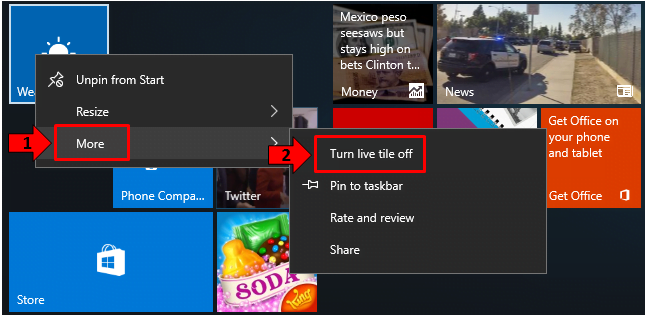
After hitting the “More” option, another options box will appear and show further settings and options for the selected tile. If the tile currently has the live tile feature turned on, the first option that will appear will say “Turn live tile off” as you can see on the screenshot above. If the selected tile has the live tile feature turned off, the first option should say “Turn live tile on”. Clicking on the option will turn the live tile feature on or off and that’s exactly how it is done in Windows 10.
Removing a Tile from the Start Section
Finally, the Start section of the Start Menu can become crowded with tiles from the apps that you have installed into your computer and in case you want to free up some space in it. You can easily do so by unpinning useless tiles from the Start section. Doing this is very easy and it involves the same steps that we’ve shown in the previous items that we’ve discussed above.
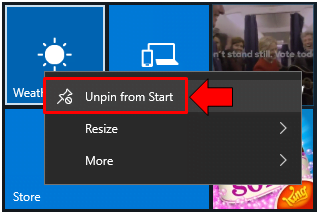
To start, you will need to launch the Start Menu and once it opens, just look for the modern app tile that you want to remove from the Start section and once you find it, simply right-click on it in order to access the same options box that we’ve accessed above and from here, just click on the option that says “Unpin from Start” as shown below.
After doing so, the tile should automatically disappear from the Start section. Just do the same thing to all of the other tiles that you want to remove from the Start portion of the Start Menu and you should be able to have enough space in it for more important tiles representing modern apps that are installed in your Windows 10 machine.
Application Tiles: A Welcome Addition the Windows OS
Most of us who have been using Windows for a long time and chose to upgrade to the later editions that have the tiles included as new features would really agree that these tiny features are of great help! Aside from making Windows 10 look even better, universal apps also make it easier for anyone to add features to a Windows laptop or PC without having to open a browser and wait a long time for the setup file to complete downloading as what happens to the traditional Desktop programs that we’ve all experienced using in the past Windows OS versions even up to now.
Aside from adding features to any Windows 10 machine, universal apps can also add more entertainment such as games, musical and many other leisure stuff to your machine all coming from one place called the “Windows Store”. Do you have any particular app, game or tool that you have installed on your machine that’s become your favorite? What app is it? We’d like to hear from you. Please feel free to join the discussion below and we also welcome topic suggestions. If you have one, just post it as a comment below.