Working With Windows Defender- Windows 10’s Built-In Security Software
One of the things that we like most about Windows 10 is it’s built-in antivirus/antimalware program which has been made available as a freely downloadable tool starting in Windows 10. Back then, it was called Microsoft Security Essentials and when Windows 8 was released, the tool itself started to become part of the Windows operating system as its default security software which erased the need for downloading and installing or even purchasing third-party antivirus programs at least for people who would put trust on the simple yet effective and cost-efficient solution provided by Microsoft.
While installing third-party antivirus/antimalware programs is still an option in Windows 10, there are things that you need to consider and advantages as well as disadvantages that you need to weigh. For instance, most third-party programs are heavy on your machine’s system resource compared to Microsoft Security Essentials which is now called Windows Defender in Windows 10 and what program could best work for Windows other than that which also comes from Microsoft? But how do you access or command Windows Defender to do scans on your computer?
If you are one of those who have been doubtful on whether this tool really works because of it’s quiet nature then we’re going to prove in this tutorial that it really does exactly what it is designed to do so be sure to get your Windows 10 computer ready to follow the steps that are going to be demonstrated as we move down towards the end of this tutorial.
What Makes Windows Defender Perfect for Windows 10?
As we have mentioned earlier, there’s nothing more perfect for Windows 10 than a security software that is developed by Microsoft which is the same company that developed and maintains Windows all these years. Comparing Windows Defender against all of the other third-party antivirus/antimalware brands, the former really works silently on the background and is very light in terms of system resource usage which means that it wouldn’t even be a cause of hangs and freezes on your machine. The other benefits that we see in using Windows Defender are as follows:
1. It Does Not Show Annoying Prompts and Sounds
Third-party antivirus software would regularly show prompts and notifications and would even play alert sounds whenever it detects something suspicious or when it finds a virus or malware on a drive or file that you have just downloaded and this isn’t really a good thing to most users. These are the very reasons why Microsoft designed Windows Defender to silently work on the background only showing Action Center notifications for later checking but not displaying them on your screen automatically as third-party software normally does. There are no surprising sounds either.
2. It is Perfectly Compatible with Windows 10 and With Other Windows OS Versions
Since it is developed by Microsoft and even comes as a built-in tool in Windows 10, you can be pretty sure that it is compatible with the operating system and would not cause any problems springing from incompatibility issues. It works smoothly with any Windows OS version as well a long as your download the right system type (32-bit or 64-bit) version of it to be installed to your computer in case you are still using Windows 7.
3. It is Easily Customizable
In Windows 10, you will be able to find Windows Defender Settings from the Universal Settings app Window right under the “Update & Security” settings category as we will be learning later on. It has its own set of options and tweaks that you can work on in order to make it work according to your preferences. You can also set it to do scans (either Quick, Full or Custom scans) on your computer on a specific time of the day. We’ll find out more about this as we move along in this tutorial.
4. It Isn’t Demanding in Terms of Space and System Resource Requirements
Third-party antivirus software normally carries with them a big load of files that will be loaded and installed on your computer if you choose to use them and this becomes a problem especially if you only have a few gigabytes or megabytes left in hard drive space. Windows Defender is far from being so because aside from the fact that it comes built-in with Windows 10, its overall file size is also just a few megabytes and it is very light on your system resource yet very efficient in protecting your machine against any threat. We’ve been using Windows Defender in all of our test computers and we’ve got no problems that originates from it so far.
The list of benefits that you can get in using Windows Defender is long but we’ve chosen to just give the four top reasons here. So now that you know what makes this tool awesome, let’s find out how you can play with it in your Windows 10 machine.
NOTE:
The screenshots and steps that are going to be shown in this tutorial are all taken from a Windows 10 computer that has the Anniversary Update installed on it. If you are still using previous builds, please be aware that there might be minor differences in how menus and features appear but everything else are basically the same.
How to Open Windows Defender
Now that you already are familiar with the Windows Defender tool, it is time to learn how you can access it in Windows 10. In previous builds, the tool really works at the background without any trace if it seen from what is readily seen on the Desktop screen or even from the hidden icons of the System Tray located at the extreme-right end of the Taskbar but when we updated to Build 14367 also known as the Anniversary Update, we’ve noticed that the tool now displays an icon in the hidden items section of the System Tray as you can see on the screenshot below.
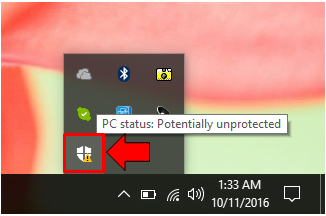
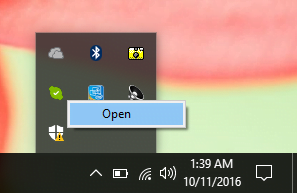
You might be wondering why there is a yellow exclamation point overlay on the icon. The simple reason for this is that there is a pending scan that we haven’t executed yet. It’s also the same reason why the pop-up message says “PC status: Potentially unprotected”. In order to launch the Windows Defender screen, all you need to do is click or right-click on the icon and an option that says “Open” will appear. Just click on it and the Windows Defender screen will open right away!
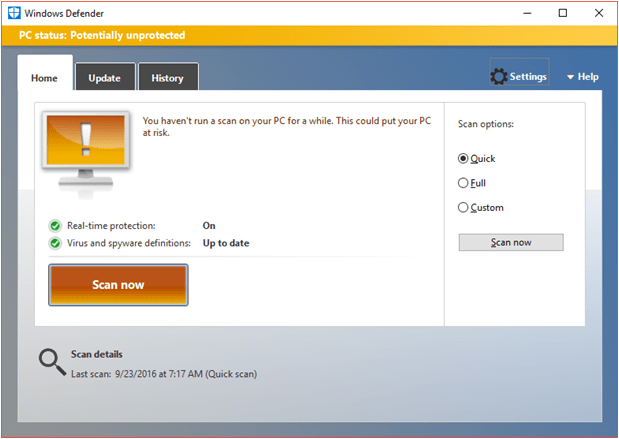
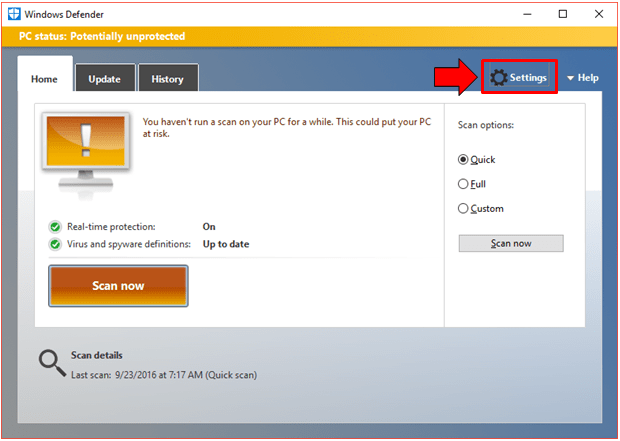
Windows Defender’s home screen is quite simple and if you’re just wanting to see it then there’s not really much to do in it. As you can see on the screenshot below, the tool is telling me to do a scan since I haven’t done so for a while. Doing a scan with the tool is pretty straightforward and that’s exactly what we’re going to talk about next as we move along in this article.
Doing a Quick, Full or Custom Scan in Windows Defender
Now that you are on the Home screen of Windows Defender, you should be able to see some valuable information about the tool such as the current status of real-time protection and as well as its virus and spyware definitions. At the right portion, you will see three different options of the types of system scan that you can do while moving towards the bottom there is a “Scan now” button which you need to click in order to commence a scan session.
Doing a Quick scan with Windows Defender is very simple, all you need to do is select “Quick” from the “Scan options” selection that is found at the right as you can see on the screenshot below.
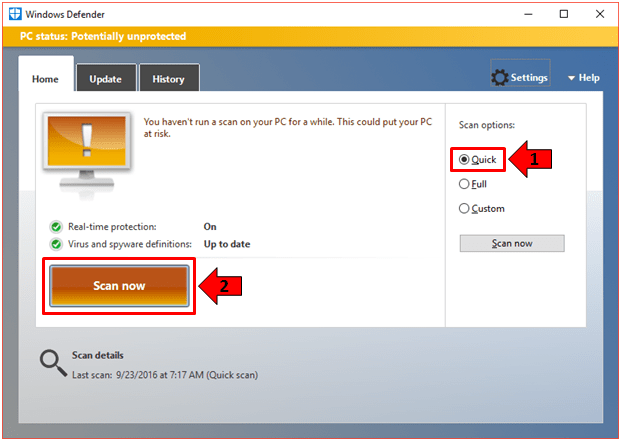
After choosing “Quick”, you will need to click on “Scan now” and the scan process will automatically start.This is the same thing that you need to do if you want to do a “Full” and “Custom” scans on your computer with the Windows Defender tool. Take note though that a “Full” scan takes longer than “Quick” scan so we would advice that you do not perform it if you are on batteries (if you are using a laptop). The “Custom” scan on the other hand will allow you to choose the Drive, Folder, Library or any other item that you want to scan for any threat and it takes shorter or longer than “Quick” scan to complete depending on the number of files that you have chosen to scan.
If you want to know when you last scanned your computer, you will find the information readily available at the bottom-left portion of the Home screen as shown on below.

Manually Updating Windows Defender
The tool itself is set to automatically download virus and spyware definitions from Microsoft Servers and they are included in the regular updates that Microsoft provides for the Windows 10 OS but if you want to start a manual update then you will simply need to click on the “Update” tab first which is found on the top portion as you can see below.
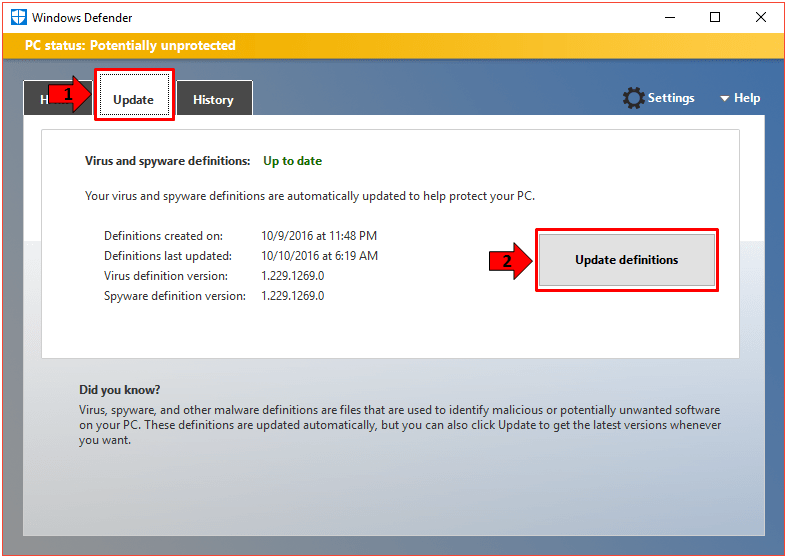
Once this tab opens, you will be able to see some valuable information again that tells you when the definitions that is currently loaded to Windows Defender was created, when the tool was last updated as well as additional details like the virus and spyware definitions version. Since you want to start a manual update of Windows Defender’s virus and spyware definitions, all you need to do is click on the “Update definitions” button that is found on the right as you can see being highlighted on the screenshot above.
Keeping Windows Defender updated is important so you can be sure that your Windows 10 machine is protected from all the latest threats that are just lurking around the dark corners of the Internet or even those that come from portable storage devices like USB flashdrives which is one of the most common media for viruses to spread rapidly among devices.
Viewing Windows Defender’s History of Malicious Items Found
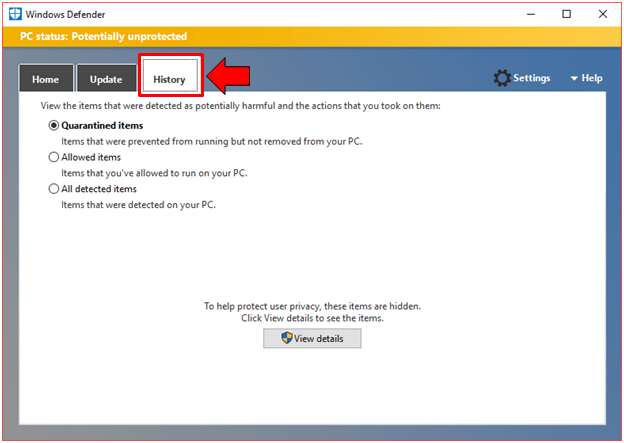
To the right of the “Home” and “Update” tabs is another one that says “History” and as its name itself suggests, it contains information of the malicious stuff that Windows Defender was able to detect from all of its scans. The “History” section of Windows Defender is shown below.
In order to view the contents of each History item which are labeled “Quarantined items”, “Allowed items” and “All detected items”, all you need to do is select the items that you want to view by clicking on its selection circle on found on its left then hit the “View details” button located at the bottom-center of the Window as you can see on the screenshot above, after you do so, a box that contains the list of items that Windows Defender found will appear as shown below.
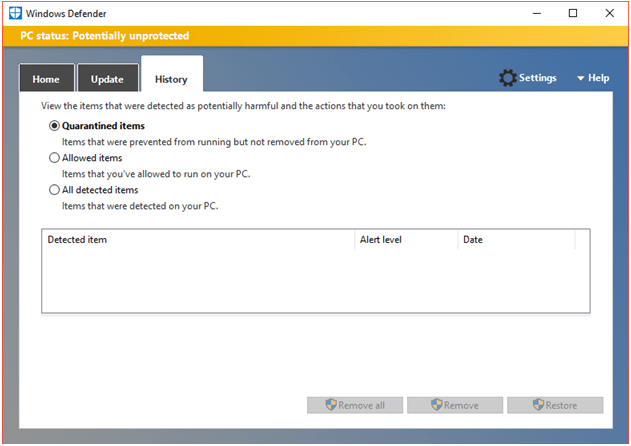
At the bottom-right portion of the “History” tab, you will see three buttons which are labeled “Remove all”, “Remove”and “Restore”, if you wish to get rid all the items that Windows Defender was able to detect, you will simply need to click the “Remove all” button but if you only want to delete a specific detected item, you can first select it then hit the “Remove” button. It is also possible to “Restore” a certain detected file which Windows Defender mistakenly saw as a threat and you can do so by clicking the “Restore” button.
Accessing Windows Defender Settings
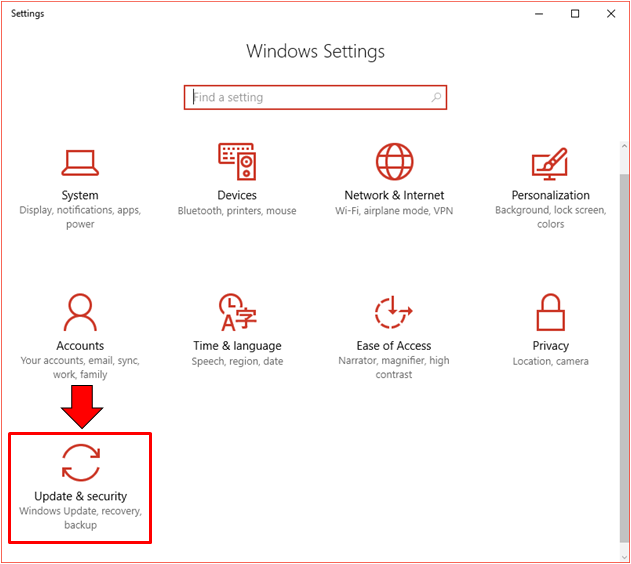
The Windows Defender tool works perfectly on its default settings so you won’t really need to tweak anything but just in case you decide to change how the tool works at any future time, it is important that you know how to view its settings. First, let’s do it the hard way which is accessing its settings from the universal Settings app. To launch the app, simply press the Windows + I keyboard shortcut combination then on the home Settings screen, simply click on the “Update & Security” settings category.
Once the “Update & Security” section opens, you will simply need to put your attention on the items that are found on the navigation pane at the left and from here, just click on the one that says “Windows Defender”. After doing so, you should be able to view all of the Settings that are available for Windows 10’s built-in antivirus software and they should exactly like the one shown below.
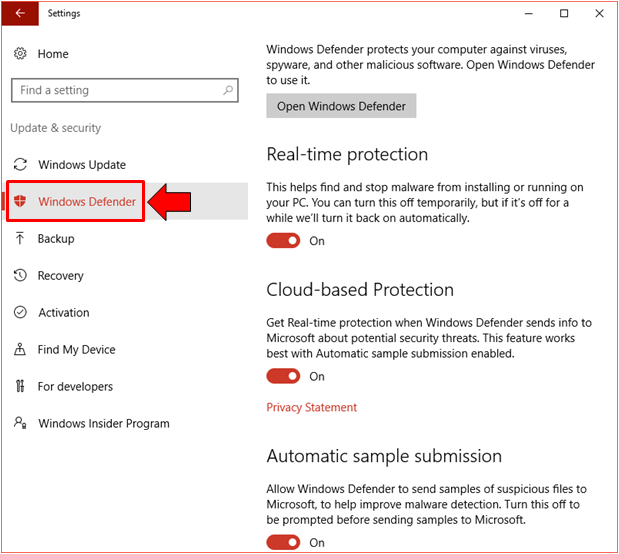
If you want an easier way in launching the settings section for Windows Defender then there is actually an available way in doing so. Just click on the “Settings” button that is found on the top-right portion of the Windows Defender screen as you can see being highlighted on the screenshot below and voila! The universal Settings app should launch right away bringing you directly to the Windows Defender settings section.
We will be going through each of the settings available for Windows Defender in our next tutorial so be sure not to miss it if you really want to make this tool work exactly as you want it to.
A Perfect Antivirus Program for Windows 10
We’ve seen a lot of third-party antivirus programs and even tried them in Windows 10 but nothing really comes close to how Windows Defender performs in terms of its ease-of-use features and other functionalities that blend perfectly with the operating system itself. Well, we’re not really wondering why it’s perfectly fit for our favorite operating system because it came from one source- Microsoft. What features do you like most about Windows Defender? Are you using third-party antivirus software on your Windows 10 machine because you weren’t aware of the existence of this built-in tool? It is time to remove it and enjoy the benefits of having a security and protection software that’s been designed to work alongside other features in your Windows 10 machine. Use Windows Defender now!