4 Windows 8.1 Secrets That You Need to Learn About
Windows users are currently at the verge of witnessing another major change in the operating system that has become an all-time favorite to PC users around the world but this title has been adversely affected by its latest version. While it is true that Windows 8 and its supposed improved edition called Windows 8.1 has been successful, the cries and clamors for some very important features to be restored are really hard to ignore. This is the reason why Microsoft would like to fix everything and regain its former title by releasing Windows 10 which, if you look closely is actually one version (Windows 9) ahead of Windows 8/8.1.
While this anticipated version of the Windows operating system are making headlines all over the Internet, users are all the more getting excited because of the rumored features that will be restored in it like the Start Menu with some improvements of course and recently, when Microsoft announced that they will be giving out Windows 10 upgrades for FREE in all Windows 7, Windows 8 or Windows 8.1 devices and even on Windows Phone.
However, since all of these are still in written form (on the news and in different articles all around the Internet) and while we are all waiting for Windows 10’s release being the big event for millions of users around the world who have been wanting to see a better Windows than that which exists in our computers today, it would be wise to get to know Windows 8.1 deeper and discover even more secrets about it which we will be showing in this tutorial.
Why Skip Windows 9?
One common question that would surely be asked by loyal Windows users is that why would Microsoft skip one number in naming its operating system editions? Why is there no Windows 9 in the first place? Well, the main reason is that the new Windows 10 is set to be worlds apart from its predecessors Windows 8 and Windows 8.1. It is the “Game Changer” operating system that Microsoft hopes to set into the PC and mobile ecosystems very soon and is envisioned to rule them all.
Naming an operating system with this type of potential as Windows 9 would be quite illogical which is why Microsoft picked one digit forward and named this emerging operating system as Windows 10. In a few months from now, we will already have our hands on this awesome operating system but before that happens, let’s make use of our time by exploring more about the secrets of Windows 8.1.
Top Secrets of Microsoft’s Windows 8.1
In every operating system that we get to use in our computers, knowing some power features and other secret tweaks in it always gives us an edge among our friends, office mates and even with the people that we live with at home. Below are some features in Windows 8.1 that will surely make you ahead among the rest in using the Windows 8.1 operating system.
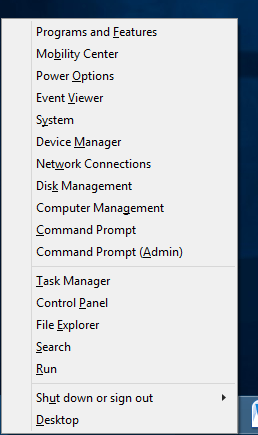
1. The Hidden Menu
There’s not a lot of people who really know about the hidden Admin Menu that is found in Windows 8 and Windows 8.1. This menu contains some links that will take every user to some very important system locations and tools like the Control Panel, Power Options, Task Manager and many others. To access this menu in your Windows 8.1 machine (as well as on Windows 8), simply press the Windows + X keys on your computer’s keyboard or right-click on the Start Button that is located at the extreme-left end of the taskbar.
2. Pin Tiles to the Taskbar
This feature has not been made available in the early versions of Windows 8 and Windows 8.1 so if you have purchased your machine quite a long time ago, probably just months after Windows 8 or Windows 8.1 was released then you will need to check with Windows Update if there is an update available or enable automatic updates so you can get these functions in your computer. Once you’re sure that your Windows system is up to date, you can proceed on with the steps in pinning tiles to the taskbar. To do this, just access the Start Screen simply by pressing on the Windows key or by clicking on the Start Button. Once the Start Screen opens, simply right-click on the tile that you want to pin to the taskbar and hit the “Pin to taskbar” option that is located inside the white options box.
3. Minimize or Maximize Modern Apps to the Taskbar
Another feature that is included in the most recent update for Windows 8.1 is the ability to minimize or maximize modern apps the same way as you do it in desktop programs. Again, you won’t be able to do this if your Windows operating system is not updated so you will need to make sure that all the necessary Windows Updates are installed and above all, automatic updates should be enabled so you can avoid the hassle of doing manual updates every time. Now, after making sure that your Windows OS is up-to-date, just open any app from the Start Screen and notice the bar that is located on its top portion.
At the left portion of this bar, you will find two buttons which resembles the ones that you normally see on Windowed desktop programs. Just click on the “-“ button and the app will minimize towards the taskbar. If you want to maximize it, simply click its icon that is located on the taskbar and the app will open in full screen again. There’s also an exit “X” button just beside the minimize button which you can click in order to close the app that you have opened.
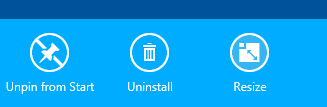
4. Group and Name Apps on the Start Screen
One last trick that you need to learn about is how you can group the tiles or even programs or folder shortcuts that are pinned on the Start Screen and name each group according to your liking. To do this, you first need to rearrange the tiles and programs on the Start Screen and combine the ones that you want to stay in one group. While grouping them, you might need to resize others so they fit exactly within a neat block. To do this, just right-click on the tile to be resized, point on the “Resize” option that is found inside the white box and the size selections will appear in a separate box. From here, simply select your desired tile size by clicking on it.
Once the tiles and program shortcuts that are pinned on your computer’s Start Screen are already arranged, all you need to do is right-click anywhere on the blue background and after doing so, an option that says “Name groups” will appear in a small while box. Once you see it, you will need to click on it so you can start naming the app groups.
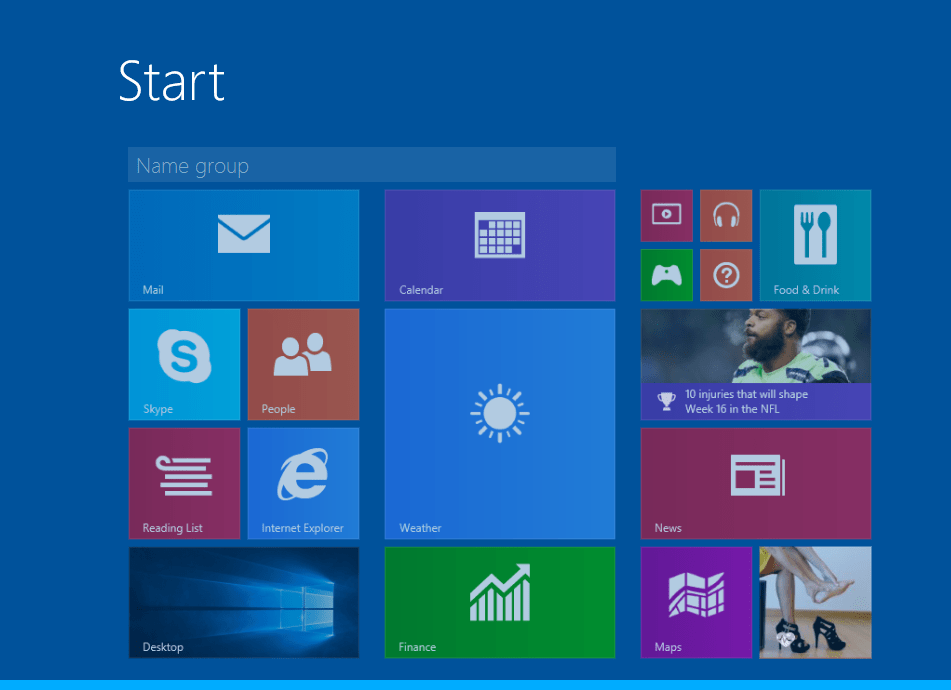
After the option inside the small white box is clicked, there will be some input boxes that will appear on top of each app groups and all you need to do is input your desired name for each group. Once you are done, simply click anywhere on the blue background area of the Start Screen and the name which you entered for each group will automatically be saved.