5 Hardware Tests That You Need to Perform on Your PC
While the operating system and all the other software that are installed on our computers can go on for a long time without any major problem, the hardware on which these software are installed tend to be taken for granted. Most of us assume that when our computers are working good software-wise, the hardware as well works just fine.
As long as a computer is maintained well and is protected by enough software from any virus and other forms of malware, it would run pretty well but that doesn’t mean that the hardware doesn’t need check and maintenance. A perfectly working operating system/software doesn’t necessarily mean that the hardware works just as perfect. You may have a smooth-running software for a while but later on, when hardware fails, all those perfect performance might be affected.
This is the reason why you need to test your hardware once in a while to make sure that everything is working great in your computer- both the software and the hardware aspect! In this tutorial, we will be discussing 5 ways in how you can test your computer’s hardware to ensure that it works on top performance all the time so be sure to read everything from top to bottom and follow any steps that we will be showing below. You can also use these steps in testing the hardware before finally purchasing a computer from the shop or from a friend selling one to you.
1. Check the Keys!
Apart from some physical wears and tears that the keyboard can have especially on pre-loved or used computers, you should also test if all of them really work without the need of pressing it harder than normal. This important part of every computer is subject to dusts and other particles that can cause some keys not to function using light or normal presses. Since the keyboard is used for almost all tasks that you perform on a computer, you need to test it regularly or if you are planning to buy a pre-loved machine, you need to really test if everything is working so you can be spared from costly repairs.

Testing the keyboard can be done online using KeyboardTester.com or you can also do it offline by using using KeyboardTest software which has a free 30-day trial. To avoid getting busted keys on your computer, we recommend that you clean it from dusts and avoid spilling other particles on it especially liquids and of course, do a regular check for any key that requires hard pressing so you can clean your keyboard, wipe it dry or do other necessary steps in order to have it work again normally and avoid having it totally busted!
2. Check for Dead Pixels
Another part of a computer that you need to check before purchasing especially if it is a used on is the screen. Every computer has a monitor and you surely don’t want anything on it that can hamper your sight of what’s really on the screen. One problem that computer screens suffer from are “Dead Pixels”. Pixels are those Red, Green and Blue bits on your screen and when a pixel is dead, it may only display one color or worst is not display any color at all. These deceased pixels start with a single one and spread or become wider.
![]()
To test a computer from dead pixels, you can use an online tool like CheckPixels or Dead Pixels Check. If you prefer an offline method of checking for dead pixels on your computer, you can use IsMyLcdOK software which you can download freely and install it on your Windows machine.
3. Check the RAM
RAM or Random Access Memory is one of the most important hardware component of every computer. It is the small piece of hardware that experts would really recommend for an upgrade to boost your computer’s performance. While you can check the memory size of your RAM from the System Properties section of the Control Panel, testing it is a little bit complicated.

Problems in the RAM can cause “Blue Screen of Death” (BSOD) and can even prevent your machine from booting up. If you want to test your RAM, you can use Memtest86+ and again, the test itself isn’t that simple. In order to perform it, you will need to create a bootable USB or CD with the software loaded into it since the test itself works upon boot up and it will take over 30 minutes to complete. If you want to really test the RAM of your computer or the one that you want to purchase, you can simply head to the Memtest86+ website to read the instructions.
4. Check for Hard Disk Drive Or Solid State Drive Health
The Hard Disk Drive (HDD) or Solid State Drive (SSD) contains the operating system that is installed on your computer and once it gets some problems, you whole machine may hang and freeze often or even fail in the long run. It is therefore important to make your HDD/SSD in 100% health always.
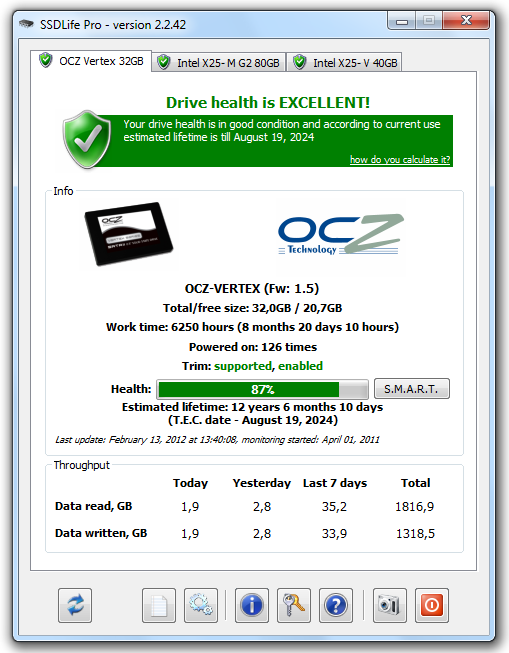
Checking for HDD/SSD health is important especially if you are planning to purchase a used computer since you don’t really know the current condition of the drive itself. You can find plenty of tools that can be used to test the Hard Disk Drive or Solid State Drive in your computer and if you have an SSD installed, you can use SSDLife to check your Solid State Drive’s health.
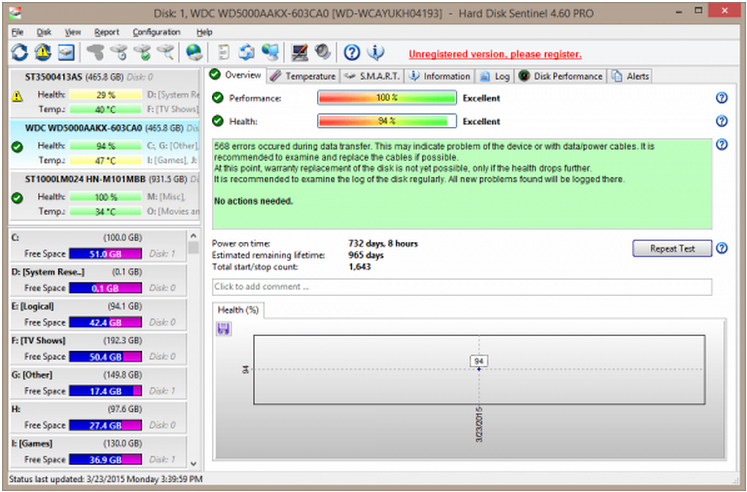
For HDD, you will need to use a separate tool called HDSentinel. This tool is designed for Hard Disk Drives and helps to identify problems, diagnoses troubles and repairs disk drive problems before they get worst. To download this software, you can simply visit the official Hard Disk Sentinel website.
5. Test CPU and GPU
The CPU and GPU are two very important hardware components in every computer that is involved in the main processing of data, commands and everything else in between. It is because of these two hardware components that you are able to use Microsoft Office, PowerPoint, Excel and even open your favorite browser. You are also able to play games because of them so it is therefore necessary to make sure that both of these hardware components are in perfect condition. To test them, you can use Furmark.

If you are trying to test a low-end PC that has no dedicated GPU to support high definition resolutions, you will need to select 1280 x 720 and if you are testing a medium to high-end PC with a GPU/graphics card, choose the resolutions 1280 x 720 to 1920 x 1080 full HD graphics resolution. If your screen flickers or is distorted while the test is running, it is a sign that there is a problem in the GPU.
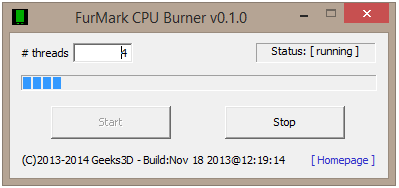
To test your machine’s CPU, all you need to do is open “CPU Burner” the hit the “Start” button to initiate the test. If your computer hangs or freezes during the test, it means that there is problem in hardware or there is not enough cooling system for the CPU to work smoothly.
Test Hardware to Prevent Serious Problems
As you can see, there are both online and offline ways in testing your computer’s hardware and both methods help ensure that your machine is in good condition. These tests will also help you decide if a pre-loved computer is worthy to be purchased on not. Do you know of other software that can be used for testing hardware components? Feel free to share them to us using the comments section below!