7 Awesome Changes and Improvements in Windows 10’S File Explorer Tool
One of the least changed feature in the Windows operating system is the Windows Explorer file management tool which has been given a new name in Windows 8, 8.1 and Windows 10 and is now called File Explorer. Along with this change in name are improvements and innovations which are all geared towards improving the performance of this very important tool and of course leveled up productivity for all Windows users.
If you were able to use Windows 8 and Windows 8.1 then you should already be familiar with the ribbon-based options that are found in it which were not in the Windows Explorer tool in Windows XP, Vista and Windows 7 but of course, most still preferred to stay in these older Windows editions especially Windows 7 because of the confusing interface in Windows 8 and Windows 8.1.
However, this year has changed everything and with the introduction of Windows 10 more than a month ago, conservative users who refused to make the upgrade to Windows 8 then Windows 8.1 have finally made the decision to jump to this latest Windows OS dubbed as the “best one yet”! But what are the things that makes Windows 10 a lot better than its predecessors? In this tutorial, we will be answering this question from the File Explorer’s point-of-view so join us as we discover some improvements in this tool that will surely boost your productivity many times over
1. A New Section Called Quick Access
In our previous tutorial, we have shown how different items are pinned to the new Quick access section of the File Explorer Window which is a new addition to the file management tool in Windows 10. The Quick access section serves as the repository for all the items that you often open in your computer which is why when it is opened, you will see a “Frequent folders” portion and a “Recent files” list both displaying some folders, libraries and specific files that you have opened in your machine as shown in the screenshot below.

The “Frequent folders” section bears all of the folders that you often access in your Windows 10 computer and it is also the place where the folders that you have pinned to the “Quick access” list while the “Recent files” section, as its name suggests displays all of the files within the folders that you access most of the time. It is really a one-stop-repository for launching any of your often-accessed stuff without the need of doing much clicking or scrolling! What’s awesome about this Quick access section is its fully customizable contents which means that you can add or remove items from it anytime and you can even clear all files from it as we will show later on in this tutorial.
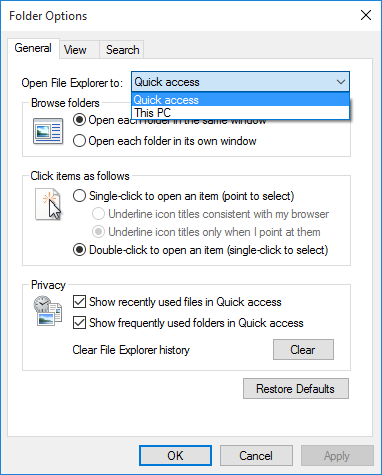
2. Fully Customizable Starting Location
Another awesome feature that is found in the File Explorer tool in Windows 10 is its starting location which can be changed anytime to either “This PC” or “Quick Access”. Its default setting is “Quick Access” that is why when you first open File Explorer in your Windows 10 machine, it will automatically take you to the Quick Access folders and files list but you can change it to “This PC” as shown in this tutorial.
But there’s also a tweak that will actually let you assign any folder as the starting location for File Explorer but we will be discussing them in our next tutorial so be sure to read it and try it as well on your newly upgraded Windows 10 computer!
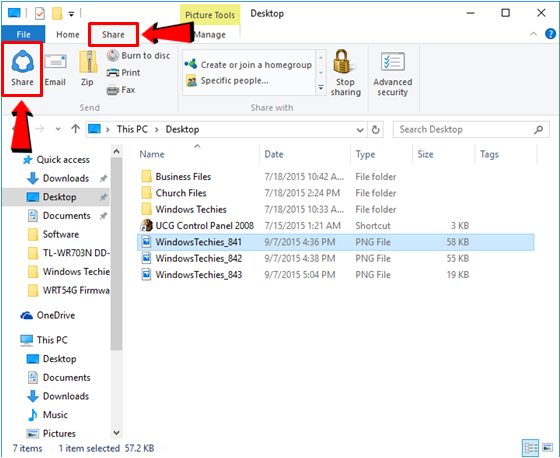
3. Sending Files From File Explorer Made Easier
In previous Windows editions, sending files meant that you had to open your email on your favorite browser, type in the recipient of the file together with a short message and attach the file itself using the “Attach files” feature in the email client and once everything is ready, you will need to hit “Send” to finally send the file to the person you intend to send it to. It was really a long and tedious process but in Windows 10, since everything is linked to your Microsoft account, you can simply select the file that you want to send from the File Explorer Window then after doing so, you will only need to click the “Share” tab on top then click the “Share” option from the ribbon as highlighted on the screenshot below.
If you want to use your Microsoft Outlook account for sending the file that you have selected, you can simply click on the “Email” option from the ribbon which is located just beside the “Share” option. More about the details in doing this will be shown in one of our future tutorials.
4. OneDrive Now Shows Only Your Windows 10 Device’s Synced Files
Another improvement that Microsoft has made in the File Explorer tool that is found in Windows 10 is found in the OneDrive app that is built-in with the operating system. Back in Windows 8 and Windows 8.1, all of the items that are saved in your OneDrive account automatically appears in the OneDrive folder that is found in the File Explorer Window but in Windows 10, with the new innovation that is called “selective sync”, you will be able to just view the files from your Windows 10 device in the OneDrive folder instead of all the files that are synced in OneDrive being displayed in File Explorer whenever you open the OneDrive folder.

As you can see, the files in the OneDrive app that appears on the screenshot above are only the ones that are meant to be synced to your OneDrive account by default. This is a welcome change from the old OneDrive version in Windows 8 and Windows 8.1 which tend to show everything that is synced to your OneDrive storage account making them vulnerable to being accessed by other users who can open your Windows 10 machine. This innovation is one of the results yielded by Microsoft’s Windows Insider Program which is meant to make Windows a lot better than all of the other previous editions that were released in the past.
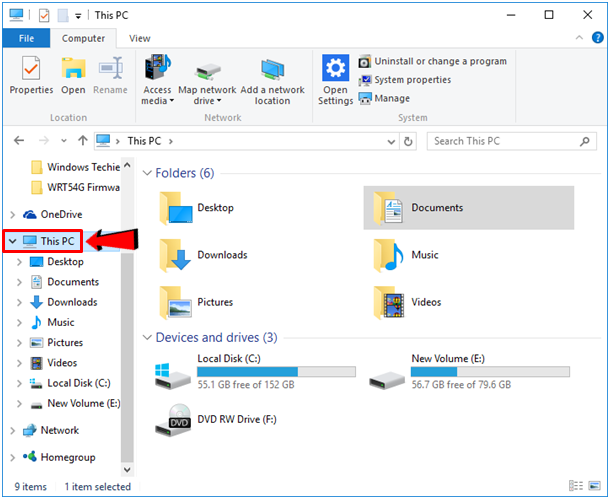
5. A New Way to Open the Settings Window
Microsoft has introduced the modern/mobile environment integration in the newer Windows editions starting Windows 8 towards Windows 8.1 and now, even in Windows 10. This new environment reinforces the efforts of the company to create a new breed of operating system that will now be able to handle not just desktop programs but as well as mobile apps. However, one of the problems that users encounter back in Windows 8 and Windows 8.1 is accessing the Settings screen and so in Windows 10, Microsoft has made sure that users can have access to this very important system location even from the File Explorer Window. To access the modern Settings Window from the File Explorer tool, simply click on the “This PC” link that is located at the left navigation pane as highlighted on the screenshot below. From here, simply hit the “Computer” tab on top then hit “Open Settings” from the options that appear on the ribbon.
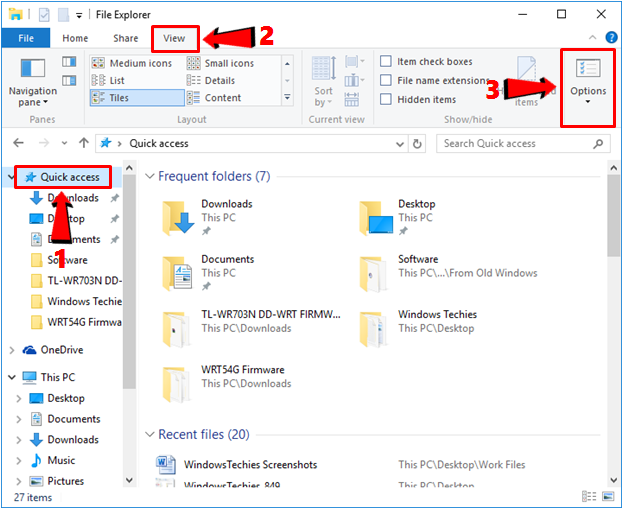
6. Items in the Quick Access Section Now Capable of Being Removed
As you open more and more files and folders in your computer, the Quick access section of the File Explorer Window may become crowded and make it hard for you to look for items that were opened a few days ago. If you want to clear this section and start fresh once again then you can just clear the File Explorer history. To access this option, simply click on the “Quick Access” link found at the navigation pane at the left of the File Explorer Window then on the tabs that are displayed on top, hit the one that is labeled “View”. After doing so, the ribbon-based options under the tab will be displayed and from here just click on the item that says “Options” located at the extreme-right end of the ribbon as highlighted on the screenshot below.
After doing so, a small Window will appear which will now contain some tweaks for the File Explorer tool and from this Window, you will see the options that are under the “General” tab. Now, just look for the section that is labeled “Privacy” and on its bottom-right portion, you should be able to see a button that says “Clear”. Just click on this button and voila! All of the items in the “Recent files” list of the Quick Access section will be gone!
7. More Ways in Accessing File Explorer!
Back in Windows 8 and Windows 8.1, accessing File Explorer was quite confusing and frustrating especially to those who have been used to the Start Menu and all of the shortcuts that were in it including the Windows Explorer tool (File Explorer’s old name). This issue has really sparked plenty of online debates, complaints and pleadings to bring the Start Menu back and many have switched back to Windows 7 after finding out that Windows 8 and Windows 8.1 were not as user-friendly as the former.
You might not agree with me but one of the most annoying thing in both Windows 8 and Windows 8.1 is the hard way in launching File Explorer on both. Well, it wouldn’t be that hard if you have the File Explorer icon pinned on your machine’s taskbar but if it has been unpinned, finding the shortcut for File Explorer really becomes confusing. Thankfully in Windows 10, Microsoft has made the previous methods in launching File Explorer still available with some new ones which you will surely love and we will demonstrate how these methods are done.
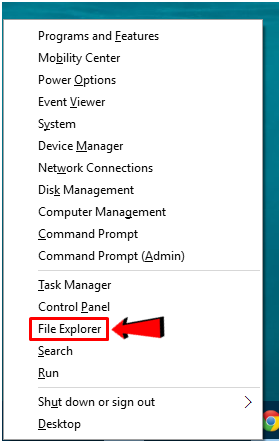
- Launch File Explorer from the WinX Menu- This method of launching File Explorer has been available in Windows 8 and Windows 8.1 and it is still available even in Windows 10. To do this, you will simply need to press the “Windows + X” keys in order to launch the WinX menu that will pop-out at the bottom-left portion of the screen and from here, simply click on the “File Explorer” link in it and the tool will open instantly!
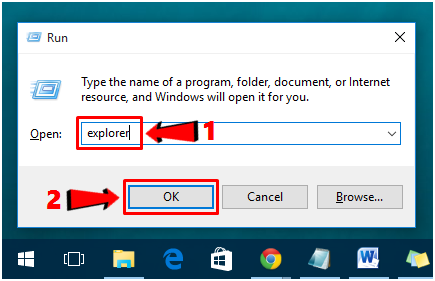
- Open File Explorer from the Run Box- Another method in launching File Explorer which is also an easy one is through the Run box. This handy tool is built-in with every Windows 10 computer and it can be used to quickly launch some built-in features in Windows provided you know their “.exe” file names. To launch File Explorer using this small tool, you will first need to open the Run box simply by pressing the “Windows + R” keys on your machine’s keyboard and after doing so, the Run box will pop-out of the bottom-left portion of the screen. Inside this tool is an input box where you will need to type in “explorer” and after doing so, just click on the “OK” button and the File Explorer tool should open right away!
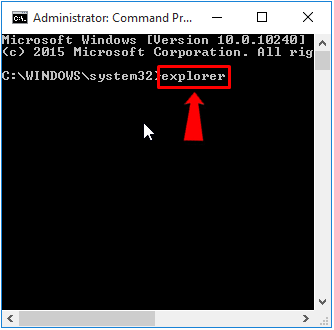
- Use the Command Prompt Application- If you want to try something else in launching the File Explorer Window aside from the easy methods that we have shown above then you can use another built-in tool in every Windows computer which is called the “Command Prompt”. To open Command Prompt, you will again need to launch the WinX menu by pressing the “Windows + X” keyboard shortcut combination then on the menu itself, you can either click “Command Prompt” or “Command Prompt (Admin)”. We will use “Command Prompt (Admin)” for illustration purposes and once this tool opens, just type in “explorer” to it and press the “Enter” key! After doing this, the File Explorer tool will open on your computer screen.
- Launch File Explorer from the Taskbar- Now, if you have just upgraded to Windows 10, you should be able to see the File Explorer icon already pinned on the Taskbar by default. If you want to have a really quick access to this tool then you will need to preserve this icon and never let anyone unpin it. To launch File Explorer from the Taskbar, all you need to do is click on it then wait for a few seconds and the File Explorer Window should open right away.

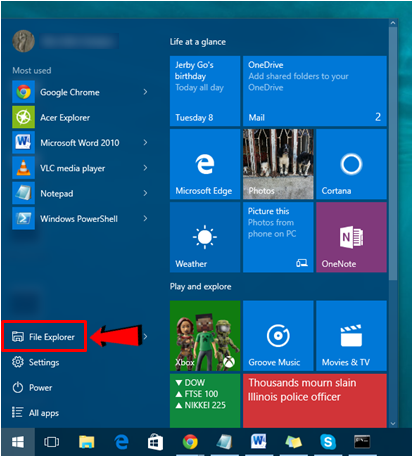
- Open File Explorer from the New and Improved Start Menu- The latest method in launching File Explorer which has just been added in Windows 10 is through the new Start Menu which now resembles the old Start Menu plus the Start Screen in one! This innovation has really gathered a lot of positive feedback from users after Windows 10 was released and one of the good thing about it is that the File Explorer tool already has a link pinned on it just like in the old Start Menu. This welcome change has really made a big shift towards the positive side from the issue-loaded Windows 8 and Windows 8.1 operating system editions. To launch File Explorer from the new Start Menu in your Windows 10 computer, all you need to do is launch the Start Menu first simply by clicking on the Start Button or pressing the Windows key on your machine’s keyboard and once the Start Menu launches, just look for the “File Explorer” link on its bottom-left portion as highlighted on the screenshot below and once you find it, just click on it in order to launch File Explorer.
In case the File Explorer icon has already been removed from being pinned on the taskbar of your Windows 10 computer, you can choose to pin it back and the process in doing so is very simple. Just open the new Start Menu once again, look for the File Explorer link at the bottom-left portion of as highlighted on the screenshot above then right-click on it in order to summon a menu where you will simply need to click on the option that says “Pin to taskbar” as shown below.
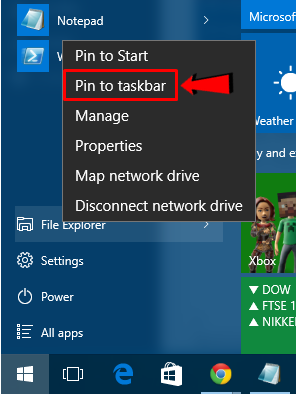
After the option is clicked, you should be able to see the File Explorer icon already pinned back to the taskbar and you can start launching it from this easy to access location.
More Things to Discover About Windows 10 in our Next Tutorials
As you can see, Windows 10 has really been improved from its immediate predecessors Windows 8 and Windows 8.1 especially when we look into the aspect of the File Explorer tool. The Windows Insider Program has really yielded much positive results which are now paying off as more and more users are choosing to upgrade to Windows 10 compared to the same period back when Windows 8 and Windows 8.1 were released. This is just the start of Microsoft’s efforts to really bring Windows to the top of its competitors and we at WindowsTechies.com will always keep you updated of any development with the newest Windows edition dubbed as “the best one yet” so just stay tuned-in with us to get all the latest about your favorite Windows operating system!