Burning Music Using Windows Media Player
We’ve already gone through the basic controls and learned the steps in creating and as well as managing playlists in Windows Media Player but everything does not end there. This awesome desktop program still has more to show off and offers some wonderful features that will help you transfer songs and other music to a CD or any other disk storage media that it supports using the process called “Burning”. Yes! You don’t need a third-party software in doing this task as most people assume.
The Windows Media Player program bundled with your Windows 8.1 operating system is actually capable of accomplishing this! Burning means you are writing some data to a CD and not setting it on fire literally. In the case of Windows Media Player, you will be able to burn songs and other music stuff to a blank CD so you can bring it with all of its contents wherever you go and you can even rip the music again to other computers. In this tutorial, we will be looking at the process of burning music into a blank CD-R storage media using the Windows Media Player program so get your machine ready and open Windows Media Player in it.
Ways in Accessing Windows Media Player
The way in accessing some desktop programs has greatly changed in Windows 8 and these changes did not really live too long before even more improvements were done in the new Windows 8.1 operating system. Because of the existence of the Metro environment which represents the Tablet world in Microsoft’s brand new operating system and the Start Menu being taken away and replaced with the Start Screen, you will now be accessing desktop programs by going through the Start Screen and accessing the Apps View section. To do this, simply follow the steps below.
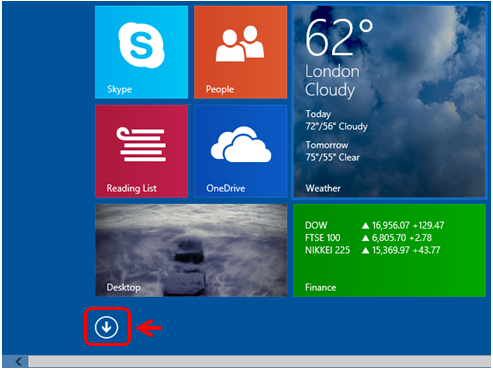
1. Access the Start Screen by clicking on the Start Button at the bottom-left corner of the screen or press the Windows key on your computer’s keyboard.

2. Once the Start Screen appears, just move the mouse pointer over it and you will see a small circle icon with an arrow that points down inside it at the lower-left portion of the screen. Just click on this icon and you will be taken right away to the Apps View screen.
3. Next, when you arrive on the Apps View screen, just scroll to the right or press the arrow right key on your machine’s keyboard and look for the Windows Media Player shortcut. You should be able to find it under the Windows Accessories category if the app list is in the “Apps by category” sorting rule.
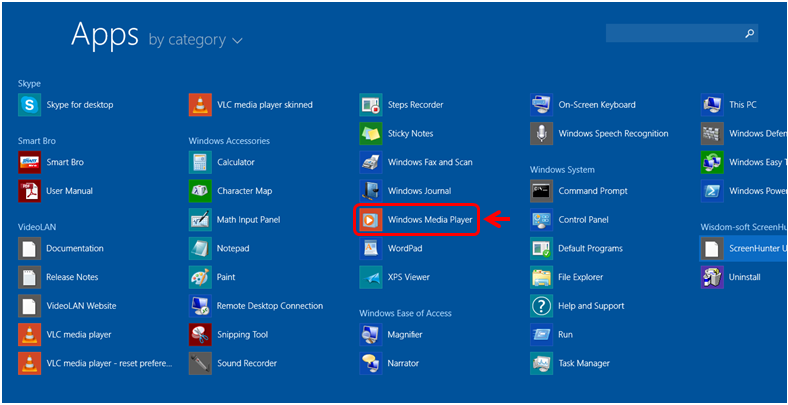
4. You can also make searching for the Windows Media Player shortcut a lot easier by changing the sorting rule to “Apps by name” so you can find it under the “W” heading. To change the sorting rule, just click on the arrow down icon beside the “Apps by <sorting rule>” label on the upper-left corner of the screen and you’ll be able to see even more options of sorting on a drop-down menu.

Using the Search Feature
You can also access Windows Media Player using the search feature in your Windows 8.1 machine. To do this, simply access the Start Screen and once it opens, start typing Windows Media Player on your keyboard. After you do so, the search screen will appear from the right-edge and the word you typed will automatically be entered into the search input box.

Below the search input box, you should be able to find the search results and from here, simply click on the one that bears the Windows Media Player logo which is also labeled accordingly as you can see on the screenshot above. Now that you already know how to access Windows Media Player on your computer, we will go to the steps involved in using it for burning music to a blank disk specifically a CD-R.
The Process of Burning
As I have mentioned earlier, it doesn’t take a third-party software to burn some music into a disk using your Windows 8.1 machine. All you need is the Windows Media Player program which is bundled with the operating system itself. Just open it using the any of the methods I have shown above and get your blank CD-R storage device ready. Be sure not to scratch its under surface to preserve its quality. If you still don’t have a blank disk, you can get one from your nearest computer electronics shop.
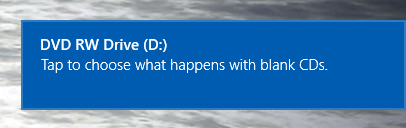
Once you already get the disk, simply get it out from its packaging and insert into your computer’s disk drive. After doing so, you will be able to see a prompt at the top-right portion of the screen which looks like the one on the screenshot below.
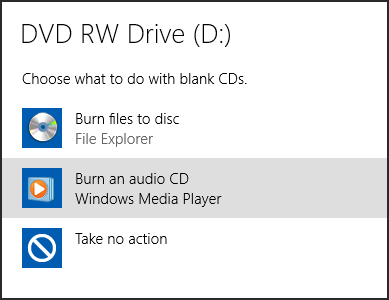
Once you see the prompt, simply click on it and you will see some options that will appear inside a white box. From these options, simply click on the one that says “Burn an audio CD Windows Media Player”
After doing so, Windows Media Player will open after initializing in a few seconds. Once it opens, you will be taken to the Burn screen where you can choose the music that you want to burn into the blank CD that you inserted. Take note that you are going to create an audio CD so you can only select music which are in MP3 format and nothing else. The type of output also depends on the disk you used. If you are using a CD-R then the files that you can store in it are music and photos. If you want to burn videos then you will need a DVD and in most cases, you’ll also need a third-party software in most cases.
On Windows Media Player’s burn screen, all you need to do is click on the Music link located on the navigation at the left side of the screen and all the music stored in your hard drive will appear.
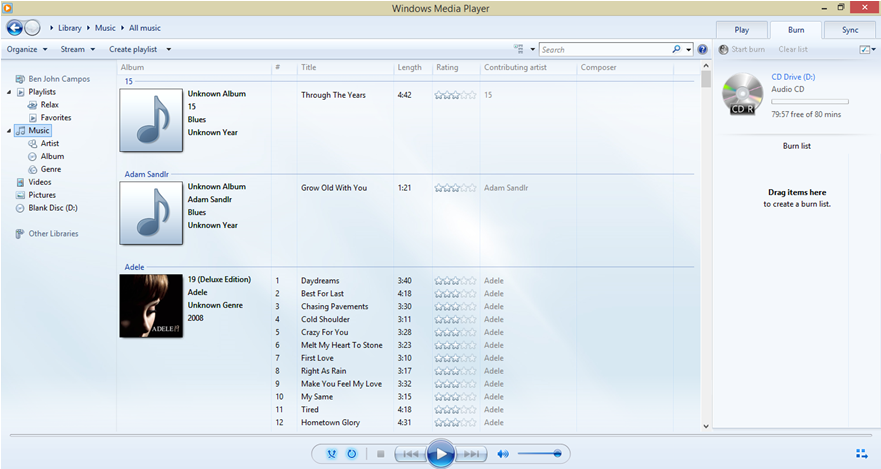
From this list of songs, simply click and hold on the song that you want to burn to the disk and drag it towards the “Burn list” section at the right. Once you reach that section, just release and the song will automatically be added to the list.

Just do this to all of the other songs that you want to burn into the disk. You can also select more items at the same time by holding the “CTRL” key and clicking on the songs that you want to select one-by-one while the CTRL key is being pressed. After selecting all the songs that you want. Just click and hold on one of them and drag it slowly to the right then drop it into the Burn list section.
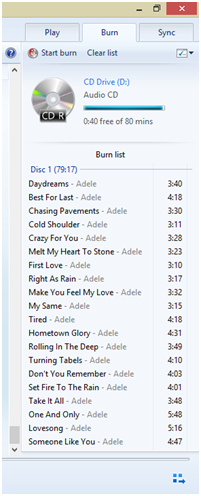
On the screenshot above, you can see that I already selected the songs that I want to burn into the disk and placed them into the Burn list section. Above this list, you can see the remaining space status for the disk that I am going to use and you will see that it is already full. The total playing time of all songs in the burn list also appears and as well as the remaining space. Once you’re sure that the songs in the list are really what you want to burn into the disk, just click on the “Start burn” button on top and that’s it! The burning process will now start. Just follow all the steps that will come after and you’re on you way to having your favorite songs into the blank CD which you share or keep for future use.