How to Change and Set Themes and Screensavers in Windows 10
Windows is undoubtedly one of the most popular operating system that exists in our planet at present and the latest developments in it has led to new devices that runs on its new mobile version. In fact, even PCs have the so-called modern environment which actually looks like the mobile operating system interface found in smartphones, tablets and hybrid devices that runs Windows 10 mobile.
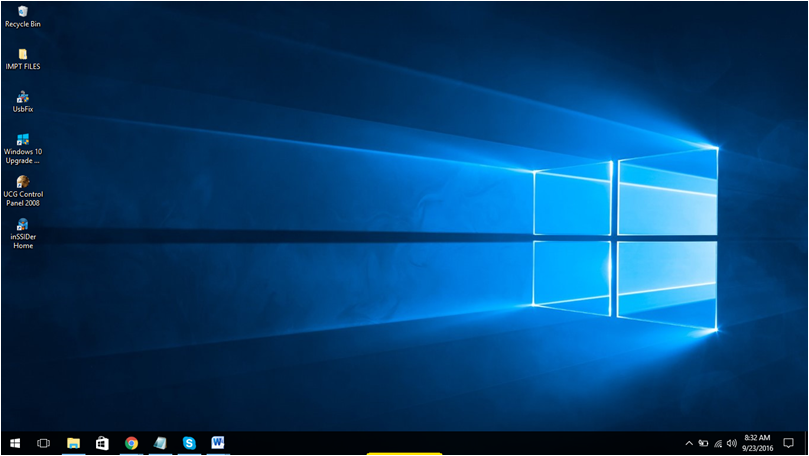
When you first opened your computer after you’ve upgraded to Windows 10, installed the operating system to your machine or you’ve decided to get a new computer that has Windows 10 installed pre-loaded to it, you might have noticed that the wallpaper looks quite boring and there is no screensaver that is set. This is the default setting since it uses much lesser power and system resource and of course, it is not the best in terms of appearance and looks. The default wallpaper in Windows 10 looks exactly like the one shown below.
However, if you are willing to sacrifice these two (power and system resource) in order to get a better looking Desktop screen that switches to a good-looking screensaver then you can actually do so by tweaking the “Appearance and Personalization” section of the Control Panel. If you want to learn the steps in doing this then you’ll need to join us as we get through them in this tutorial.
Accessing the Appearance and Personalization Section in Windows 10
Unlike the older Windows editions such as Windows XP, Vista and Windows 7, Microsoft has started to incorporate a new feature in Windows 8 that has been carried over to Windows 8.1 up even until Windows 10. This feature is the modern counterpart of the Control Panel and is called the “Universal Settings App”. This app contains settings and tweaks for Windows just like the Control Panel feature but the difference is its layout and interface. There are also links, options and tweaks in it that still leads to the Control Panel Window.
Since we are trying to change the appearance and further personalize the wallpaper and screensaver of Windows 10, let us first learn how the Appearance and Personalization section is accessed from the universal Settings app. To do this, you must first launch it by using any of the methods below.
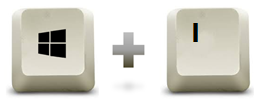
First, you can quickly open the Settings app by pressing a keyboard shortcut combination. Just press the Windows + I keys simultaneously and you should be able to launch the universal Settings app in an instant without the need of scrolling or clicking through some items on your computer screen.
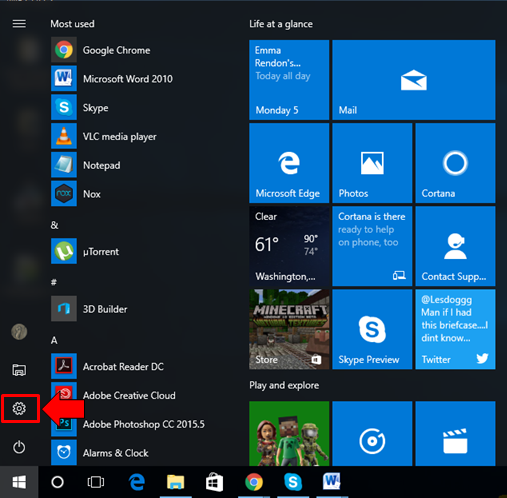
Another method is done by clicking on the Settings icon that is found on the narrow vertical bar at the left portion of the Start Menu. To access it, you will simply need to launch the Start Menu by first pressing on the Windows key or clicking on the Start Button at the extreme-left end of the Taskbar and after you do so, just click or tap on the Settings icon found at the left as you can see being highlighted on the screenshot below.
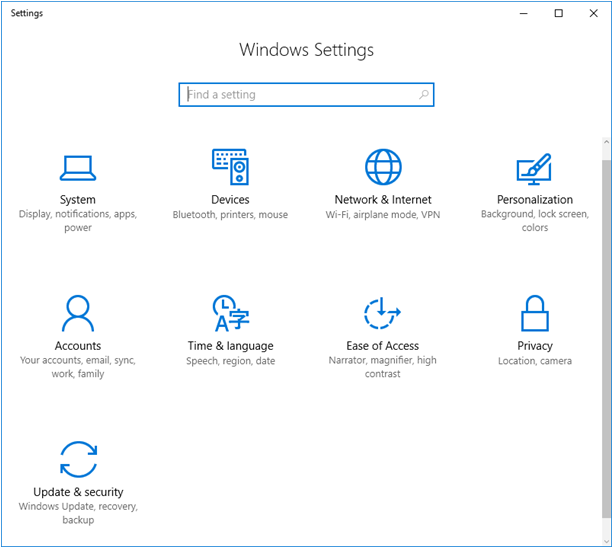
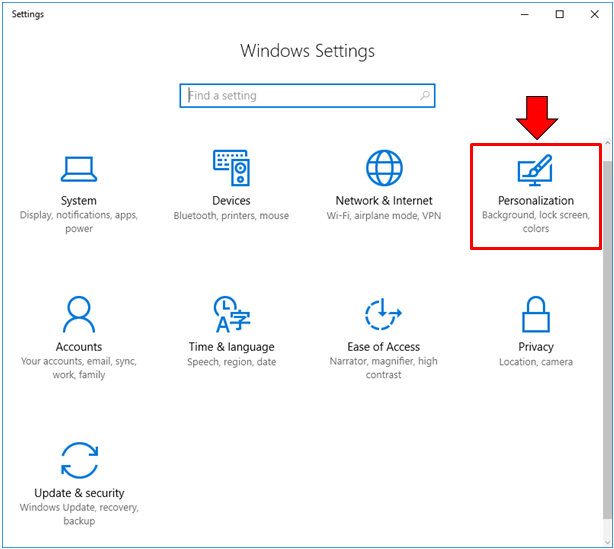
Once the Settings app Window opens, you’ll be able to see 9 settings category in it and from here, you will need to click on the one that is labeled “Personalization” as you can see on the screenshot below. This is where the link that leads to the settings for changing wallpaper and screensaver in your Windows 10 machine is actually found.
After this category opens, you will now be able to see all available settings for customizing Windows 10’s appearance such as Background, Themes and many others sitting as links on the navigation pane at the left. Most of the settings and tweaks under these items leads to the Control Panel Window and that is where you will be doing much of the changes in settings on. Now, you might be wondering why the Settings app is still needed when most of the links in it just leads to the traditional Control Panel Window.
The simple answer that we can give which is just an educated guess from us is that Microsoft wants their users to be more familiar with the modern/mobile Windows operating system environment preparing them for using mobile devices such as smartphones and tablets running on the mobile version of Windows.
There is also this feature called “Continuum” which is found even in PC versions of Windows 10. The feature basically helps switching from PC to Tablet mode become easier. It is found in hybrid devices as well that has a detachable screen which will automatically act as a tablet once it gets detached from the keyboard panel. Making Windows 10 work like this helps it become adaptable to any computing/device modes without the need of pressing buttons or booting to certain modes. It’s really an ingenious step but not that pleasing to all users especially to those who have been used to the older Windows editions.
Accessing the Appearance and Personalization Section in the Control Panel Window
Now, since accessing the Personalization section from the universal Settings app only takes you to the Control Panel Window, it would make things a lot faster to do if you just access this same section from the traditional Control Panel Window. To open Control Panel on your Windows 10 machine, you will first need to press the Windows + X keys in order to launch a menu that will appear on the left-hand portion of your computer screen as you can see on the screenshot below.
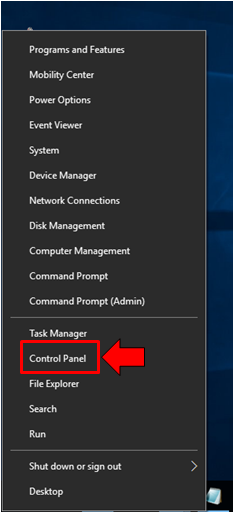
From this menu, all you need to do is click on the link that is found near the bottom which says “Control Panel”. Doing this will launch the Control Panel Window in an instant showing all available setting categories for you to click. Since we want to do some personalizations on your computer’s appearance, you will need to click on the “Appearance and Personalization” category as you can see being highlighted on the screenshot below.
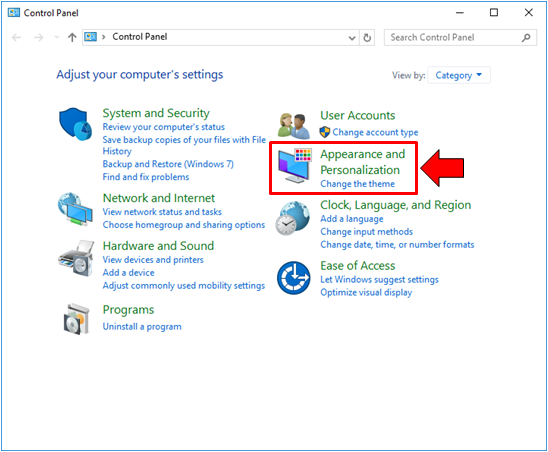
Once this Control Panel category opens, you should be able to see all available options under it and this is where we will be doing most of the needed tweaks in order to set a new wallpaper and as well as a good-looking screensaver for your Windows 10 machine.
Changing the Wallpaper
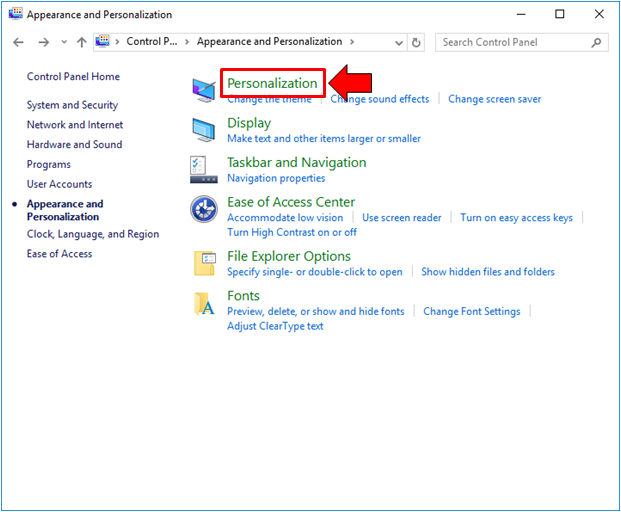
Now that you are in the “Appearance and Personalization” section of the Control Panel Window, it is time to learn the steps in how you can actually change the default wallpaper that is set for your Windows 10 computer right after you bought a new one or upgraded a relatively old machine to this latest operating system build. To do this, you must first click on the “Personalization” link that is the top-most one as shown below.
The next Window will then display the available themes that you can set for your computer. Once you are on this page, all you need to do is click on the theme of your choice from the box that is found under the “Change the visuals and sounds on your computer” as highlighted on the screenshot below.
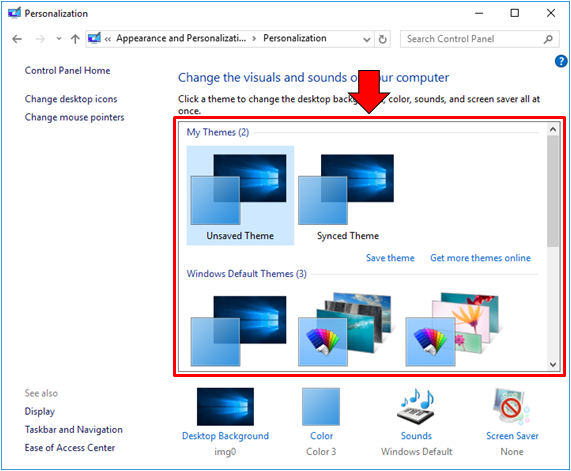
The good thing about changing the theme is that you can also change the desktop background also known as wallpaper, color, sounds and even the screensaver all at the same time in case the theme that you have selected to set as the new one has these stuff bundled with it. However, you need to remember that the default themes which are built within Windows 10 don’t have a screensaver set for them by default so you’ll need to learn how to set this up if you really want to make your machine look awesome even when it is on standby instead of just looking like it is turned off since having no screensaver set automatically turns off the screen on standby to save on battery power.
How to Set Screensaver in Windows 10
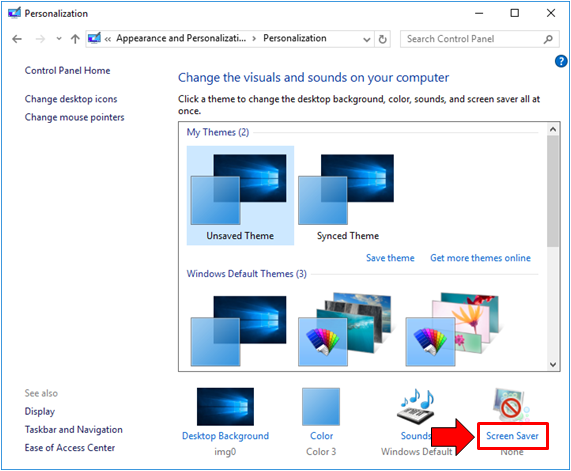
Now that you already know how to set a new theme for your Windows 10 machine, it is time to get to the next and the last thing that we’d like to cover in this tutorial which is setting up a screensaver. To start, you must click on the link that is found at the bottom-right portion of the “Personalization” Window from which we’ve done the changing of theme earlier as you can see below.
After hitting on this link, a new Window will appear which is labeled “Screen Saver Settings” and from here, you will be able to find all available tweaks that you can possibly do on the screensaver of your Windows 10 computer. Now, if you wish to set a screensaver then you will need to click on the drop-down options box that is found at the left hand portion of the “Screensaver” section as you can see on the screenshot below.
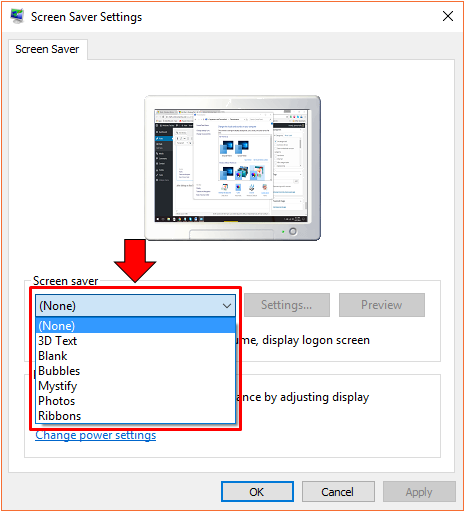
The very first option that is selected is “(None)” and as you can see on the screenshot above, the “Settings…” and the “Preview” buttons are still grayed-out which means that they are clickable yet. Once you select a screensaver, these buttons will become clickable for you to tweak settings and options of the screensaver that you’ve selected. Remember that the contents of the Settings Window that would appear after you hit the “Settings…” button differs depending on what screensaver you have selected.
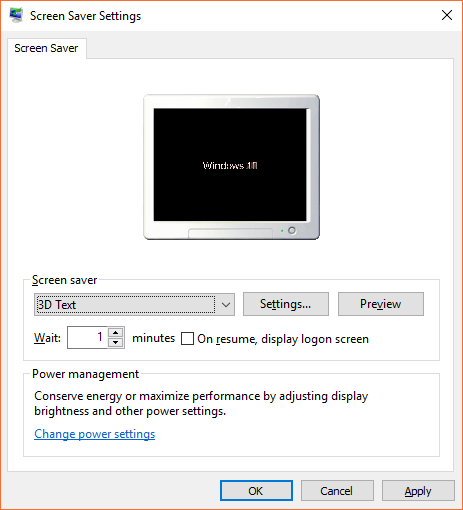
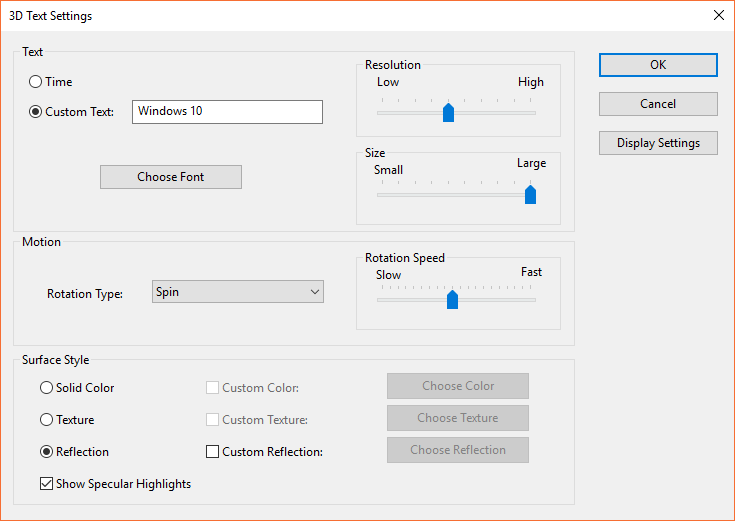
For instance, if you’ve chosen the “3D Text” screensaver as shown on the screenshot above, clicking on the “Settings…” button will open a new Window which has options for changing the text that would be displayed once the screensaver starts playing on your screen as well as its font style and, direction of the text’s rotation, speed of rotation and many others as you can see below.
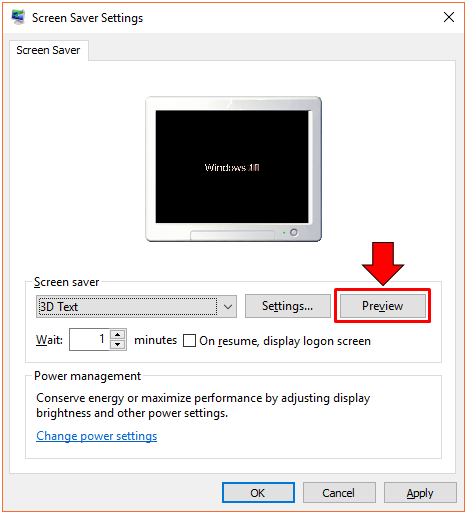
For other screensavers such as “Bubbles”, you can set the number of bubbles that would appear on the screen once the screensaver starts playing. Most of the settings are pretty much simple and easy-to-understand and you can experiment on each one of them so you can choose the best one that fits your taste. Once you are done making some tweaks with the screensaver that you have selected, you can choose to view it before you finally save all changes and you can do this by clicking the “Preview” button as highlighted on the screenshot below.
You can also set the number of minutes for your computer screen to stay awake before it starts displaying the screensaver. There is also an option for allowing the screensaver to display even when your computer is locked. All of these settings are found just underneath the screensaver drop-down selection box, the “Settings…” and the “Preview” buttons. Once you are done changing and tweaking the settings for the screensaver that you have selected, you can now hit the “Apply” then “OK” buttons which are found at the bottom-right portion of the “Screen Saver Settings” Window and that’s it! The new screensaver should now take over your computer screen according to the number of minutes to wait setting that you’ve chosen earlier.
Using a screensaver makes your machine look awesome especially when you usually use it for presentations at work or in school so instead of just letting the projector screen run blue, you can now set a screensaver of your choice to replace the boring blue screen that displays on most projector screens whenever its source device switches to standby mode and turns off its display. Do you know of some tricks that can be done on Windows 10’s screensaver feature? We’d like to hear from you. If you have something interesting to share or a topic that you would like to be expounded by us in the form of a tutorial then please feel free to post them on the comments section below! Also, if this article helped you, please share it with your friends who would also be interested about setting a screensaver on their Windows 10 machine.